background image

8  

  Configuring the System 

ACQ16 USB Installation Manual 

Software Installation 

If you did not purchase a complete system with everything installed and tested, you 
will need to install the P3 Plus system software.  For the Acquisition Interface to 
operate correctly, you must install the software onto the hard disk of the personal 
computer.  The procedures are outlined in the Ponemah Physiology Platform 
reference manual. 

For the ACQ16 USB Acquisition Interface Unit to operate, the user must select 
ACQ16 USB as the acquisition device.  This is done by starting the P3 Plus 
application, selecting 

Application Configuration

 from the 

Options

 menu, selecting 

the 

Acquisition Interface

 tab, and selecting 

ACQ16 USB

.  View the 

Interface 

Configuration

 section for details. 

Installing the ACQ16 USB Acquisition Interface 

Steps to install the ACQ16 USB Acquisition Interface: 

1.


Connect the USB cable between the Acquisition Interface and a USB 
connector on the PC. 

2.


Turn on power to the Acquisition Interface unit. 

3.


When the 

Welcome to the Found New Hardware Wizard

 dialog appears 

asking if Windows can connect to Windows Update, select 

No, not this 

time

 and click on the 

Next

 button. 

4.


A bubble should appear in the lower right hand corner of the screen stating 
that new hardware was found and that it was the DSI Ponemah ACQ16 
USB. 

5.


On the 

Found New Hardware Wizard

 dialog, select the 

Install the 

software automatically (Recommended)

 option, and click on the 

Next


button. 

6.


After a few moments, the dialog should state that the wizard has finished 
installing the software for the ACQ16 USB. 

7.


A bubble should appear in the lower right hand corner of the screen stating 
that the new hardware is a USB Device. 

8.


Another bubble should appear stating the new hardware is installed and 
ready to use. 

The hardware drivers are now installed and P3 Plus can be started. 

ACQ16 USB Connections 


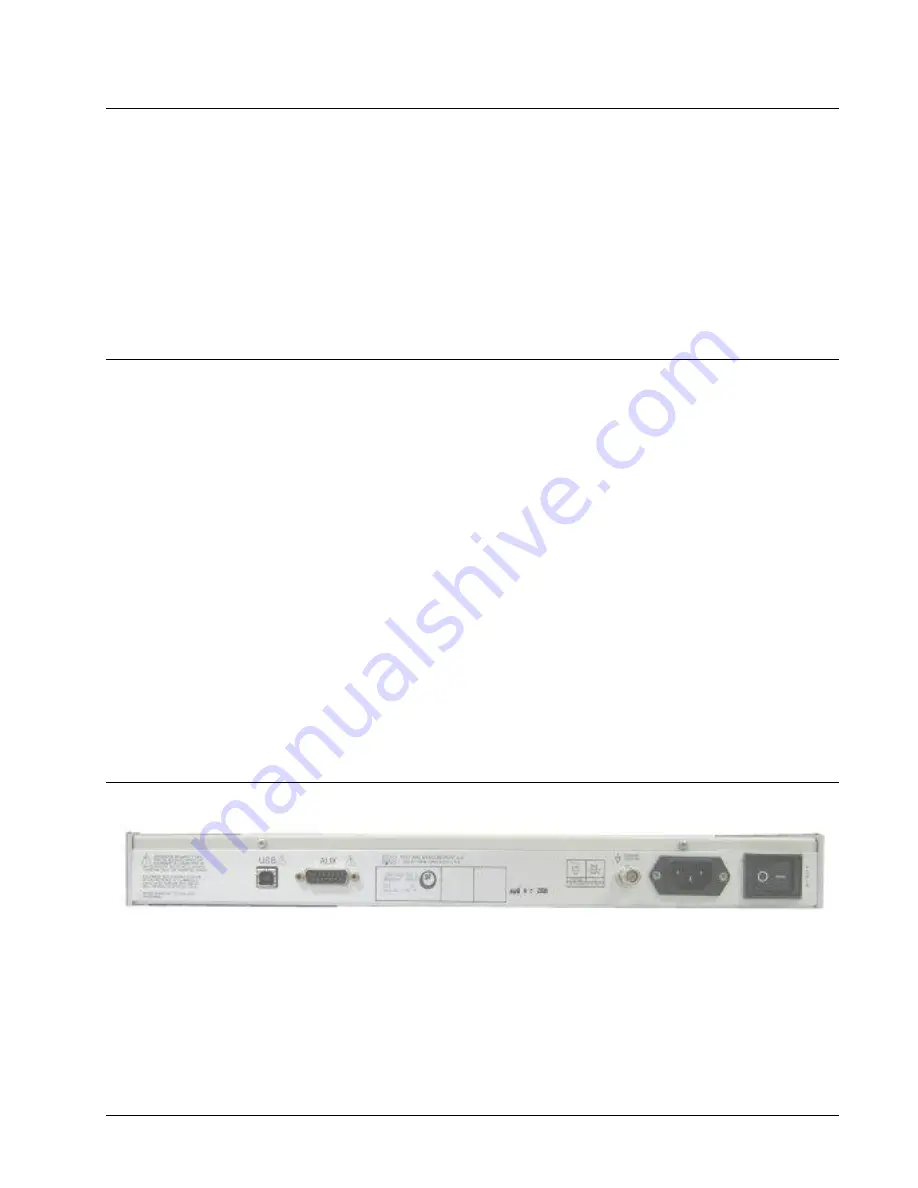
Figure 2: Rear Panel 

The Acquisition Interface has three rear panel connectors:  a power connector, the 
USB Port connector, and the Auxiliary connector. 

Содержание PNM-P3P-USB16

Страница 1: ...lation Manual Model PNM P3P USB16 Manual MU00153 001 Revision 53 Data Sciences International 119 14th Street NW Suite 100 St Paul MN 55112 Phone 1 651 481 7400 US 1 800 262 9687 Email support datasci...

Страница 2: ...s or in the cure mitigation treatment or prevention of disease or used as a life support device Use of DSI Ponemah products are solely for the purposes of conducting life science research Copyright 19...

Страница 3: ...or 9 Auxiliary Connector Preview Feature 9 Signal Input 9 Getting Started 11 Introduction 11 Starting the P3 Plus Program 11 Calibration Dialog 13 Configuring the ACQ16 USB 13 General Tab 13 Configura...

Страница 4: ...ii System Overview ACQ16 USB Installation Manual Electromagnetic Emissions Immunity Tables 26...

Страница 5: ...s also marked with this symbol See references to this symbol in the manual WARNING risk of electric shock AC Alternating current Equipotentiality Chassis ground OFF connection to AC mains ON connectio...

Страница 6: ...e power cord and connector specified for your instrument Use only a power cord that is in good condition Upon loss of the protective ground connection all accessible conductive parts may render an ele...

Страница 7: ...he computer The ACQ16 USB accepts any conditioned high level input up to 10V full scale allowing the system to be easily configured for special application requirements The ACQ16 USB is the interface...

Страница 8: ...USB are the same as the P3 Plus application with the following differences Your choice of instrumentation signal conditioning modules and analysis modules Please view the P3 Plus Manual for system re...

Страница 9: ...0VAC at 50 60Hz The AC input rating is auto switching If you require assistance in configuring your system contact our customer support department You can also request assistance from our support depa...

Страница 10: ...n Interface and a USB connector on the PC 2 Turn on power to the Acquisition Interface unit 3 When the Welcome to the Found New Hardware Wizard dialog appears asking if Windows can connect to Windows...

Страница 11: ...t is triggered within P3 Plus a TTL pulse will appear on this pin Alarm Out If an alarm condition occurs a pulse will appear on this pin The pulse is a TTL level pulse that lasts for the duration of t...

Страница 12: ...10 Configuring the System ACQ16 USB Installation Manual The ranges allow you to set up the ACQ16 USB for full scale compatibility with most common signal conditioning systems...

Страница 13: ...t selected during installation using a standard USB cable P N P02124 2 If you have not already installed the P3 Plus software on your system please refer to the Ponemah Physiology Platform reference m...

Страница 14: ...tification of the data collected After clicking on the Continue button the Main Menu screen will be displayed You are now ready to begin setting up acquiring and analyzing your input data The P3 Plus...

Страница 15: ...n and Descriptions tabs which are accessed by their own tabs General Tab The General Tab allows the user to set up channel specific signal conditioner parameters They include the channel Label State a...

Страница 16: ...S in the P3 Setup dialog The default is ON Low High Span There is one span control that sets the maximum input of the signal conditioner The span is symmetrical Ranges available are 1 25V 2 5V 5V and...

Страница 17: ...anual Calibration Dialog 15 Units This column displays the units that have been set in the Configuration tab and cannot be changed in this tab The Units have no effect on the channel and it is for doc...

Страница 18: ...er This column is useful in troubleshooting the signal conditioner input connection Low Cal High Cal If you have available an input calibration signal voltage it can be used to calibrate the inputs Do...

Страница 19: ...ialog box as shown here This function allows you to manually enter a specific value that will be assigned to either the Low or High Cal or by clicking the Measure button accept an external voltage tha...

Страница 20: ...rs being recorded This may include additional user information or test setup information This information is stored with the test set up in a text file It is not directly used as part of the signal co...

Страница 21: ...Identifier or Value columns and select Voltage View Below is an example of the right click menu that will appear Voltage View Menu Once voltage view has been selected the values listed for Value and...

Страница 22: ...t the settings of the channel selected When selected the channel will reset all values back to the default settings See the individual sections for the default values When this selection is selected a...

Страница 23: ...Aggregate Sample Rate 250k samples per second Resolution 16 bits Filter 1 pole fixed 50kHz 20 Noise 0 25 Full Scale Offset 0 25 Full Scale Gain Error 0 25 Full Scale Bandwidth Flat to 1 5kHz 3dB 50kH...

Страница 24: ...Ch1 8 Input Cables J02937 Ch9 16 Note Replace cables when subjected to deterioration or abuse Troubleshooting If the system displays the following message on startup Acquisition Unit Not Found then ve...

Страница 25: ...ACQ16 USB Installation Manual Appendix 23 Rack Mounting The diagram below displays how to assemble the rack mount kit...

Страница 26: ...24 Appendix ACQ16 USB Installation Manual...

Страница 27: ...essary as described below If the ACQ16 USB is used in dirty or dusty environments cleaning should be performed more frequently When necessary power down the acquisition system and disconnect the power...

Страница 28: ...nment Emissions Test Compliance Electromagnetic environment guidance RF emissions EN 55011 Group 1 The equipment uses RF energy only for its internal function Therefore its RF emissions are very low a...

Страница 29: ...should be that of a typical commercial or hospital environment Surge EN 61000 4 5 1kV differential mode 2kV common mode Complies Mains power quality should be that of a typical commercial or hospital...

Страница 30: ...smitters as determined by an electromagnetic site survey should be less than the compliance level in each frequency range Interference may occur in the vicinity of equipment marked with the following...

Страница 31: ...e dans le manuel AVERTISSEMENT risque de d charge lectrique C A courant alternative La terre d Equipotentiality chassis ETEINT raccordement aux forces C A EN MARCHE raccordement aux forces C A Les pro...

Страница 32: ...diqu s pour votre instrument Employez seulement un cordon de secteur qui est en bon tat Apr s la perte du raccordement du protecteur terre toutes les pi ces conductrices accessibles peuvent rendre une...

Отзывы: