background image

Page 12

MANUEL D’OPÉRATION ECO-55 / ECO-55 ST

FRANÇAIS

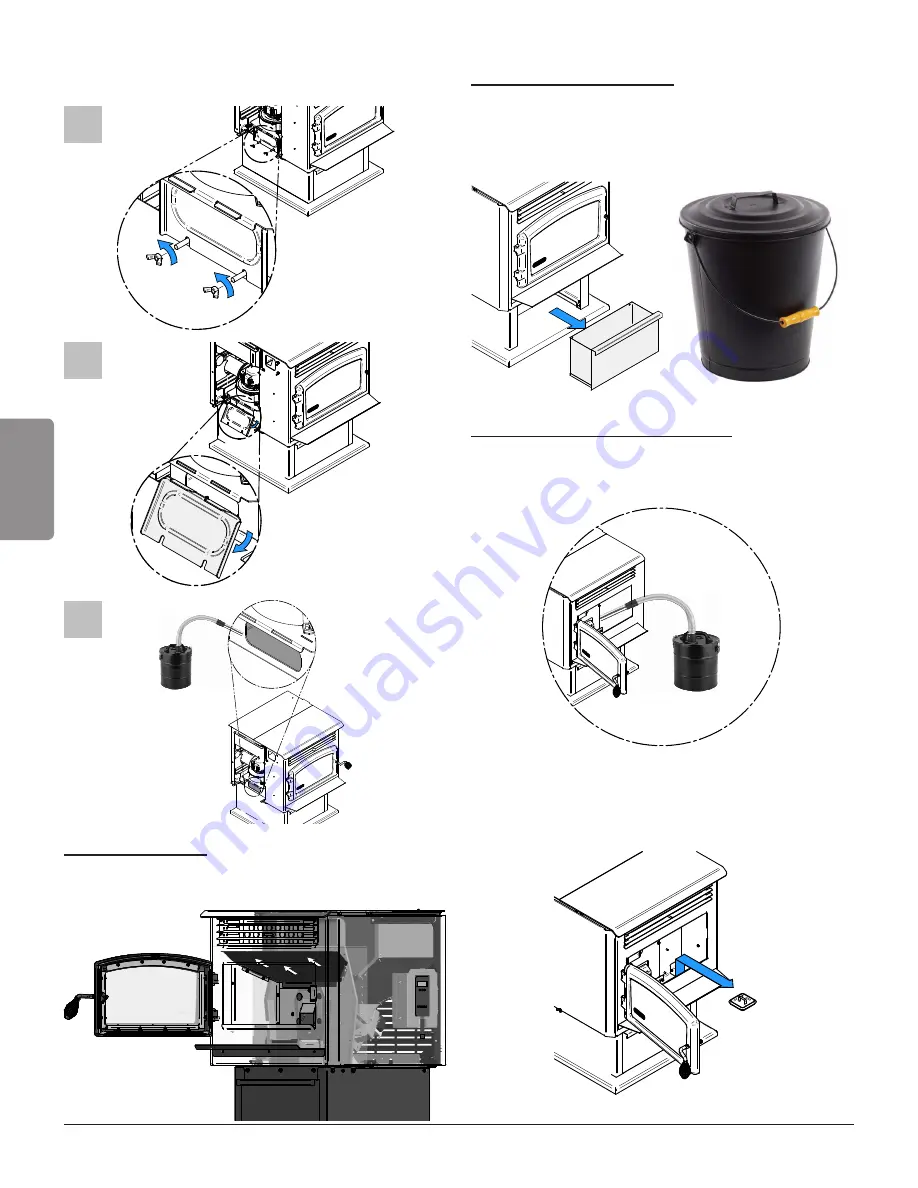
6.5.6  CHAMBRE À COMBUSTION
Nettoyez la chambre à combustion en aspirant les 

cendres 

refroidies

. Lorsque nécessaire, brossez les 

parois et aspirez les cendres par la suite.

Vous pouvez aussi pousser les cendres dans le tiroir 

à cendres par l’ouverture au fond de la chambre à 

combustion. Dans ce cas-ci seulement, les cendres 

n’ont pas à être froides.

Videz le tiroir à cendres et entreposez les cendres 

dans un contenant de métal avec un couvert.

6.5.5  TIROIR À CENDRES

Retirez et brossez le coupe-feu. Ne pas oublier de le 

remettre en place.

6.5.4  COUPE-FEU

7

8

9

Brossez et aspirez l’intérieur de la canalisation 

d’évacuation, lorsque nécessaire. 

Содержание DP00070

Страница 1: ...CTION REQUIREMENTS IN YOUR AREA PLEASE READ THIS ENTIRE MANUAL BEFORE INSTALLATION AND USE OF THIS PELLET FUEL BURNING ROOM HEATER FAILURE TO FOLLOW THESE INSTRUCTIONS COULD RESULT IN PROPERTY DAMAGE BODILY INJURY OR EVEN DEATH READ AND KEEP THIS MANUAL FOR REFERENCE This manual is available for free download on the manufacturer s website It is a copyrighted document Re sale is strictly prohibited...

Страница 2: ...s invoice We also recom mend that you register your warranty online at https www drolet ca en warranty warranty registration Registering your warranty online will help us to quickly track the information we need about your stove DANGER HOT WHILE IN OPERATION KEEP CHILDREN CLOTHING AND FURNITURE AWAY CONTACT MAY CAUSE SKIN BURNS NOTICE This heating unit is designed to serve as a supplementary heat ...

Страница 3: ...RE OPERATING THE STOVE 6 5 2 STARTUP 6 5 3 REFULING 6 5 4 SHUT DOWN 7 5 5 SIGNS OF OVERHEATING 7 5 6 THERMOSTAT MODE 7 5 7 CONVECTION ADJUSTMENTS 8 5 8 AIR INTAKE ADJUSTMENTS 8 6 STOVE MAINTENANCE 8 6 1 MAINTENANCE SAFETY 8 6 2 RECOMMANDED TOOLS 9 6 3 ASHES REMOVAL 9 6 4 MAINTENANCE CALENDAR 10 6 5 MAINTENANCE TECHNIQUES 10 7 VENTING SYSTEM MAINTENANCE 14 7 1 SOOT AND FLY ASHES 14 8 TROUBLESHOOTIN...

Страница 4: ... CSA B415 1 10 stack loss method 4 Higher Heating Value of the fuel 5 Lower Heating Value of the fuel 6 Optimum overall efficiency at a specific burn rate LHV 7 This appliance is officially tested and certified by an inde pendent agency 8 Carbon monoxyde 9 Unless stated otherwise measures were taken directly at the main power source and include all electrical components present in the appliance 1 ...

Страница 5: ...supply are controlled from a control panel on the right hand side of the stove The control panel buttons and display areas are as follows A Control panel display area B Stove state display area C Stove heating intensity display area level 1 to 6 1 MODE the MODE button is used to either turn off the appliance OFF turn it on in manual operation MANUAL or in thermostatic operation THERMOSTAT 2 RESET ...

Страница 6: ...smells like paint CAUTION NEVER USE A GRATE OR OTHER MEANS OF SUPPORTING THE FUEL ONLY USE THE APPROVED STOVE BURN POT AND DO NOT MODIFY IT 5 3 REFULING When the stove is running you have 90 seconds to fill the hopper before the stove stops You will hear a beeping sound that will intensify every 30 seconds After 90 seconds if the hopper lid is still open the stove will stop and display the warning...

Страница 7: ...t intensity level 1 until the thermostat requires heat again The stove will shut down after 45 minutes if there is no demand for heat Pilot ON When the thermostat stops requiring heat the unit automatically switch to its lowest intensity level 1 until the thermostat requires heat again The stove will never shut down even if there is no demand for heat 5 6 THERMOSTAT MODE 5 5 SIGNS OF OVERHEATING I...

Страница 8: ...the cleaning steps are carried out the same way for the ECO 55 ST 5 7 CONVECTION ADJUSTMENTS 5 8 AIR INTAKE ADJUSTMENTS Each intensity level has been programmed with an optimum convection speed However it is possible to increase the convection air speed by pressing the AUX button All intensity levels can be increased at the exception of the intensity level 6 which is already at its maximum speed I...

Страница 9: ...IGHT FITTING LID THECLOSEDMETALCONTAINERSHOULD BE PLACED ON A NONCOMBUSTIBLE SURFACE WELL AWAY FROM ALL COMBUSTIBLE MATERIALS PENDING FINAL DISPOSAL IF THE ASHES ARE DISPOSED OF BY BURIAL IN SOIL OR OTHERWISE LOCALLYDISPERSED THEY SHOULD BE RETAINED IN THE CLOSED CONTAINER UNTIL ALL CINDERS HAVE BEEN THOROUGHLY COOLED CAUTION THE USE OF A DOMESTIC CENTRAL OR COMMERCIAL VACUUM CLEANER TO PERFORM TH...

Страница 10: ... them in the ash drawer 5 Clean the glass BIANNUEL MAINTENANCE 25 BAGS 1 Vacuum cold ashes from the exhaust tubes and from the heat exchanger 2 Brush the combustion chamber and vacuum the cold ashes from the combustion chamber or push them in the ash drawer 3 Inspect the venting system 4 Inspect all gaskets ANNUAL MAINTENANCE 1 TON 1 Sweep venting system 2 Empty and vacuum hopper 6 5 MAINTENANCE T...

Страница 11: ...rush and vaccum inside the heat exchanger channel when necessary NOTICE Never use abrasive cleaners on the glass or on any plated part Do not clean the glass while it s hot Do not force strike or adopt any behaviour that could weaken the glass door Do not operate the stove with the glass removed cracked or broken 1 2 3 4 5 6 ...

Страница 12: ...erwards You can also push the ashes into the ash drawer through the opening at the bottom of the firebox In this case alone the ashes do not have to be cold Empty the ash drawer and store the ashes in a metal container with a lid 6 5 5 ASH DRAWER Remove and brush the baffle Do not forget to put it back in place 6 5 4 BAFFLE 7 8 9 Brush and vaccum inside the exhaust channel when necessary ...

Страница 13: ...ompress If the stove door is not properly sealed it will be difficult to keep the door glass clean and combustion gases may leak into the room Adjusting the door may then be required If the door adjustment is not sufficient replace the door gasket with a genuine part 6 5 10 DOOR ADJUSTMENT Remove the lock pin by pulling and turning with pliers Turn the handle counter clock wise one turn to increas...

Страница 14: ...y sweeper or fire inspector 7 1 SOOT AND FLY ASHES The combustion products contain small particles of fly ash Fly ash can accumulate especially in horizontal sections of exhaust pipe and restrict the flow of combustion gases Incomplete combustion 8 TROUBLESHOOTING NOTICE VISIT OUR WEB SITE TO OBTAIN A DETAILED TROUBLESHOOTING DOCUMENT Most common problems are generally caused by the following fact...

Страница 15: ...cured The unit will shut down and restart resetting the error code by itself L Ignition failed Make sure the pellets are of good quality and that they are dry Clean the burn pot Make sure the igniter is working Adjust the air intake Press the RESET button to reset the stove and MODE to restart it FE The exhaust blower fuse is defective FL The ignitor fuse is defective FC The convection blower fuse...

Страница 16: ...cretion may decide to repair or replace any part or unit after inspection and investigation of the defect The manufacturer may at its discretion fully discharge all obligations with respect to this warranty by refunding the wholesale price of any warranted but defective parts The manufacturer shall in no event be responsible for any uncommon indirect consequential damages of any nature which are i...

Страница 17: ...CE MANUEL AU COMPLET AVANT D INSTALLER VOTRE NOUVEAU POÊLE IL EST IMPORTANT DE RESPECTER INTÉGRALEMENT LES DIRECTIVES D INSTALLATION SI LE POÊLE N EST PAS INSTALLÉ CORRECTEMENT ILPEUT EN RÉSULTER UN INCENDIE DES BLESSURES CORPORELLES OU MÊME LE DÉCÈS LIRE LE PRÉSENT MANUEL ET LE CONSERVER POUR CONSULTATION Ce manuel peut être téléchargé gratuitement à partir du site web du manufacturier Il s agit ...

Страница 18: ... Nous vous recommandons également d enregistrer votre garantie en ligne au https www drolet ca fr garantie enregistrement garantie L enregistrement de votre garantie nous aidera à trouver rapidement les informations requises sur votre appareil DANGER CHAUD LORSQU EN FONCTION TENIR LES ENFANTS LES VÊTEMENTS ET LES MEUBLES ÉLOIGNÉS TOUT CONTACT AVEC LA PEAU PEUT CAUSER DES BRÛLURES REMARQUE Une sour...

Страница 19: ...GE DE L APPAREIL 6 5 3 REMPLISSAGE DE L APPAREIL 6 5 4 PROCÉDURE D ARRÊT 7 5 5 SIGNES DE SURCHAUFFE 7 5 6 MODE THERMOSTAT 7 5 7 AJUSTEMENT DE LA VITESSE DE L AIR DE CONVECTION 8 5 8 AJUSTEMENT DE L ENTRÉE D AIR 8 6 ENTRETIEN DE L APPAREIL 8 6 1 SÉCURITÉ LORS DE L ENTRETIEN 8 6 2 ÉQUIPEMENTS RECOMMANDÉS 9 6 3 ENLÈVEMENT DES CENDRES 9 6 4 CALENDRIER D ENTRETIEN 10 6 5 TECHNIQUES D ENTRETIEN 10 7 ENT...

Страница 20: ... lb 3 Telle que mesurée selon la méthode CSA B415 1 10 4 Pouvoir Calorifique Supérieur du combustible 5 Pouvoir Calorifique Inférieur du combustible 6 Rendement optimal à un taux de combustion donné PCI 7 Cet appareil est officiellement testé et certifié par un orga nisme indépendant 8 Monoxyde de carbone 9 Sauf indication contraire les mesures ont été prises à la source d alimentation de courant ...

Страница 21: ...sont contrôlés par le panneau de contrôle du poêle situé sur le côté droit Les divers boutons et zones de visualisations du panneau de contrôle sont les suivants A Zone de visualisation des différents messages B Zone de visualisation de l état du poêle C Zone de visualisation de l intensité du poêle niveau 1 à 6 1 MODE Le bouton MODE est utilisé pour arrêter le poêle OFF le mettre en marche en opé...

Страница 22: ...TION APPROUVÉ POUR CE POÊLE ET NE LE MODIFIEZ PAS 5 3 REMPLISSAGE DE L APPAREIL Lorsque le poêle est en marche vous avez 90 secondes pour remplir la trémie de granules avant que le poêle s arrête Un signal sonore se fera entendre et s intensifiera chaque 30 secondes Après 90 secondes si le couvercle de la trémie est toujours ouvert le poêle s arrêtera en affichant le code d avertissement d Pour pl...

Страница 23: ...te le poêle se met automatiquement à son niveau d intensité le plus faible 1 jusqu à ce que le thermostat exige à nouveau de la chaleur Le poêle s arrêtera après 45 minutes si le thermostat ne demande pas de chaleur durant cette période Pilot ON Lorsque la température est atteinte le poêle se met automatiquement à son niveau d intensité le plus faible 1 jusqu à ce que le thermostat exige à nouveau...

Страница 24: ...t présenté Notez que toutes les étapes de nettoyage sont les mêmes pour le ECO 55 ST 5 7 AJUSTEMENT DE LA VITESSE DE L AIR DE CONVECTION Chaqueniveaud intensitédecombustiondel appareil a été programmé avec une vitesse de convection optimale Toutefois il est possible d augmenter la vitesse en appuyant sur le bouton AUX Tous les niveaux d intensité peuvent être augmentés sauf le niveau d intensité 6...

Страница 25: ...ENT ÊTRE MISES DANS UN CONTENANT MÉTALLIQUE AVEC UN COUVERCLE ÉTANCHE CE CONTENANT FERMÉ DEVRAIT ÊTRE DÉPOSÉ SUR UNE SURFACE NON COMBUSTIBLE LOIN DE TOUT MATÉRIAU POUVANT PRENDRE FEU SI LES CENDRES SONT DESTINÉES À ÊTRE ENTERRÉES OU LOCALEMENT DISPERSÉES ELLES DEVRAIENT ÊTRE MAINTENUES DANS LE RÉCIPIENT FERMÉ JUSQU À CE QU ELLES SOIENT COMPLÈTEMENT REFROIDIES MISE EN GARDE L UTILISATION D UN ASPIR...

Страница 26: ...r à cendres 6 Nettoyez la vitre ENTRETIEN BI ANNUEL 25 SACS 1 Aspirez les cendres dans la canalisation d évacuation et dans la canalisation de l échangeur de chaleur 2 Brossez et aspirez les cendres froides de la chambre à combustion ou poussez les dans le tiroir à cendres 3 Inspectez le système d évent 4 Inspectez les joints d étanchéité ENTRETIEN ANNUEL 1 TONNE 1 Ramonez le système d évent 2 Vid...

Страница 27: ...l intérieur de la canalisation de l échangeur de chaleur lorsque nécessaire REMARQUE Ne jamais utiliser de nettoyants abrasifs sur la vitre Ne pas nettoyer la vitre lorsqu elle est chaude Ne pas forcer frapper claquer ou adopter tout autre comportement qui pourrait fragiliser la porte vitrée Ne pas utiliser le poêle si la vitre est manquante fissurée ou cassée 1 2 3 4 5 6 ...

Страница 28: ...ser les cendres dans le tiroir à cendres par l ouverture au fond de la chambre à combustion Dans ce cas ci seulement les cendres n ont pas à être froides Videz le tiroir à cendres et entreposez les cendres dans un contenant de métal avec un couvert 6 5 5 TIROIR À CENDRES Retirez et brossez le coupe feu Ne pas oublier de le remettre en place 6 5 4 COUPE FEU 7 8 9 Brossez et aspirez l intérieur de l...

Страница 29: ...a vitre de la porte propre et les gaz de combustion pourraient fuir dans la pièce Un ajustement de la porte peut alors être nécessaire Si l ajustement de la porte n est pas suffisant remplacez le cordon de porte avec une pièce d origine 6 5 10 AJUSTEMENT DE LA PORTE Enlevez la goupille de retenue en tirant et tournant à l aide de pince et tournez la poignée un tour dans le sens contraire des aigui...

Страница 30: ...par un ramoneur qualifié ou un inspecteur du service d incendie 7 1 CENDRES VOLANTES ET SUIE Les produits de combustion contiennent de petites particules de cendres volantes Des cendres 8 DÉPANNAGE REMARQUE VISITEZ NOTRE SITE WEB POUR OBTENIR UN DOCUMENT DÉTAILLÉ SUR LE DÉPANNAGE Les problèmes les plus courants sont généralement reliés aux causes suivantes 1 Mauvaise utilisation ou entretien inadé...

Страница 31: ...ien certifié C Manque de courant L appareil exécutera une séquence d arrêt puis redémarrera par lui même en effacant le code C L Allumage raté Assurez vous que les granules sont de bonne qualité et qu ils sont secs Nettoyez le pot de combustion Assurez vous que l allumeur fonctionne Ajustez l entrée d air de combustion Appuyez sur le bouton Reset pour réinitialiser le poêle et sur Mode pour le red...

Страница 32: ...rer ou remplacer toute pièce ou unité après inspection et étude du défaut Le fabricant peut à sa discrétion se décharger de toutes ses obligations en ce qui concerne la présente garantie en remboursant le prix de gros de toute pièce défectueuse garantie Le fabricant ne peut en aucun cas être tenu responsable de tout dommage extraordinaire indirect ou consécutif quelle qu en soit la nature qui dépa...

Отзывы: