


139
4.
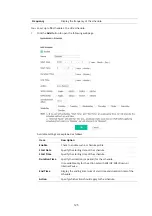
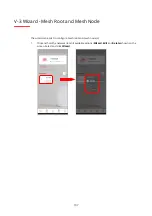
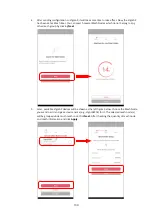
After sending configuration to VigorAP, it will take some time to take effect. Now, the VigorAP
has been set as Mesh Root. You can search several Mesh Nodes which do not belong to any
other mesh group by clicking
Next
.
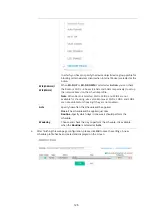
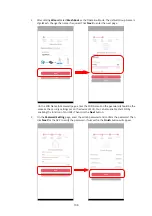
5.
Later, available VigorAP devices will be shown as the left figure below. Choose the Mesh Node
you want to add and give a device name (e.g., VigorAP903) for it. The selected mesh node(s)
will be grouped under such mesh root. Click
Next
. After checking the quantity of mesh node
and mesh information and click
Apply
.
Содержание VigorAP 906
Страница 1: ...I ...
Страница 2: ...II VigorAP 906 802 11ax Access Point User s Guide Version 1 0 Firmware Version V1 4 5 Date Nov 9 2022 ...
Страница 7: ...VII Chapter I Installation ...
Страница 8: ......
Страница 18: ...10 Next click Change adapter options Click the local area connection ...
Страница 28: ...20 4 A summary of the settings configuration will be shown on the screen Click Finish ...
Страница 33: ...25 8 Later a summary page of mesh root with mesh node will be shown on the screen ...
Страница 35: ...27 Chapter II Connectivity ...
Страница 39: ...31 ...
Страница 62: ...54 Below shows how Band Steering works ...
Страница 66: ...58 ...
Страница 82: ...74 Collect some Mesh logs and send the result to DrayTek for analysis ...
Страница 84: ...76 II 4 7 Mesh Syslog ...
Страница 95: ...87 Chapter III Management ...
Страница 116: ...108 ...
Страница 127: ...119 Chapter IV Others ...
Страница 140: ...132 This page is left blank ...
Страница 141: ...133 Chapter V Mobile APP DrayTek Wireless ...
Страница 157: ...149 Chapter VI Troubleshooting ...
Страница 161: ...153 VI 1 4 WLAN 2 4GHz Statistics This page is used for debugging by RD only ...
Страница 162: ...VigorAP 903 User s Guide 154 VI 1 5 WLAN 5GHz Statistics This page is used for debugging by RD only ...
Страница 169: ...161 ...