background image


WORKING ADVISE WITH SAFETY SWITCH      


22 
MAINTENANCE ADVICE 

23 

WARRANTY 


24 


When  working  at  the  wall  or  roof,  ensure 
that everything conforms to the local health 
and safety regulations.  


Before plugging in and using Seamer check  plug and 
cable also accessories if damaged. 


Consider  work  area  environment  in  rain  or 
snow, working on Metal Roofs is prohibited 
after DIN18339. 


Any  damage  on  Seamer,  send  machine  in  to  the 
manufacturer for servicing. 


DANGER / ACCIDENT 


Check  label  for  voltage,  the  electric  mains 
connection must correspondent.  


Don’t expose the Seamer to rain or snow, 
the  Power  Seamer  can  be  used  in  damp 
locations  on  account  of  water-protection 
resistance after IP 54 


The  Seamer  must  be  operated  on  a 
grounded  socket  only,  to  guard  against  an 
electric shock. Danger due to electric shock. 


Guard against electrical shock. 


Disconnect plug from socket, before 
machine - adjustment or servicing and when 
not in use. Injury 

– Danger. 


Do not transport Seamer or Metal Box with 
a lifting crane. 


Operate Seamer only when located on top of 
the panel. Injury. 


Working  overhead  with  the  seamer  is  not 
allowed. 


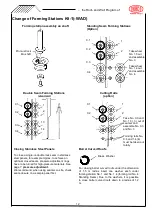
Ensure that the forming stations are 
positioned correctly, (numbers). Use Original 
Forming Rolls only. 


The  Seamer  must  work  freely  without 
force, do not push or pull and do not sit or 
stand on top of the machine.  
Danger, accident. 


Before profiling check the rolls, for right 
position, that they are located in the pin and 
the screws tight.      


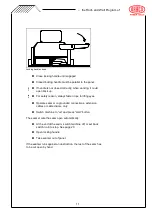
The  Operator  must  secure  himself  when 
working with the machine.  
Danger Accident. 


Lifting eyes are provided to enable a safety 
rope  or  cable  to  be  fitted,  especially  when 
working on vertical claddings or on a steep 


...  the Roof- and Wall Program of


Safetey Indicators for  

Users and Operators


Содержание K9-1

Страница 1: ...ore attempting to operate this machine and observe all safety regulations and signs Pic K9 1 WAD Mach No 04536 the Roof and Wall Program of Max Draenert Apparatebau GmbH Co KG Electric Cordless Pneuma...

Страница 2: ...17 FUNCTION CHECK UP DUAL SAFETY SWITCH DF 17 WORKING INSTRUCTIONS DF 18 WORKING WITH THE REMOTE CONTROL K9 1 KF 18 VARIABLE PRESSURRE ADJUSTMENT K9 1 ASS 19 CONTROL BOX 20 SHORT DESCRIPTION START UP...

Страница 3: ...ic shock Danger due to electric shock Guard against electrical shock Disconnect plug from socket before machine adjustment or servicing and when not in use Injury Danger Do not transport Seamer or Met...

Страница 4: ...m Steel 0 7 21 mm gauge 370 N mm Stainless Steel 0 5 24 mm gauge 400 N mm Min Radius 2 or 1 2 m Seam Height 25 60 mm Panel width min 140 mm Recommended Material temperature min 10 40 C F Technical cha...

Страница 5: ...seam Lifting eyes are assembled to the seamer to enable a safety rope or cable to be fitted especially when working on vertical claddings or on a steep slope on top of the roof Overhead working with t...

Страница 6: ...work with the 4 outrigger wheels at the side of the seamer When working on vertical claddings on a steep slope at the end of the roof secure a safety rope to the lifting eyes to prevent machine fallin...

Страница 7: ...o times and one time with hand seamer K7 To avoid seamer to work itself out of the seam close long panels every 2 to 3 meter with the hand seamer K8 Fasten screws after adjustment The outrigger wheels...

Страница 8: ...ically and close the panel to a double lock seam Insert the seamer locking handle open with the four forming rolls into the panel The first two forming rolls No 1 and No 2 must be set under the single...

Страница 9: ...double lock forming stations 1 3 and 1 4 Take both rolls off the shaft Assemble single lock forming rolls 3 and 4 to the marked numbers at the side of the seamer 3 and 4 turn the rolls until the pin s...

Страница 10: ...rking Sequence Cutting Double Lock or Single Lock Seam Forming stations diagram Seam cutting a burr could be on both sides of the panel Injury Wear gloves Working direction variable up or down or oppo...

Страница 11: ...ting eyes Operate seamer on grounded connections extension cables or cable drums only Switch machine to on and press start button The seamer cuts the seam open automatically At the end of the seam swi...

Страница 12: ...on site check seam closure on a sample panel first Barrel Curved Roofs For closing barrel curved roofs under the dimension of 1 5 m radius insert one washer each under forming station No 1 and No 1 4...

Страница 13: ...lders 3 and 0 3 and tighten these with 4 screws Please make sure that numbers 3 and 0 3 match the cutting blades and cutting blade holders Cutting roll station 3 Cutting roll station 0 3 Pos Order no...

Страница 14: ...de station 3 1 30 K 906301 Cutting blade holder station 3 1 40 K 906280 Brass insert 1 50 81265 Pin 6x12 1 Pos Order no Item Pieces BG900300 Cutting roll station 0 3 complete 1 10 81238 Screw M5x12 4...

Страница 15: ...leaving an upstand of 8 mm 2 Bend both sides up 24 mm with a hand bending tool 3 Form a wider panel both sides overcloak U U profil 4 Fasten cleats lay wider panel over undercloak 5 Close to a single...

Страница 16: ...The hot air blower will warm up the seam to achieve an optional closed seam If a temperature of 10 C on top of the seam is not reached turn the electronic speed control to a lower working speed minimu...

Страница 17: ...item can be fitted in the factory afterwards Function At the end of the ridge eave or any other obstructions the machine shuts off automatically due two switches at the front and below the seamer Chec...

Страница 18: ...in in hole 1 to lock the seam switch the dual safety switch is out of order Attention Check dual safety switch every time before working with the seamer Check the setting of the pin no 1 or 2 WORKING...

Страница 19: ...an be changed on both adjustment rings regular Increase pressure Decrease pressure Turn both adjustment rings clockwise Turn both adjustment rings anti clockwise After the adjustments are made check s...

Страница 20: ...1 Main switch on off 2 Start pushbutton 3 Socket for Dual Safety Switch K9 1 DF 4 Fuse 5 Variable speed knob 6 Switch for forward stop reverse 7 Socket for remote control K9 1 KF temporary plug the R...

Страница 21: ...ition 6 Check if temporary plug or the remote control No 7 is assembled to the seamer Important One of these plugs must be mounted to the seamer always otherwise machine will not run 7 For double lock...

Страница 22: ...st turn ATTENTION When working with the dual safety switch the pin must be disconnected otherwise seamer will not stop at the end of the seam Check spring tension of seam lever switch at all times Dan...

Страница 23: ...iginal spare parts only WARNING Prior to use of this equipment all operators must read the instructions carefully and educate themselves to the proper operation of this power seamer K9 1 This equipmen...

Страница 24: ...s field repairs freight air fare direct or consequential costs or expenses resulting from an associated with machine failure This warranty is VOID if the part or any machinery in which any parts are c...

Страница 25: ...r our sole responsibility that this product is in conformity with the following standards or standardisation documents EG 06 42 DIN EN ISO 12100 1 DIN EN ISO 12100 2 DIN EN ISO 14121 1 DIN EN ISO 1384...

Отзывы: