background image

5


Instruction manual

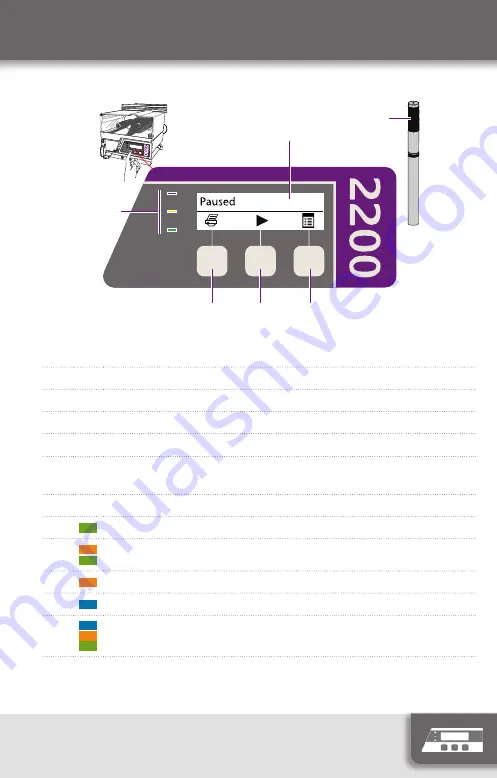
User Interface

4

5

3

2

1

6

1 Print control button
2 Starting up
3 Simple User Interface (SUI) mode
4 Status screen

5 Beacons  

(same meanings as the LEDs, No. 6)

6 LEDs:

Green: System is OK

Orange and green: System is OK, warnings present

Orange: Printer paused
Blue: System error or cover open

Blue, orange and green: Test pattern mode

Содержание markerm-imaje 2200

Страница 1: ...erview Interface overview Starting shutting down the printer Selecting and printing a job Replacing consumables Adjustments Maintenance Troubleshooting Technical Specifications Information Instruction manual 2200 ...

Страница 2: ... 8 3 2 4 1 11 10 1 Status beacon 2 Standalone terminal optional 3 Print module 4 Adjustable stand 5 Label module 6 Electrical power supply connection 7 Printer positioning screw 8 Interface with LCD screen 9 Power switch 10 CPU 11 Manufacturer s plate ...

Страница 3: ...y spindle 8 Print head 2 Ribbon rewind spindle 9 Blow bar 3 Label roll guide 10 Status screen LEDs and control buttons 4 Label supply spindle 11 Label path 5 Label compensator arm 12 Print head lever 6 Backing paper compensator arm 13 Ink ribbon compartment 7 Backing paper rewind spindle ...

Страница 4: ...0 Hz connector with ground connection A Power switch P15 Beacon B Electrical power supply P16 LVDS P3 Relay outputs P17 Pre Trig photocell P9 LHM communication P18 Input Main Trig photocell P10 Opto input P19 Input Return Sensor photocell P11 Port Série 1 RJ45 P20 Applicator connection P12 USB port P21 Barcode reader P13 Serial port 2 DE 9 P24 LHM power P14 Ethernet LAN ...

Страница 5: ... 2 Starting up 3 Simple User Interface SUI mode 4 Status screen 5 Beacons same meanings as the LEDs No 6 6 LEDs Green System is OK Orange and green System is OK warnings present Orange Printer paused Blue System error or cover open Blue orange and green Test pattern mode ...

Страница 6: ...rwrite labels Add fonts Overwrite fonts Add images Overwrite images Software version IP Address USB memory label n Insert USB flash drive Host name Load images System information Layouts Loads the selected labels A USB flash drive must be inserted at this point in order for the following menu to appear Pressing the button shifts the printer to Simple User Interface SUI mode The operation of SUI mo...

Страница 7: ... module Allowed time elapsed 2 Resumes printing or confirms the warnings and faults 3 Message field 4 Exits current menu level and goes back one level 5 Confirms a menu selection or operation 6 Navigation key moves the cursor in the menus and message field 7 Shifts between upper and lower case letters 8 Accesses a list of local and Unicode characters 9 Shifts to the red characters in the bottom ri...

Страница 8: ...ator settings Set start value Printer settings Production parameters Control panel Edit the configuration requests Port settings Terminal Printer connection Data input device Settings Time Date Set display language Set display contrast Password management Servicing Window For more information refer to the terminal user manual ...

Страница 9: ...els and codes CoLOS Create Professional allows you to define the location and format of information to be printed including default or fixed information using image templates preview images before loading them upload one or more images to all compatible devices including CimComms SmartLase Small Character Ink Jet and NextGen models send images to a local or network desktop printer ...

Страница 10: ...ly Offset Dates BBE and Shift Codes Merged text Calculated text Math text Printer setting text Variable text information from database or external data The 2200 printer comes with 10 default TrueType fonts Further fonts may be added to the printer s memory UTF 8 Unicode is supported Example of an image template For more information refer to the CoLOS Create Pro user manual ...

Страница 11: ...11 Instruction manual Daily startup and shutdown 10 seconds 3 seconds Starting up Ready for label data Shutting down ...

Страница 12: ...Instruction manual 12 Selecting a job Using the standalone terminal or ENTER For more information refer to the terminal user manual Either option depending on your configuration ...

Страница 13: ...13 Instruction manual Printing a job Pause printing On printer Stop printing On standalone terminal ...

Страница 14: ...Instruction manual 14 Loading labels 1 3 8 2 4 5 10 11 9 12 7 6 1 5 m 5 ft Outside wound roll ...

Страница 15: ...15 Instruction manual Loading the ribbon 1 2 3 4 7 6 5 ...

Страница 16: ...rn the printer back on while pressing the Print key 3 Hold the key depressed until the grey test target is printed To return to normal operation turn the printer off then back on Automatic adjustment of the Media Position Sensor MPS 4 Press and hold the key for 7 seconds after printing the grey test target 5 The automatic control starts and white labels are fed through the printer 6 The automatic ...

Страница 17: ...17 Instruction manual Positioning of labels 1 3 Stretched 2 Taut ...

Страница 18: ...Instruction manual 18 Adjusting the outfeed d 1 2 1 2 Adjusting the air flow Adjusting the outfeed plate d 0 4 mm and ...

Страница 19: ...19 Instruction manual Adjusting a creased ribbon 1 3 2 4 5 ...

Страница 20: ...Instruction manual 20 Adjusting the printing 13 25 A B 25 50 ZZZYYYXXX 2 mm Yes No Adjusting the position Adjusting the pressure ...

Страница 21: ...21 Instruction manual Cleaning the print head 1 3 2 5 4 6 7 8 Printhead Cleaning Film THIS SIDE DOWN DATAMAX 13mm CLEANER ...

Страница 22: ...Instruction manual 22 Replacing the print head 1 2 3 4 5 ...

Страница 23: ...23 Instruction manual Changing the print roll clic 1 3 2 4 5 Make sure that the roll properly locks in place when reassembling ...

Страница 24: ...Instruction manual 24 Changing the supply roll clic 1 2 3 Make sure that the roll properly locks in place when reassembling ...

Страница 25: ...he system ready online 03 Paused Press the Start button to make the system enter Ready mode System update Wait for the update to finish Press the Start button Press the Start button to make the system ready System Info Restart the printer to place the system offline Test pattern Restart the printer to place the system offline Hex Dump Restart the printer to place the system offline MPS auto adjust...

Страница 26: ... is outfed 61 Label in position Check whether 1 A label has already been placed on the pad of the applicator 2 The sensor is dirty 63 Arm not in initial position Something is preventing the applicator arm from reaching its resting position Check whether 1 The applicator arm is bent 2 The resting sensor is operating 70 Head raised Lower the print head lever Check whether the microswitch is defectiv...

Страница 27: ...ts per mm Maximum print speed Up to 12 ips 300 mm per second Media specifications Medium die cut self adhesive labels Maximum label roll 350 mm 13 8 Inner core 76 mm 3 Label size W 30 mm x H 230 mm W 1 2 x H 9 depending on applicator model Ribbon type inside wound ribbon coated side in Markem Imaje recommends using ribbon having a width at least that of the medium being used Maximum ribbon roll si...

Страница 28: ... temperature range 5 C to 45 C Humidity 20 to 85 non condensing using Markem Imaje brand media Power requirements 100 240 V AC 50 60 Hz 3 A Total current for connectors 3 4 6 7 and 8 limited to 1 5 A 5 9 and 10 limited to 1 A The printer and accessories use a total current of 0 5 A Device Consumption Printer with accessories 0 5 A Terminal 0 2 A Status beacon 3 lights 0 1 A Approvals CE GS cULus F...

Страница 29: ...ult print protocol for most print devices Web server I O signals 2 x In via opto 5 x Out via relay 24 VDC May be controlled via an external emergency shutdown circuit Barcode reader input Air consumption Air supply 6 9 bar filtered and dry Air consumption 23 85 l min depending on the applicator model used and the application speed 6 labels per minute 25 labels per minute 50 labels per minute 120 l...

Страница 30: ...ronet etc TrueType download Field rotation 0 90 180 270 Graphic features Supports the most common formats BMP WMF PCX PNG ICO GIF TIFF JPEG Barcode symbologies Linear barcodes Interleaved 2 5 Code 39 USS Codabar UPC A UPC E EAN 8 EAN 13 EAN 128 EAN UPC extension code Code 128 ITF 14 RSS 14 RSS 14 Truncated RSS Limited RSS Expanded Code 2 of 5 2D barcodes PDF417 LEB KIX RM4SCC QR Code M1 M2 Maxi Co...

Страница 31: ...ecifications M8 4x Markem Imaje assumes no liability if a non Markem Imaje stand is used Mount NOTE Does not apply to the pallet applicator The multi position mount allows the printer applicator to be mounted on a non Markem Image stand ...

Страница 32: ...s 400 1200 945 510 635 730 430 40 650 210 260 135 635 750 431 430 359 173 932 1030 5 225 1000 780 740 Dimensions adjustable stand and H base Given the many assembly possibilities please contact Markem Imaje to obtain additional dimension drawings ...

Страница 33: ...hall alone be authentic and shall prevail in the event of a dispute Markem Imaje reserves the right to modify the specifications of its products without prior notice Any reproduction even partial of this document is prohibited Translation of the original manual the original manual in French is available on www markem imaje com 2019 Markem Imaje All Rights Reserved English version S N Serial number...

Страница 34: ...aspard Monge 26500 BOURG LES VALENCE France tel 33 0 4 75 75 55 00 www markem imaje com User Documentation A43126 FB 03 2019 en 2200 Applicators Pallet Blow Tamp S Tamp L Tamp Blow S Tamp Blow L Wipe Enhanced Wipe Corner Wrap Flex SE ...

Отзывы: