13
DIAGNOSTIC SERVICE MANUAL
DIAGNOSTIC SERVICE MANUAL
DIAGNOSTIC SERVICE MANUAL
DIAGNOSTIC SERVICE MANUAL
DIAGNOSTIC SERVICE MANUAL
Dometic
Dometic
Dometic
Dometic
Dometic
®
®
®
®
®
RM3604/3804 AES
RM3604/3804 AES
RM3604/3804 AES
RM3604/3804 AES
RM3604/3804 AES
®
®
®
®
®
Refrigerators
Refrigerators
Refrigerators
Refrigerators
Refrigerators
SECTION 8
SECTION 8
SECTION 8
SECTION 8
SECTION 8
O
O
O
O
OTHER
THER
THER
THER
THER
8.1
8.1
8.1
8.1
8.1
LEVELING
LEVELING
LEVELING
LEVELING
LEVELING
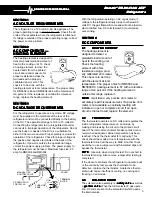
Leveling is one of the requirements for proper operation
with absorption refrigerators. The absorption design
utilizes no mechanical pumps or compressors to circu-
late the refrigerant within the system, so proper leveling
must be maintained to provide the correct refrigerant
flow. Without proper leveling refrigerant within the
cooling unit will collect and stagnate at certain areas.
Without proper refrigerant flow, the cooling process will
stop. The RM3604 and RM3804 has a type of cooling
unit that utilizes an enclosed pump tube surrounded by a
solution to protect the assembly. To insure proper
leveling with these models, the vehicle needs to be
leveled so it is comfortable to live in (no noticeable
sloping of floor or walls). When the vehicle is moving,
leveling is not critical as the rolling and pitching move-
ment of the vehicle will pass to either side of level,
keeping the refrigerant from accumulating in the piping.
8.2
8.2
8.2
8.2
8.2
VENTILATION
VENTILATION
VENTILATION
VENTILATION
VENTILATION
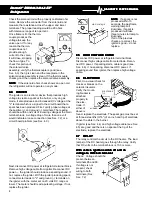
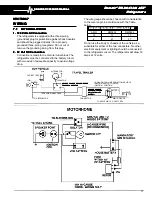
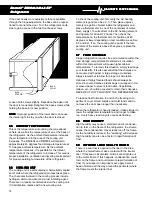
Ventilation is one of the requirements for proper cooling
unit operation. The coach vent system must be able to
provide a way to direct the hot air produced by the action
of the cooling unit, out away from the installation of the
refrigerator. The refrigerator extracts heat from the interior
of the refrigerator cabinet and dissipates the heat out
through the vent system. In a proper installation there
should be as little open space as possible surrounding the
sides and top of the refrigerator to achieve proper air flow.
All potential dead air pockets should be blocked or baffled
to insure that heat won't be trapped in these spaces and
reduce efficiency. In addition, the cooling unit should be at
least one half (1/2) inch from the nearest surface made of
combustible materials.
NOTE
NOTE
NOTE
NOTE
NOTE: Refrigerators should be installed in accordance
with appropriate installation instructions received with
the refrigerator.
8.3
8.3
8.3
8.3
8.3
AIR LEAKS
AIR LEAKS
AIR LEAKS
AIR LEAKS
AIR LEAKS
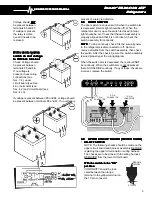
Check the gasket on the doors to be sure of a positive
air seal. A simple method to check gaskets is to close
the door on a dollar bill, then pull the dollar bill out. If no
resistance is felt, the gasket is not sealing properly. This
should be done on all four sides of the door. If a gasket
is not sealing properly, first warm the gasket material
with a hair dryer.
DO NOT OVERHEAT AS YOU CAN MELT
DO NOT OVERHEAT AS YOU CAN MELT
DO NOT OVERHEAT AS YOU CAN MELT
DO NOT OVERHEAT AS YOU CAN MELT
DO NOT OVERHEAT AS YOU CAN MELT
THE MATERIAL.
THE MATERIAL.
THE MATERIAL.
THE MATERIAL.
THE MATERIAL.
Then close the door and the magnetic strip should pull
the gasket to the metal frame. Leave door closed until
the material has cooled. Then recheck for a positive
seal. If a positive seal cannot be achieved, replace the
gasket. Also check that the cooling unit is installed
properly. The cooling unit's foam block, the portion that
surrounds the evaporator coils, must be flush to the
cabinet at the back of the refrigerator and have a
positive seal. If the cooling unit is not installed properly,
remove and install properly.
NOTE
NOTE
NOTE
NOTE
NOTE: Air leaks will cause insufficient cooling as well as
rapid formation of frost.
8.4
8.4
8.4
8.4
8.4
DOOR POSITION
DOOR POSITION
DOOR POSITION
DOOR POSITION
DOOR POSITION
The door position can be checked by observing any
misalignment of the door in relation to the frame.
To correct the door alignment, loosen the hinge screws
slightly and reorient the door in the proper position. Hold
the door in its new position and carefully retighten the
hinge screws.
0" CLEARANCE
FROM SIDE OF
CABINET
1/2" FROM
COMBUSTIBLE
MATERIALS
PATH OF
AIR FLOW
SMOOTH FIT,
PROPER SEAL

