background image

Firmware  Upgrade 

- 50 - 

Firmware Upgrade 

 
The firmware of the HQR1 DVR can be upgraded if necessary. The HQR1 DVR will 
check the core image file on CF card while power up. If an image & OSD file is 
found  then  the  firmware  of  the  HQR1  DVR  will  be  upgraded  automatically. 
Please follow below instructions to upgrade. 
 

1. Upgrade 1 Channel DCS HQR1 DVR 

1)


Format CF card in FAT32 file system. 

2)


Copy imge.2510.img and osd.img to the root of CF card. 

3)


Use 

DCS  HQR1  DVR  Desktop  Software


  to  generate  ipcam.ini 

depending on your needs. Ipcam.ini must be under the root of CF card while 
upgrading. 

4)


Power off and then insert CF card into DCS HQR1 DVR. 

5)


Turn on the power of DCS HQR1 DVR. 

6)


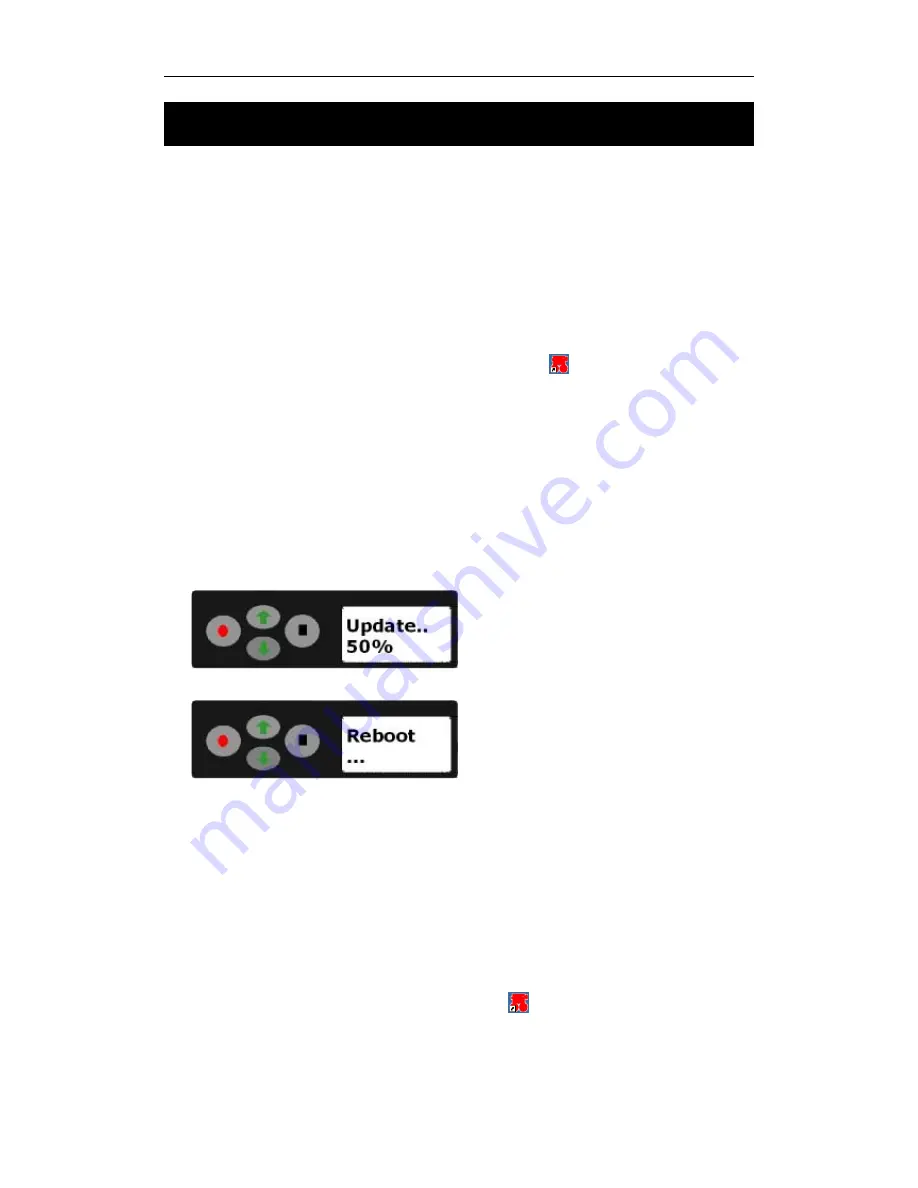
The firmware will be upgraded after power on. The LED turns to red, then 
yellow and alternately flashes red and yellow several times. It takes about 
two minutes to upgrade. 
At  the  same  time,  LCD  will  display  schedule  of  upgrade  process  if  you 
upgrade from Firmware V1.0.4 or newer. 


When the DCS HQR1 DVR upgrades successfully, it will reboot automatically. 


* DON’T TURN OFF POWER DURING THIS PERIOD!!


7)


The DCS HQR1 DVR will be rebooted automatically after upgrade. The LED 
will  change  to  red,  yellow  and  then  green.  It  takes  about  12  seconds  to 
reboot. 

8)


A Beep will sound one time once the DCS HQR1 DVR upgrades successfully. 


2. Upgrade 4 Channel HQR1-C4 DVR 

1)


Format CF card in FAT32 file system. 

2)


Copy imge.2510.img, osd.img & osd_4ch.img to the root of CF card. 

3)


Use 

DCS HQR1 DVR Desktop Software


  to generate ipcam.ini depend 

on your need configuration. Ipcam.ini must be under the root of CF card 
while upgrading. 

Содержание DCS HQR1

Страница 1: ...1CH 4CH DCS HQR1 DVR User s Manual Version 1 1 1 2007 11 23 ...

Страница 2: ...Removing the end plate screws will void your warranty If your HQR1 DVR requires servicing please contact your authorized distributor or factory Do not use the HQR1 DVR to power devices other than a single camera This document is a work in progress and reflects only the HQR1 DVR device ...

Страница 3: ... HQR1 DVR 5 1 Channel DCS HQR1 DVR 5 4 Channel DCS HQR1 DVR 5 Video and Audio Interface 5 Button Bullet Camera Interface 6 Eject CF Card 6 Operation of DCS HQR1 DVR 7 Quick Start 7 Push Button 7 RECORD 7 STOP 8 Infrared Remote Control 8 Infrared Remote Control for 4 Channel DCS HQR1 DVR 8 LANC Remote Control 9 Wireless Remote Control 10 Video Quality 10 Video File Name 11 DCS HQR1 DVR Status 12 Re...

Страница 4: ...figuration Menu Output 31 MPEG 2 Converter 32 Lap Timer 35 Configuration of Lap Timer 35 Connection 35 Mask Time 35 Recording of Lap Time 35 Configure DCS HQR1 DVR using LCD Configuration Menu 37 LCD Configuration Menu 37 Enter Quit LCD Configuration Menu 37 Configure DCS HQR1 DVR in LCD Configuration Menu 38 LCD Configuration Menu Details 38 Menu 38 Menu Item Parameter 39 LCD Configuration Menu S...

Страница 5: ...ct Flash card is used as a storage medium The CF card is a solid storage media with the best anti shock capability available today It is also low powered and provides fast speed with multiple diversity options It is very good choice for mobile DVR applications HQR1 DVR offers two encoding formats MPEG 2 for DVD and MPEG4 for archive and streaming video MPEG 2 MPEG 2 is a standard for generic codin...

Страница 6: ...ter or Internal Lion Rechargeable Battery On board battery charging circuit Offers power for camera MIC Changeable CF Flash Card to save video Multi Color LED for status Micro Vibration Motor or Beep status warning Optional OSD and RTC Optional Lap Timer Palm sized Only 160g weight with battery and CF card Video Audio input Linux OS and upgradeable firmware Support Windows 98 ME NT 2000 XP Vista f...

Страница 7: ...ree space Display 1024x768 and above 24 32 bit color depth Graphic Adapter Support DirectX 9 0c USB One free USB 2 0 host interface Card Reader one high speed USB 2 0 1394 card reader PCMCIA Optional PCMCIA interface Installation Guide Before Installation 1 Check all accessories and CF card 2 Format CF card with FAT32 file system if it is new 3 Check power adapter and battery 4 Check whether PC an...

Страница 8: ... until the charging LED goes out Li ion rechargeable battery is expendable The battery should be replaced after 500 charge cycles The used battery should be disposed of properly The Beep Vibration Motor is only one in DCS HQR1 DVR The Beep is standard part Vibration Motor is optional only for special model Safety and Warning Never connect IRIS Power output to any power adapter It may damage the in...

Страница 9: ...anual 5 Connect Video Audio signal to DCS HQR1 DVR 1 Channel DCS HQR1 DVR 4 Channel DCS HQR C4 DVR Video and Audio Interface If the HQR1 DVR is configured as RCA audio video interface the colours correspond to Yellow Video ...

Страница 10: ...button cameras can connect to DCS HQR1 DVR directly without the jump cable if the interface of button camera conforms to the IRIS interface in Appendix Eject CF Card 1 Wait until the LED turns green 2 Disconnect power adapter Switch off power from the internal battery 3 Eject CF card ...

Страница 11: ...QR1 DVR is quite simple There are two push buttons REC and STOP An LED is used to indicate the status of operation Push Button RECORD Press the REC button for at least one second to start recording The LED will flash red and you will hear three beeps The flash frequency is about 3 times per second Slower flash frequency means no video signal is connected ...

Страница 12: ...re eject CF card Infrared Remote Control Infrared remote control is optional for the HQR1 DVR Three buttons are defined Start recording Stop recording Keep pressing to make HQR1 DVR in Sleep Wakeup mode Infrared Remote Control for 4 Channel HQR C4 DVR The numeric key on the IR remote controller controls 9 positions of Picture In Picture you can configure it select any one array method as your defa...

Страница 13: ...V1 4 V1 6 are supported by the HQR1 DVR Power on the HQR1 DVR after booting is finished you can control the HQR1 DVR start stop recording using LANC remote control And you can power off HQR1 DVR power on it again After the HQR1 DVR starts successfully the status LED on LANC remote control will display green Press the button on the center of LANC to start recording and the status LED on LANC will f...

Страница 14: ...reless remote control Video Quality 1M Record video using 1Mbits s record video based on CIF SIF resolution EP Record video using 2Mbits s LP Record video using 4Mbits s SP Record video using 6Mbits s HQ Record video using 8Mbits s The recorded file size is dependent on the complexity of movement objects The following is the estimated recording time 1M 100 min GB EP 60 min GB LP 40 min GB SP 20 mi...

Страница 15: ...r s Manual 11 Video File Name Record file name starts with DVR_ by default The file name will be DVR_xxx avi XXX is incremental from 000 to 999 The prefix DVR_ can be modified in DCS HQR1 DVR Gen configuration software ...

Страница 16: ...ds Standby LED is green Means it is ready to record Recording red LED will flash about 6 times second CF full yellow LED will flash Battery Low Recording is stopped automatically LED flashes 4 times and enters sleep mode Sleep LED is yellow Only the POWER button can wake it up No Video LED will slowly flash red whilst trying to record ...

Страница 17: ...nd the use of VLC media player which can be downloaded for free on the internet Card Reader High speed card readers are recommended for read and replay of recorded video If the card reader is fast your PC can replay video instantly from the CF card without coping video file to PC hard disk first PCMCIA Interface Most laptops have a PCMCIA interface CF card with a PCMCIA adapter can be read directl...

Страница 18: ...re package DCS HQR1 DVR before you use the DVR for the first time Run setup exe to install DCS HQR1 DVR Click Next button to continue installation setup During the installation process you can select the target folder or use the default folder when software prompts you ...

Страница 19: ...DCS HQR1 DVR User s Manual 15 After you select the target folder Click Next button to confirm it Click Next button to start DCS HQR1 DVR software install ...

Страница 20: ...Configuration 16 Click Close button to finish it when installer prompt you the installation is successfully ...

Страница 21: ...re Configuration of DCS HQR1 DVR The HQR1 DVR is initialized as ipcam ini under the root directory of the CF card It must be in the root directory of CF card The HQR1 DVR will use the last time configuration if ipcam ini is not found during startup Double click to configure DCS HQR1 DVR DCS HQR1 DVR Desktop Software can configure the video format average bit rate audio in TV system time stamp beac...

Страница 22: ...se to import the ipcam ini file if there is an old configuration file available on CF card Leave Source File empty if there is no ipcam ini file available Destination File is where to save the generated ipcam ini usually it is the same path as the imported source file You can click Browse to select a folder or drive ...

Страница 23: ...9 After selecting the destination file click Save button to save current configuration in the configuration file If you want to use a default configuration please click Restore button to restore all values to default configuration ...

Страница 24: ...re which is a Windows configuration software for DCS HQR1 DVR to configure the ipcam ini file Sometimes if you lose your ipcam ini or want to restore default configuration of DCS HQR1 DVR it is simple you can click Restore button to restore all values to default setting for DCS HQR1 DVR only ...

Страница 25: ...andards Audio Source Please select the correct audio in setting which is based on your actual audio input Default audio source is Line In you need to select External Mic if you use an external microphone or you can select Internal Mic item if you use the internal microphone in DCS HQR1 DVR Bit Rate Select proper bit rate based on the scene and video quality required Please refer to Video Quality s...

Страница 26: ...can enable time stamp in two formats to stamp your recorded video with real date time You can disable Time Stamp features if you don t need to record date time in your recordings In DCS HQR1 DVR priority of Beacon is higher than Time Stamp the Time Stamp will be disabled at once when the Beacon is enabled ...

Страница 27: ...casion environment you may want to turn this function off you can disable beep vibration function The default configuration is enable beep vibrate feature you can disable it in DCS HQR1 DVR Configure Utility Siwtch off Enable Beep Vibration options in DCS HQR1 DVR Configure Utility to disable it now you can operate DCS HQR1 DVR in silent mode Record Method Normal Cycle Record You can configure the...

Страница 28: ...n single file only the maximum size of single recording video file is 2GB when video reaches the 2GB limit the system will save the new recordings from the begin of recorded video file If your CF card is smaller than 2GB the HQR1 DVR will save recorded video in single file only when CF card is full the system will save the new recorded video from the beginning of the recorded video file You can se...

Страница 29: ...startup Power Off Timer To save the battery power you can enable the HQR1 DVR to power off automatically depending on the timer that you set You can set the timer depending on your actual requirements The default status of Power Off Timer is disable Picture Adjust You can adjust the brightness contrast saturation Hue of the picture to get the best quality The default value is 50 you can click the ...

Страница 30: ... can connect four video inputs at the same time Video Input You can select 1 2 3 or 4 channel video inputs at the same time In the 4 Channel area pull down the menu of Layout to select the video input source amount of video inputs and video input arrange method The Ch_0 Ch_1 Ch_2 Ch_3 items mean video in 0 to video in 3 inputs are slected this is for 1 channel recordings you can select any video i...

Страница 31: ...recorded video will include 4 channel video in one video file PIP item is for 2 channel video input at the same time the 2 channel video will be recorded in one video file at the same time PIP mode supports nine different positions beforehand please consult the Picture In Picture PIP chapter for more details ...

Страница 32: ...the same time the 2 channel video will be recorded in one video file H Split item means the 2 channel video input array in recording video file horizontally Left Right V Split item is for 2 channel video input at the same time the 2 channel video will be record in one video file at the same time V Split item means the 2 channel video input array in recording video file vertically Top Button ...

Страница 33: ...ideo it has nine different positions you can select any position for your requirement from the Position option You can configure or switch the array method of Picture In Picture via the HQR1 DVR Desktop Software IR remote controller The numeric keys on the IR remote controller is can be programmed with 9 ...

Страница 34: ...ler directly when you record the video using the 4 Channel HQR1 C4 DVR The numeric keys 1 9 is controls the 9 items in the Position pull down menu Numeric Key on IR remote Controller Item in Position Menu Position 0 Position 1 Position 2 Position 3 Position 4 Position 5 Position 6 Position 7 Position 8 The Border of Frame When you use 2 or 4 channel video input you can enable disable or select dif...

Страница 35: ...o enable frame of video You can select 4 different styles of border frame Configuration Menu Output 4 Channel HQR1 C4 DVR supports analog output to TV or Monitor when you connect a TV or Monitor to the Audio Video Output you can preview current video the configuration menu NOTE This option is only for 4 Channel DCS HQR1 C4 DVR it is not supported by 1 CH DCS HQR1 DVR ...

Страница 36: ...andard MPEG 2 video for later video replay edit burn The conversion of MPEG 4 is not required Click Convert tab on the video convert page to convert the MPEG 2 recording video After you select the source file to convert detailed information of the recorded MPEG 2 video will be displayed ...

Страница 37: ...DCS HQR1 DVR User s Manual 33 ...

Страница 38: ...MPEG 2 Converter 34 For better performance of conversion it is recommend that source file is on the CF card in a card reader and target file is on the hard disk ...

Страница 39: ...ial edition of DCS HQR1 DVR with Lap Timer function Connection Simply connect the External Beacon Receiver into the Beacon jack on the DCS HQR1 DVR and point the External Beacon Receiver to the Beacon The Lap Timer will start to work when Beacon signal is detected Mask Time The Mask Timer is the time interval that DCS HQR1 DVR doesn t respond after the detection of Beacon signal The default value ...

Страница 40: ... Hostname Team WORKGROUP Sport Motor Scene Security READY 04 05 588 Summary Total Record Time 04 05 588 Lap Timer is not a standard function of DCS HQR1 DVR standard version it is optional only for special version ...

Страница 41: ...it LCD Configuration Menu Hold push button for at least 3 seconds to enter the LCD configuration menu once you enter LCD configuration menu successfully the LCD will display valid menu menu item parameters of these menu items depend on your HQR1 DVR version After you finish configuring press to quit to upper menu ...

Страница 42: ...guration Menu Once you enter LCD configuration menu you can switch menu using buttons then press to select the menu menu item that you want to configure Using select the parameter value parameter area that you want to configure then press to save the configuration When you finish configuration press one or two times once to quit LCD configuration menu LCD Configuration Menu Details Menu The valid ...

Страница 43: ...yy mm dd please set correct date Use to select correct year then press switch to month area use select correct month then press switch to day area use select correct day press will switch to year again finish setting the correct date press to save the current configuration press quit to DATE menu 2 Menu Item Time The parameter format is hour minute second please set correct time ...

Страница 44: ...ish setting the correct time press save the current configuration press quit to TIME menu 3 Menu Item Stamp Status Default status of stamp is Disable please select proper stamp status to your requirements Press to switch Disable Enable status then press save current configuration press quit the STAMP menu INPUT Menu Menu Menu Item Parameter INPUT VIDEO QUAD PIP PIP2 H Split V Split AUDIO Line In E...

Страница 45: ... item Press to switch video input configuration then press save current configuration press to quit the VIDEO menu 2 Menu Item Audio Input Default parameter is Line In please select Ext Mic if you use external microphone input or select Int Mic if you use internal microphone in the HQR1 DVR Press to switch Line In Ext Mic Int Mic parameter then press to save the current configuration press quit th...

Страница 46: ...C J PAL B PAL D PAL G SECAM FORMAT MPEG 4 MPEG 2 QUALITY 1M EP 2M LP 4M SP 6M HQ 8M 1 Menu Item Video Standard Default parameter is NTSC please select correct video standard depend on your video source Press to switch the video standard parameter then press to save the current configuration press quit the STANDARD menu ...

Страница 47: ...uit Press to switch MPEG 4 MPEG 2 format then press to save current configuration press quit the FORMAT menu 3 Menu Item Video Quality Default parameter is EP 2M please select proper video quality to suit Press to switch 1M EP 2M LP 4M SP 6M HQ 8M quality then press to save current configuration press quit the QUALITY menu ...

Страница 48: ... Sec 1 Menu Item Beacon Status Default status of beacon is Disable please select proper beacon status to suit Press to switch Disable Enable status then press to save current configuration press quit the BEACON menu 2 Menu Item Beacon Mask Delay Default parameter of beacon mask delay is 10 Sec please select proper delay time to suit ...

Страница 49: ... Carrier 1 Menu Item Hostname Default value of HostName is Hostname use select correct first letter then press switch to next letter area until all letters are set finish setting the correct hostname press to save current configuration press quit the HostName menu item 2 Menu Item Scene Default value of Scene is Scene use select correct first letter then press switch to next letter area until all ...

Страница 50: ...ess switch to next letter area until all letters are set finish settting the correct group press to save current configuration press quit the Group menu item 4 Menu Item Carrier Default value of Carrier is Carrier use select correct first letter then press switch to next letter area until all letters are set finish setting the correct carrier press to save current configuration press quit the Carr...

Страница 51: ...er area until all letters are set finish setting the correct hostname press to save current configuration press to quit the Lfprefi menu item 2 Menu Item SysCloc The system clock of the HQR1 DVR needs to be calibrated for accurate time recording it is important for the Lap Timer The default value is No if you need to calibrate the system clock use select Yes then press to start calibrating After y...

Страница 52: ...stem clock of HQR1 DVR is calibrated successfully the DCS HQR1 DVR will restart again LCD Configuration Menu Structure Menu Menu Item Parameter INPUT VIDEO QUAD PIP PIP2 H Split V Split AUDIO Line In Ext Mic Int Mic VIDEO STANDARD NTSC NTSC J PAL B PAL D PAL G SECAM FORMAT MPEG 2 MPEG 4 QUALITY 1M 1M EP 2M LP 4M SP 6M ...

Страница 53: ...r s Manual 49 HQ 8M DATE DATE 07 03 20 TIME 12 00 00 STAMP Enable Disable BEACON BEACON Enable Disable MASK TIME 10 sec USERDES HOSTNAME HostName SCENE Scene GROUP Group CARRIER Carrier MISC LFPREFI DVR_ SYSCLOC Yes No ...

Страница 54: ...ll be upgraded after power on The LED turns to red then yellow and alternately flashes red and yellow several times It takes about two minutes to upgrade At the same time LCD will display schedule of upgrade process if you upgrade from Firmware V1 0 4 or newer When the DCS HQR1 DVR upgrades successfully it will reboot automatically DON T TURN OFF POWER DURING THIS PERIOD 7 The DCS HQR1 DVR will be...

Страница 55: ... seconds to reboot 8 A Beep will sound once the DCS HQR1 DVR is rebooted successfully 9 Power off 4 Channel HQR1 C4 DVR then power on 4 Channel DCS HQR1 DVR C4 again To Upgrade 4 Channel HQR1 C4 DVR after reboot you must power off power on the 4 Channel HQR1 C4 DVR manually The file updmgr txt will be found under the root of CF card The phrase of following can be found in the content of updmgr txt...

Страница 56: ...ernal battery 3 Charging period It takes 5 8 hours to charge a fully discharged battery The charge indicator LED will go out once fully charged 4 File is not accessible or DCS HQR1 DVR can t startup File system is wrong This can happen after abnormal power off and long time usages of CF card Format CF card in FAT32 file system ...

Страница 57: ... on Board 1 GND 2 Audio In 3 Power Output Limited load for camera 4 Video In The number corresponding to the pin number of IRIS connector IRIS Cable 1 3 2 4 1 GND 2 AUDIO 3 POWER 4 VIDEO Video Yellow RCA MALE Audio White RCA MALE Power Black PLUG Ø5 5 2 1 ...

Страница 58: ...Enable Disable option Optimize Beacon support Release DCS HQR1 DVR Configuration File Generator V1 0 5 Release Firmware V1 0 5 Image upgrade file Release Official User s Manual V1 0 5 05 08 07 Optimize LANC Remote Control support Add new version IR Remote Control support Optimize Record on Power On function Add Beep Vibration Enable Disable option Add Time Stamp in two format disable option Optimi...

Страница 59: ...Add System Clock Calibrate function Decrease the time of starting 10 18 07 Version 1 1 1 Add 1M CIF SIF Bitrates Encode Option Add 8M Bitrates Encode Option Add Single recording video file Cycle Record Mode Add Full Disk CF Card Cycle Record Mode Add Analog Menu Output for 4 Channel DCS HQR1 DVR Replace OSD library for 1 Channel DCS HQR1 DVR Support black border of OSD font Improve large CF card s...

Отзывы: