background image


62 

Ordercode: 101600  

LS-190 LED Screen Processor 

13)


Press the menu control (02) to confirm your choice and press the MENU/EFFECT button to return to 

the previous menu. 

14)


Turn the menu control (02) to select <SEND TO RECEIVER> and press the menu control (02) to save. 

15)


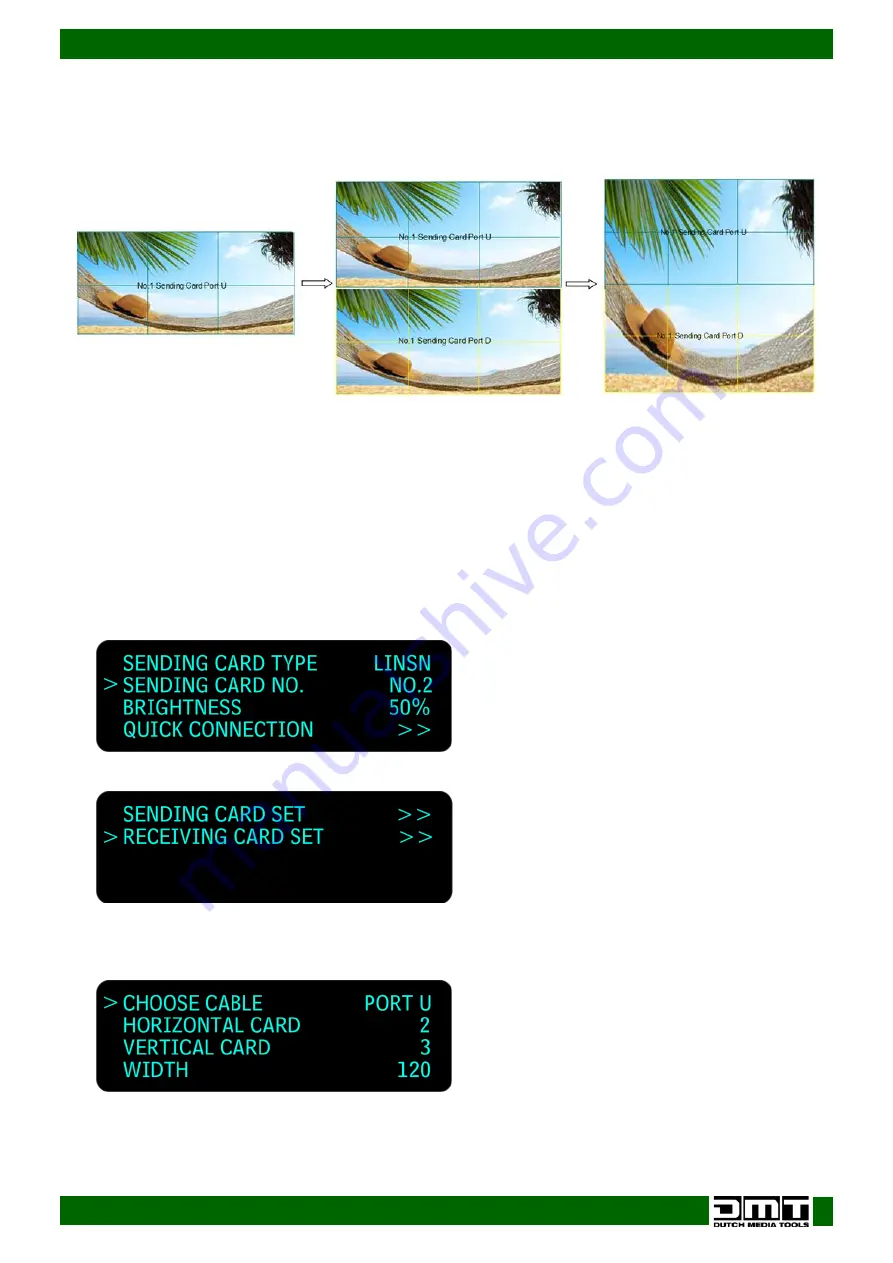
Repeat the above steps for the U1 port. Look at the preview below. 


Connect the ports D and U of Two Sending Cards to a LED Display 

01)


Make sure that the device is operating in normal mode: both red power indicators and both green 

signal indicators are on, when the device receives signal input. 

02)


Choose the input signal, for example, DVI. 

03)


Connect four cables to the ports: U1, D1, U2 and D2. 

04)


Connect the D1 and U1 ports of No.1 sending card to the LED display. Follow the instructions from 

page 61. 

05)


Connect both ports (D2 and U2) of No.2 sending card to the LED display. 

06)


Turn the menu control (02) to select <DISPLAY CONNECTION> and press the menu control (02) to 

enter. Press the menu control (02) to select <SENDING CARD NO.> and press the menu control (02) to 

enter. Turn the menu control (02) to select NO.2 and press the menu control (02) to confirm.  


07)


Turn the menu control (02) to select <QUICK CONNECTION> and press the menu control (02) to enter.  


08)


Turn the menu control (02) to select <RECEIVING CARD SET> and press the menu control (02) to enter. 

09)


Turn the menu control (02) to select <CHOOSE CABLE> and press the menu control (02) to enter. Turn 

the menu control (02) to select <PORT U> and press the menu control (02) to confirm. 


Содержание LS-190

Страница 1: ...LS 190 LED Screen Processor V1 Highlite International B V Vestastraat 2 6468 EX Kerkrade the Netherlands Ordercode 101600 MANUAL ENGLISH ...

Страница 2: ... 15 1 5 SDI Adjust 15 2 Output 16 2 1 Output Detail 16 2 2 Output Format 16 2 3 Output Adjust 16 2 4 Scale 16 2 5 Screen 16 2 6 Ratio 17 2 7 Picture 17 2 8 PIP 17 2 9 Text Overlay 17 2 10 Display Mode 18 2 11 Gamma 18 3 Transition 18 3 1 Deinterlace 18 3 2 Image Enhance 18 3 3 Mode 19 3 4 Fade Time 20 3 5 Alpha 20 4 Audio 20 5 Split 20 6 Display Connection 21 6 1 Sending Card Type 21 6 2 Sending C...

Страница 3: ...tput Image Setup Toolbar 36 LED Screen Toolbar 37 Sending Card 37 Display Connection 37 Images Display Toolbar 38 User Mode Toolbar 38 Log Toolbar 38 Information Toolbar 38 Video Processor Options 38 Minus Pixel Adjustment 39 Split 39 Output Polarity 39 Layout 40 Alpha Delay Time 40 Device Schedule 41 IP Address 41 Clock 41 VGA Adjust 42 Output DE Delay 42 Input DE Delay 43 Output Adjust 43 AV Out...

Страница 4: ...ED Display 59 Connect Both Ports D and U of One Sending Card to a LED Display 61 Connect the ports D and U of Two Sending Cards to a LED Display 62 How to Use Blackout 65 How to Save Parameters 65 How to Load the Saved Parameters 65 Maintenance 66 Software Upgrade 66 Downloading the IP Software 66 Fireware Upgrade 68 Troubleshooting 69 Not working 69 No Output in LED Display 69 LED Display Only Di...

Страница 5: ... cable 1 5 m 3 x dvi dvi 1 5 m 1 x USB A B 1 5 m 1 x DVI DVI VGA 10 cm 1 x BNC BNC 1 5 m 1 x BNC RCA 1 5 m 1 x CAT5 1 5 m 1 x RS232 RJ11 1 x USB memory stick User manual Safety Instructions Every person involved with the installation operation and maintenance of this system has to be qualified follow the instructions of this manual Before you initial start up please make sure that there is no dama...

Страница 6: ...nspect for safety before operating If the device has been exposed to drastic temperature fluctuation e g after transportation do not switch it on immediately The arising condensation water might damage your device Leave the device switched off until it has reached room temperature If your DMT device fails to work properly discontinue use immediately Pack the unit securely preferably in the origina...

Страница 7: ... is always a safe method to use Note If you are given an RMA number please include the following information on a piece of paper inside the box 01 Your name 02 Your address 03 Your phone number 04 A brief description of the symptoms Claims The client has the obligation to check the delivered goods immediately upon delivery for any short comings and or visible defects or perform this check after ou...

Страница 8: ...B15 VGA UXGA 1 x DVI I SMPTE 1 x DP Display port input 1 x 3G SDI Input BNC 10 x Audio Input RCA Socket 48Kbps 24bit Outputs 2 x DVI I Output 1 x VGA Output 1 x Audio Output 48Kbps 24bit Communication RS232 USB TCP IP Humidity 10 to 90 Dimensions 482 x 316 x 88 mm LxWxH 19 inch x 2 HE Weight 4 7 kg Frontside Fig 01 01 OLED display 02 Menu control 03 Function buttons MENU EFFECT Menu and Effect fun...

Страница 9: ...V POS button to set the height by turning the menu control 02 or pressing the desired number buttons 04 Press the V SIZE V POS button twice and set the vertical position by turning the menu control 02 or pressing the desired number buttons 04 Press the button twice to enter CROP mode Turn the menu control 02 to choose the crop menu items and adjust the image by turning the menu control 02 or press...

Страница 10: ...s signal input 06 IMAGE1 IMAGE2 IMAGEA and IMAGE B select button 07 Sending card 2 LED indicator Red power indicator The LED is on when the device is connected to the power supply Green signal indicator The LED is flashing when the sending card receives signal input 08 Freeze button Press the button When the LED is on the output image becomes frozen Press the button to return to live image Note In...

Страница 11: ...for the third controller Upgrade mode 11 10 100M UDP Interface This interface can be used for software control 12 15 22 23 U and D ports Default port always use U port but for large setups use D port Output ports to a LED screen Connect the LED screen to one of these ports using a standard CAT5 or CAT6 cable with or without the Ethercon connector 13 USB Interface Control the LS 190 with its softwa...

Страница 12: ... include PAL NTSC and SECAM 30 S Video DIN 4 Connect an S Video signal PAL NTSC SECAM compatible 31 DVI Input 32 33 34 YPbPr Input R Pr G Y B Pb BNC support SD HD analog video input up to 1080p60 35 VGA Input 36 AUDIO Output 37 DVI Output Connect to a preview monitor or a sending card This DVI connector does not support hot plugging 38 DVI VGA DVI Output Connect to a preview monitor or a sending c...

Страница 13: ...lastic padding is removed Connect all cables Do not supply power before the whole system is set up and connected properly Always disconnect from electric mains power supply before cleaning or servicing Damages caused by non observance are not subject to warranty Set Up and Operation Follow the directions below as they pertain to your preferred operation mode Before plugging the unit in always make...

Страница 14: ...13 Ordercode 101600 LS 190 LED Screen Processor Menu Overview ...

Страница 15: ...rocessor Main Menu Options 01 At start up the display will show 4 screens 02 Press the MENU EFFECT button 03 to enter the main menu The display will show 03 Turn the menu control 02 to toggle through the menu and press to access the submenus ...

Страница 16: ...00 100 V POS Image vertical position 100 100 CLOCK Input signal clock 100 100 PHASE Input image phase 100 100 AUTO ADJUST Auto adjust a VGA input signal H POS V POS CLOCK PHASE to be displayed in full screen image 1 4 ADC Adjust Auto adjustment of brightness 01 Press the menu control 02 to enter 02 Turn the menu control 02 to choose ADC AUTO ADJUST and press the menu control 02 to enter 03 Press t...

Страница 17: ...2 and press it to choose the desired DVI mode The available options are DVI Mode Set the protocol to HDMI or DVI Date Range DVI1 output range Set as RGB graphic mode or YCbCr video mode The RGB output scale range is between 0 255 The YCbCr adjustment range is between 16 235 DE Adjust When black spots appear on the sides of the screen use this function to shift the black out of the screen Set the f...

Страница 18: ...s between 0 16 SELECT Set the size or position of IMAGE A or IMAGE B Note You can access this menu by pressing the IMAGE 1 IMAGE 2 button Please read How to Set up the PIP page 55 2 9 Text Overlay Text overlay function The submenus are TEXT OVERLAY Choose ON OFF PRESET Set one of the following 13 presets User User mode WhOnBk1 White On Black 1 WhOnBk2 White On Black 2 BkOnWh1 Black On White 1 BkOn...

Страница 19: ...nd maximum value of the blue channel The adjustment range is between is 0 248 For more details please see How to Perform the Text Overlay Setting page 50 2 10 Display Mode MODE Image mode selection Select the desired mode The available options are black video image freeze image flat color and test pattern In order to access this menu you can press the FREEZE button TEST PATTERN Select one of the 6...

Страница 20: ...ode Choose the desired mode The available modes are CUT Seamless switching FADE Fade in fade out POP L T PUSH L T POP R T PUSH R T POP L B PUSH L B POP R B PUSH R B POP CENTRE PUSH CENTRE POP LEFT PUSH LEFT POP RIGHT PUSH RIGHT POP TOP PUSH TOP POP BOTTOM ...

Страница 21: ...ter 03 Turn the menu control 02 to choose and then press it to enter one of the following 4 options Mute Mute function Choose ON OFF Volume Volume adjustment Audio In Choose audio input source IMAGE A IMAGE B HDMI Choose internal or external audio for HMDI 5 Split 01 While in main menu turn the menu control 02 and choose SPLIT 02 Press the menu control 02 to enter 03 Turn the menu control 02 to ch...

Страница 22: ...5 Press the menu control 02 to confirm your choice 6 5 Quick Connection 01 Press the menu control 02 to enter the menu The available options are SENDING CARD SET RECEIVING CARD SET 02 Turn the menu control 02 to select one of the 2 options and press the menu control 02 to enter Sending Card Set 01 Turn the menu control 02 to access the options Press the menu control 02 and then turn it to change s...

Страница 23: ...main menu turn the menu control 02 and choose SAVE SETUP 02 Press the menu control 02 to enter 03 Turn the menu control 02 to choose and then press it to enter one of the following 3 options 7 1 Save To The LS 190 provides 10 save positions 01 Turn the menu control 02 to select the desired slot SAVE1 10 or press one of the source buttons 1 10 A flashing source button indicates that this button alr...

Страница 24: ...ON OFF IP ADDRESS Turn the menu control 02 to adjust and press the menu control 02 to set the desired digits which create the IP address SUBNET MASK Turn the menu control 02 to adjust and press the menu control 02 to set the subnet mask GATEWAY Turn the menu control 02 to adjust and press the menu control 02 to set the gateway 8 4 Lock Front Panel Set whether you want to lock the buttons 01 Press ...

Страница 25: ...y to configure with user friendly communication software which supports drag and drop operations The software IS NOT COMPATIBLE with Mac operating systems 01 Double click to install Click on Next to proceed 02 Accept the terms of the license agreement by checking the white square and click on Agree to proceed ...

Страница 26: ...25 Ordercode 101600 LS 190 LED Screen Processor 03 If need be click on Change to select a different destination folder for the LS 190 software ...

Страница 27: ...26 Ordercode 101600 LS 190 LED Screen Processor 04 Click on Next to proceed 05 Click on Next to proceed ...

Страница 28: ...27 Ordercode 101600 LS 190 LED Screen Processor 06 Click on Next to proceed 07 Click on Finish to complete installation ...

Страница 29: ... possible to connect the device with USB line Please read How to Connect Windows Control Program by USB Interface page 51 Note While using the RS 232 COM line it is possible to upgrade the 100M program It is not possible while using USB Upgrading is normally performed by the manufacturer Inappropriate operations may damage the LS 190 beyond repair 01 Set the local port between 0 1023 02 Set the re...

Страница 30: ...ange its parameters 02 Click on the icon to save the current user parameters as a script 03 Click on the icon to import templates There are 6 available templates You can call up the desired template by using the following key combinations 04 Click on the icon to export templates Export the current settings as a template ...

Страница 31: ...ed scripts or execute the schedule edited before starting the software 06 If you have chosen the open device it is possible to resume the last activity or use the desired script file 07 Click on to choose the desired script 08 If you choose Execute schedule when start the display will show 09 Click on the icon to set the language The available languages are Chinese English and German ...

Страница 32: ... software Communication Toolbar 01 Click on one of the following icons Open the COM Close the COM Set the COM Device Toolbar 01 Click on one of the following icons Synchronization Save to flash Note The same as MENU SAVE SETUP SAVE TO or the same as the SAVE key ...

Страница 33: ...he following icons Factory Setup Advance Note Adjustments should be made only by a qualified engineer Please contact us to receive the password 04 Click on the icon for audio patterns Choose the audio input source for IMAGE A or IMAGE B Note The same as MENU AUDIO AUDIO IN 05 Click on the icon for VGA adjustment Note The same as MENU INPUT VGA ADJUST ...

Страница 34: ...33 Ordercode 101600 LS 190 LED Screen Processor Schedule Toolbar 01 Click on the icon to customize a schedule 02 Click on the icon to execute the schedule Execute the tasks in the order of appearance ...

Страница 35: ...ut resolutions Note The same as MENU OUTPUT FORMAT OUT Images Display Mode Toolbar 01 Choose whether you want to work in a single channel or dual channel Layout Toolbar 01 If in single channel mode this option in unavailable 02 If in dual channel mode it is possible to set the device to PIP or PBP mode directly with the quick preset layout button Note The same as MENU OUTPUT PIP LAYOUT ...

Страница 36: ...indow mode select any channel signal by connecting the signal interface green color The red box indicates the selected signal for channel 1 system default the last selected signal as channel 2 signal And the white area will show the input signal Screen Parameter Toolbar Set the size and position of the screen Once the settings have been adjusted the display will show Note The same as MENU OUTPUT S...

Страница 37: ... MENU OUTPUT DISPLAY MODE MODE or the FREEZE button By means of the volume toolbar users can adjust the volume of audio or mute Note The same as MENU AUDIO MUTE Setting Gamma is generally not recommended due to the fact that a LED display itself already has the Gamma function Note The same as MENU OUTPUT GAMMA Output Image Setup Toolbar It is possible to customize brightness contrast saturation co...

Страница 38: ...d type sending card number You can also set brightness gamma X Y width and height Display Connection Set column row width height connect type network port and the relative offset Receiving Card Set the receiving card number and set the X Y value Box Link View the current settings Note The same as MENU DISPLAY CORRECTION ...

Страница 39: ... the same effect as setting the parameters in the image toolbars User Mode Toolbar Call up the saved user mode1 mode2 or mode3 Log Toolbar It is possible to save or delete the log file Information Toolbar View the current software version core board version firmware version and the serial number at the bottom of the software interface Video Processor Options ...

Страница 40: ...rocessor Minus Pixel Adjustment Set the minus pixel adjustment for DVI1 and DVI 2 Split Choose ON and set H total V total H position V position H size and V size Note The same as MENU SPLIT Output Polarity Set the polarity for all your ports ...

Страница 41: ...40 Ordercode 101600 LS 190 LED Screen Processor Layout By means of the layout it is possible to set a variety of double picture modes Alpha Delay Time Set Alpha delay time Set the value to 0 or 50 ...

Страница 42: ...he LS 190 to automatically play the assigned input video in time It is also possible to choose either one window or two window mode and set ratio place A maximum of 10 timing operations can be saved in the schedule IP Address Set the device s IP address Clock Set or adjust the computer time ...

Страница 43: ...42 Ordercode 101600 LS 190 LED Screen Processor VGA Adjust Adjust your VGA s contrast and brightness You can also set the horizontal and vertical polarity Output DE Delay ...

Страница 44: ...43 Ordercode 101600 LS 190 LED Screen Processor Input DE Delay Output Adjust AV Output Format Set the desired AV output format Set to NTSC or PAL ...

Страница 45: ...44 Ordercode 101600 LS 190 LED Screen Processor DVI Gamma VGA Gamma ...

Страница 46: ...45 Ordercode 101600 LS 190 LED Screen Processor Input Config Audio Setting Device Update USB Upgrade ...

Страница 47: ...monitor the device s total working time and if need be to reset or export it Hot Backup Set to ON in order to set the backup signal to BACKUP_1 5 When the received signal becomes interrupted the device will switch to the preset backup signal USB Playlist Geen flauw idee ...

Страница 48: ...Screen Processor Title Setting Set the color position and rate of your subtitles Test Pattern Select the desired test pattern Help Click on Version History software update history or on About software version and company information ...

Страница 49: ...ftware IS NOT COMPATIBLE with Mac operating systems 02 Connect the LS 190 to the computer with a network cable See the diagram below 03 Power on the LS 190 start the network function MENU SYSTEM ETHERNET NETWORK and adjust the settings to match the network settings of the PC 04 Click on the icon to start the software The screen will show 05 Select Ethernet ...

Страница 50: ...dows Control Program by RS232 Interface 01 Install the software on your PC 02 Take the included RS 232 cable and connect one side of the RJ11 download line to the RS232 on the LS 190 Connect the other end to the serial port on the PC or 03 If there is not any serial port on your PC you will need a serial to USB adapter 04 Connect one end of the RJ11 download line to the RS232 on the LS 190 05 Conn...

Страница 51: ... Device Manager and check the COM number In the example below COM1 is available 09 Remember the COM number which you are using and then run the control software 10 Find Communication option 11 When used for the first time it is necessary to click on the button ...

Страница 52: ...hat the connection was successful and the software is ready for use Note If you switch the device off while connecting close the port and then remove and insert the USB and reconnect How to Connect Windows Control Program by USB Interface Install the Driver 01 Connect the USB cable to the PC and the LS 190 02 Switch the LS 190 on The PC will look for appropriate software 03 Install the recommended...

Страница 53: ...52 Ordercode 101600 LS 190 LED Screen Processor 05 When the installation is finished check the installed COM port in the Device Manager See the picture below ...

Страница 54: ...software and run it The interface will show 07 Select the COM as before and set the BaudRate to 115200 08 Click on the button to connect If the icon in the lower right corner turns green it means that the connection is ok Now you can use the software to control the device ...

Страница 55: ...and the frequency 50 or 60Hz 08 If you multiply all the resolution values width height frequency the result should not exceed 141557760 Example Resolution 1 1536x1536x60 141557760 OK Resolution 2 2560x1536x60 235929600 INCORRECT NOT SUPPORTED How to Perform Single Image Switching 01 Boot the default CV1 to the current input source If you need to seamlessly switch to other sources such as DVI press...

Страница 56: ...control 02 to enter 07 Turn the menu control 02 to set the image transparency The adjustment range is between 0 16 Press the menu control 02 to confirm 08 Turn the menu control 02 to select SELECT and press the menu control 02 to enter 09 Turn the menu control 02 to select IMAGE A or B alternatively press the IMAGE1 IMAGE2 button How to Set up the Size and Position of the Single Image 01 Press the...

Страница 57: ... Horizontal position The default value is 0 Set the value in the same way as H SIZE and V SIZE V POS Vertical position The default value is 0 Set the value in the same way as H SIZE and V SIZE MODE Mode option Press the menu control 02 and turn it to select SCREEN SIZE Press the menu control 02 again to confirm your choice How to Perform the Text Overlay Setting Before setting the text overlay ple...

Страница 58: ...n to adjust the size and position of VGA image then set the VGA image to the required position 08 Ensure that the VGA image overlay on the CV1 image is displayed normally and without black edges If there are black edges around the VGA image choose the ZOOM option in PICTURE menu to adjust 09 Set the text overlay mode Go to TEXT OVERLAY and turn the menu control 02 to select PRESET Press the menu c...

Страница 59: ...follows 01 Press the MENU EFFECT button to enter the menu Turn the menu control 02 to select AUDIO press the menu control 02 to confirm and turn the menu control 02 to select MUTE 02 Press the menu control 02 to enter MUTE and turn the menu control 02 and select OFF to disable the function 03 Set the VOLUME according to your preferences 04 In PIP mode choose IMAGE A or IMAGE B as audio input sourc...

Страница 60: ...d power indicators and both green signal indicators are ON when the device receives signal input 02 Choose the input signal for example DVI 03 Connect the cable to the U1 port 04 Press the MENU EFFECT button and turn the menu control 02 to choose DISPLAY CONNECTION Press the menu control 02 to enter 05 Turn the menu control 02 to select SENDING CARD NO and press the menu control 02 to enter Turn t...

Страница 61: ...n to confirm and then turn the menu control 02 to choose the desired connection mode There 8 available kinds of connection 11 Press the menu control 02 to confirm your choice and press the MENU EFFECT button to return to the previous menu 12 Turn the menu control 02 to select SEND TO RECEIVER and press the menu control 02 to save 13 Repeat the above steps for port D1 Look at the picture below for ...

Страница 62: ...elect SENDING CARD NO and press the menu control 02 to confirm Turn the menu control 02 to select NO 1 and press the menu control 02 to confirm 08 Turn the menu control 02 to select QUICK CONNECTION and press the menu control 02 to enter 09 Turn the menu control 02 to select RECEIVING CARD SET and press the menu control 02 to enter 10 Turn the menu control 02 to select CHOOSE CABLE and press the m...

Страница 63: ...s U1 D1 U2 and D2 04 Connect the D1 and U1 ports of No 1 sending card to the LED display Follow the instructions from page 61 05 Connect both ports D2 and U2 of No 2 sending card to the LED display 06 Turn the menu control 02 to select DISPLAY CONNECTION and press the menu control 02 to enter Press the menu control 02 to select SENDING CARD NO and press the menu control 02 to enter Turn the menu c...

Страница 64: ...ious menu Turn the menu control 02 to select SENDING CARD SET 11 Press the menu control 02 to enter 12 Turn the menu control 02 to select X and set it to 360 Note X VERTICAL CARD WIDTH VERTICAL CARD 3 WIDTH 120 3 x 120 360 13 Set X of the D port of No 2 sending card to 360 14 Look at the previews below ...

Страница 65: ...64 Ordercode 101600 LS 190 LED Screen Processor ...

Страница 66: ...tton to enter the menu Turn the menu control 02 to select SAVE SETUP and press the menu control 02 to select SAVE TO in order to save the parameter How to Load the Saved Parameters 01 Press the LOAD PIP2 button to enable LOAD function 02 Turn the menu control 02 to select the save slot which you would like to load 03 Press the menu control 02 to confirm 04 It is also possible to press the MENU EFF...

Страница 67: ...fety related and machine technical installations are to be inspected by a skilled person once a year The following points have to be considered during the inspection 01 All screws used for installing the device or parts of the device have to be tightly connected and must not be corroded 02 There may not be any deformations on housings fixations and installation spots 03 Mechanically moving parts l...

Страница 68: ...the right serial port and set the Baud rate to 9600 05 Select LPC2368 to load the hex file for IP board upgrading 06 Check the item below to confirm 07 Click on the START button 08 After downloading exit the program turn off the power and set the 2 DIP switches back to the up position 09 Reboot the LS 190 ...

Страница 69: ... follows 01 Connect the LS 190 to the PC 02 Start the network function MENU SYSTEM ETHERNET NETWORK select ON and check the IP address of the LS 190 Make sure that the LS 190 and the PC both use the same IP address 03 Open the website Enter the current IP address the username admin and the password DMT123 and click on OK 04 Enter the website click on Fireware Upgrade and load the page 05 Click on ...

Страница 70: ...er supply 02 All cables Please check all connections and all cables 03 If all of the above appears to be O K plug the unit in again 04 If you are unable to determine the cause of the problem do not open the LS 190 as this may damage the unit and the warranty will become void 05 Return the device to your DMT dealer No Output in LED Display 01 Confirm if there is any input signal 02 Press the MENU E...

Страница 71: ... to the up position and reboot the LS 190 Aliasstep or Shaking When the Input SDI Signal is Selected 01 Press the MENU EFFECT button and enter the menu 02 Turn the menu control 02 to select INPUT and press the menu control 02 to confirm and select SDI ADJUST 03 Turn the menu control 02 to select ANTI ALIASSTEP and select one of the available effects ANTI ALIASSTEP STEP_1 7 STEP_1 corresponds to 10...

Страница 72: ...l R G B Hsync Vsync 0 to1Vpp 3dB 0 7V Video 0 3v Sync 75 ohm Black level 300mV Sync tip 0V Supported Resolution 1024 768 60Hz 800 600 60Hz 640 480 60Hz 1280 720 60Hz 1280 800 60Hz 1280 960 60Hz 1280 1024 60Hz 1440 900 60Hz 1400 1050 60Hz 1600 1200 60Hz 1680 1050 60Hz 1920 1080 60Hz 1366 768 60Hz DVI Input Number of Outputs 1 Connector Standard DVI I socket Supported Resolution SMPTE 625 25 PAL 525...

Страница 73: ...60 812 60Hz 2560 816 60Hz VGA Output Number of Outputs 1 Connector Standard DB15 Socket Supported Resolution VESA 800 600 60Hz 1024 768 60Hz 1024 768 75Hz 1280 720 60Hz 1280 720 50Hz 1280 768 60Hz 1280 800 60Hz 1280 1024 60Hz 1360 768 60Hz 1366 768 60Hz 1400 1050 60Hz 1440 900 60Hz 1600 1200 60Hz 1680 1050 60Hz 1920 1080 60Hz 1920 1080 50Hz 1920 1200 60Hz 2048 1152 60Hz 2560 812 60Hz 2560 816 60Hz...

Страница 74: ...73 Ordercode 101600 LS 190 LED Screen Processor Dimensions ...

Страница 75: ...74 Ordercode 101600 LS 190 LED Screen Processor ...

Страница 76: ... 2016 DMT ...

Отзывы: