background image

©2013 

DJI  Innovations.  All  Rights  Reserved.     


13 

The Camera Wiring/Shutter Control 

The Camera Wiring


Z15-5D gimbal can transfer the signal from transmitter to infrared signal for shutter control, please make sure you 

connect the camera with the Z15-5D gimbal correctly and the camera settings are correct.


Step1: Connect the video transmission cable to the correct port on the camera.   

Z15-5D MARK II: To the A/V OUT port of 5D MARK II. 

Z15-5D MARK III: To the A/V OUT/DIGITAL port of 5D MARK III. 

Note: 


Make  sure  to  press  the  AF.DRIVE  button  and  set  the  drive  mode  as 

  (10-sec.self-timer/Remote 

control) or 

  (2-sec.self-timer/Remote control).


The Shutter Control


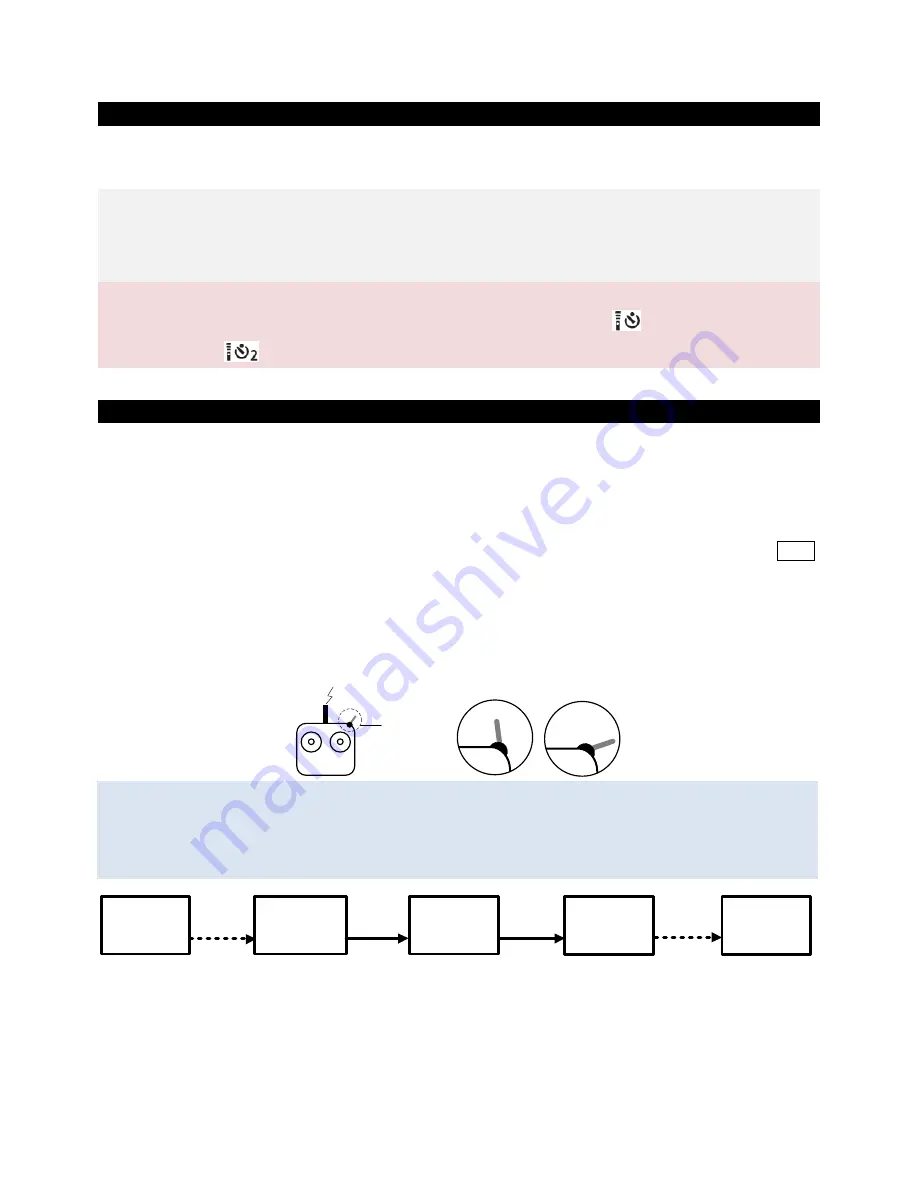
Z15-5D  gimbal  can  transfer  the  signal  from  transmitter  to  infrared  for  shutter  control,  please  set  one  2-position 

switch/channel for remote shutter control. 

Make sure the shutter control module is correctly mounted and wired. 

Whichever selection of the switch on your transmitter was set; wire the right channel of the receiver to the  SHUT 

port. One switch toggle corresponds to one photo shot. 

For example, toggle twice will result in two shot. 
Position – 1 

 Position – 2: First shot 

Position – 2 

Position – 1: Second shot 


Tips: 


The following diagram shows how the shutter control works. 


If the shutter control works abnormally, please check each step. 

TX

2-Position Switch

RC Receiver

2-Position Switch 

Channel

TX Command

GCU

SHUT

Wireless

Camera

Shutter

TX Command

Infrared 

shutter 
control 

command

3-Pins Cable

Wireless

Camera

Infrared sensor

Internal wire


Tx

1

2-Positon 

Switch

2

Содержание Zenmuse Z15-5D

Страница 1: ... 2013 DJI Innovations All Rights Reserved Zenmuse Z15 5D User Manual V1 04 2014 12 www dji com ...

Страница 2: ... and connect gimbal to your aircraft as well as to install the assistant software on your computer Please respect the AMA s National Model Aircraft Safety Code As DJI Innovations has no control over use setup final assembly modification including use of non specified DJI parts i e motors ESCs propellers etc or misuse no liability shall be assumed nor accepted for any resulting damage or injury By ...

Страница 3: ...rcraft nose direction when powered up Gimbal and Aircraft Nose Relative Angle Gimbal point keeps the same relative angle with the aircraft nose direction Relative angle between the gimbal point and aircraft nose direction may change Zero relative angle between the gimbal point and aircraft nose TX Control Controlled Controlled Not controlled Attitude stability YES YES YES Vibration Reduction YES Y...

Страница 4: ...ervo drive modules and independent IMU module Gimbal Controller Unit GCU 1 Connect the gimbal controller unit to the flight control system with a CAN Bus cable The GCU will control the gimbal s PAN ROLL and TILT axes rotation 5D Main Parts Package Lens Retaining Ring 1 For fixing the camera lens Mounting Bracket 4 For the gimbal and landing gear connection Mounting Board for Receiver 1 For fixing ...

Страница 5: ... Head cup screw 8 pin Cable Connect the GCU and Gimbal use the 8 pin cable Gimbal Video Signal Cable 1 For connecting the GCU and Wireless Video Transmission Unit transmitting the AV signal Micro USB Cable 1 For the parameter configurations and firmware upgrade via Assistant Software on PC CAN Bus Cable 1 The GCU communicates with the flight control unit via a CAN Bus DJI DJI Spares Pack Spares Pa...

Страница 6: ... 6 GIMBAL DESCRIPTION 7 CAMERA SETUP 9 MOUNT 11 CAMERA WIRING SHUTTER CONTROL 13 VIDEO SIGNAL TRANSMISSION 14 GCU CONNECTION 15 WORKING MODES AUX2 AUX3 SWITCH SETUP 17 ASSISTANT SOFTWARE 18 TEST 18 APPENDIX 20 IMPORTANT NOTES 20 PORT DESCRIPTION 21 GIMBAL LED INDICATOR 21 TROUBLE SHOOTING 22 SPECIFICATIONS 23 ...

Страница 7: ...h servo driver module has two G8 ports which are used to transmit servo and video signals Z15 5D MARK II Servo Driver Module 1 360 continuous rotation 25 90 15 Servo Driver Module 2 Servo Driver Module 3 8 pin Cable Connect the GCU and Gimbal Video Transmission Cable To the A V OUT port of 5D Mark II Lens Mount Position Damping Unit The Mounting Board for Receiver IMU Module Lens Retaining Ring s ...

Страница 8: ...er Module 2 Servo Driver Module 3 8 pin Cable Connect the GCU and Gimbal Video Transmission Cable To the A V OUT DIGITAL port of 5D Mark III Lens Mount Position Damping Unit The Mounting Board for Receiver IMU Module Lens Retaining Ring s Screw Cable Clamp ROLL TILT PAN Gimbal status Indicator 8 pin Port To the G8 port of GCU ...

Страница 9: ...peed to within 1 100sec to 1 30sec If shooting mode is set to Manual exposure please adjust the aperture properly and set the ISO speed to A Auto Tips In the Menu settings the values in red italic font are strongly recommended Failure to follow the recommended settings may results in shakey or poor footage image quality Canon 5D Mark III Mode Dial Movie Shooting Turn the Mode Dial to set the shoot...

Страница 10: ... Tips In the Menu settings the values in red italic font are strongly recommended Failure to follow the recommended settings may results in shakey or poor footage image quality The use of an SD card is preferred as a CF card may effect the balance performance of the gimbal and lead to shakey or poor footage image quality ...

Страница 11: ...e camera into the gimbal Tighten the Camera Mounting Screw first then tighten the Lens Retaining Ring Screw Note Take care when pushing the lens into the lens mount position too much force may damage the lens Mounting the Gimbal to the Landing Gear Please adhere to the dimensions of the gimbal shown below to mount the gimbal to a proper Landing Gear using the mounting brackets 4 and M2 5 8 screws ...

Страница 12: ... when mounting in order to prevent the damping unit from being stretched or distorted Keep overall balance when mounting in order to ensure the center of gravity on the Z axis The gimbal center of gravity has already been set which directly determines the gimbal s performance Please do not adjust the gimbal center of gravity by yourself The gimbal is a high precision controlled instrument Do not r...

Страница 13: ...imbal can transfer the signal from transmitter to infrared for shutter control please set one 2 position switch channel for remote shutter control Make sure the shutter control module is correctly mounted and wired Whichever selection of the switch on your transmitter was set wire the right channel of the receiver to the SHUT port One switch toggle corresponds to one photo shot For example toggle ...

Страница 14: ...module to the GCU before powering on The standard gimbal video signal cable is recommended Make sure you solder the gimbal video signal cable to the wireless video transmission module correctly Ensure the cables are insulated to prevent a short circuit Video Signal Cable AV GND Cable Please refer to the user manuals of the wireless transmitter module to supply power for it since the GCU cannot pro...

Страница 15: ...use only one battery for power supply Battery 4S 12S Make sure the ports are accessible when installing the GUC so as to facilitate wiring and software configuration In 3 pin ports pins near the nicks are the signal pins DO NOT cover the heat sinks keep them unobstructed The GCU module is NOT water proof or oil proof Wireless Video Transition Module Air End A2 WKM ACE ONE ACE Waypoint Refer to the...

Страница 16: ...t is off when non connection and disconnected 2 position switch channel Or Futaba S Bus channel AUX2 When the AUX2 is connected to a 2 position switch channel it is used for camera orientation downward or forward switch in FPV Mode Reset The camera orientation is set to forward while non connection or disconnected If a S Bus receiver is used it should be connected to the AUX2 port PPM channel AUX3...

Страница 17: ...d on Tips For the 3 position switch you may assign Position 1 to Non orientation locked Position 2 to FPV Mode Reset Position 3 to Orientation locked Position 1 and Position 3 can be reverse assigned One 2 position switch can be assigned for any two of the working modes as you like Setting the AUX2 Switch The Z15 supports controlling the camera lens downward or forward in Reset Mode Please wire th...

Страница 18: ...he assistant software Step5 Please upgrade the firmware and configure the parameters according to the assistant software indications if necessary Test Check List Before Flight Notes The gimbal is installed firmly to the landing gear and the camera is mounted correctly and stably All cables are correctly connected without any connected back to front The gimbal video signal cable is in good soldered...

Страница 19: ... and the three axes of the gimbal should be in the condition as the above diagram shows Step7 The gimbal will enter initialization at this time the three axes will rotate very slowly Step8 The gimbal is at a standstill after initialization and ready for use Step9 Toggle the Working Modes switch on your transmitter making sure it is working properly Step10 Toggle the Working Modes to the Non orient...

Страница 20: ...Doing so may result in decreased performance or even damage Do not unplug any cables which are attached to the gimbal ports or attempt to change or customize the mechanical structure Make sure the cable connections are correct and secure to ensure the gimbal works normally and is in full control Make sure to connect the Wireless Video Transmission module to the gimbal controller before powering on...

Страница 21: ...mission module transmitting the AV signal XT60 To the battery G8 To the gimbal transmitting video signal Micro USB port PC connection for configuration and firmware upgrades CAN Bus port Use CAN Bus to connect the GCU to the flight control system The Gimbal Video Transmission cable port To the AV port of Camera 8 Pin Cable Port To the G8 port of GCU The Gimbal LED Indicator LED Indicator Descripti...

Страница 22: ...g direction is aligned with the aircraft nose 2 The gimbal is abnormal after initializing Abnormal calibration after manufacture Please contact the local dealer or DJI Innovations customer service 3 Cannot distinguish the gimbal direction when in use BVR flight Switch to the FPV Mode first then to another Working Mode needed 4 The gimbal green LED is on but without video display 1 The wireless vid...

Страница 23: ... GCU Input Power 4S 12S LiPo Battery Control Requirement Four spare receiver channels at least Assistant Software System Requirement Windows XP SP3 Windows 7 Windows 8 32 or 64 bit Mechanical Electrical Characteristics Working Current Static current 200mA 25V Dynamic current 400mA 25V Locked rotor current 4A 25V Operating Temperature 10 C 50 C Weight 1 42Kg Dimensions 204mm 242mm 264mm GCU Weight ...

Страница 24: ... 2013 DJI Innovations All Rights Reserved 24 Tilt axis 130 s Roll axis 30 s Controlled Rotation Range Pan axis control 360 continuous rotation Tilt axis control From 90 to 15 Roll axis control 25 ...

Отзывы: