background image

Remote Controller

©

 2016 DJI. All Rights Reserved. 


31

Phantom 4


User Manual


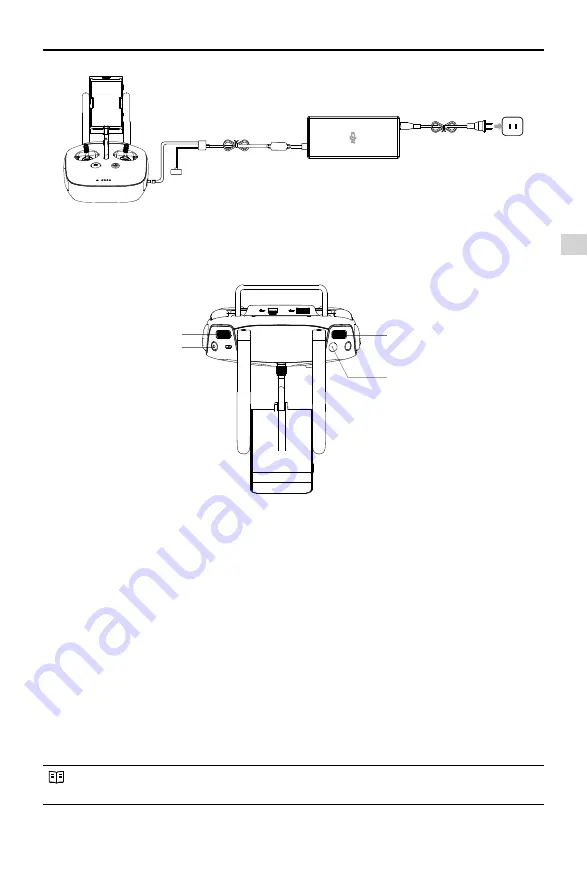
Charger

Power Outlet

Power Button

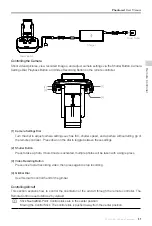
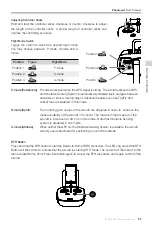
Controlling the Camera

Shoot videos/pictures, view recorded images, and adjust camera settings via the Shutter Button, Camera 

Settings Dial, Playback Button, and Video Recording Button on the remote controller.

[1]  Camera Settings Dial

Turn the dial to adjust camera settings such as ISO, shutter speed, and aperture without letting go of 

the remote controller.  Press down on the dial to toggle between these settings.

[2]  Shutter Button

Press to take a photo. If burst mode is activated, multiple photos will be taken with a single press.

[3]  Video Recoding Button

Press once to start recording video, then press again to stop recording. 

[4]  Gimbal Dial

Use this dial to control the tilt of the gimbal. 

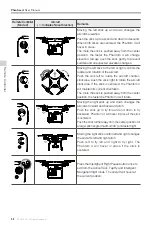
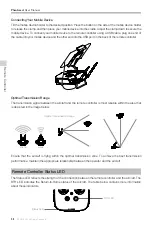
Controlling Aircraft 

This section explains how to control the orientation of the aircraft through the remote controller. The 

Remote Control is set to Mode 2 by default. 

Stick Neutral/Mid-Point: Control sticks are in the center position. 

Moving the Control Stick: The control stick is pushed away from the center position.

[1]

[2]

[3]

[4]

Содержание PHANTOM 4

Страница 1: ...PHANTOM 4 V1 0 2016 03 User Manual ...

Страница 2: ...e tutorial videos at the link below which demonstrates how to use Phantom 4 safely http www dji com product phantom 4 video Download the DJI GO app Download and install the DJI GO app before using the aircraft Scan the QR code to the right to download the latest version The Android version of the DJI GO app is compatible with Android 4 1 2 or later The iOS version of the DJI GO app is compatible w...

Страница 3: ...tatus Indicator 12 Return to Home RTH 13 Smart RTH 13 Low Battery RTH 13 Failsafe RTH 14 Obstacle Avoidance During FailSafe RTH 16 TapFly 16 ActiveTrack 18 Obstalce and Vision Positioning System 20 Detection Range 21 Calibrating Front Sensors 21 Flight Recorder 22 Attaching and Detaching the Propellers 23 DJI Intelligent Flight Battery 24 Remote Controller Remote Controller Profile 30 Using the Re...

Страница 4: ... Flight Flight Environment Requirements 47 Flight Limits and No Fly Zones 47 Preflight Checklist 51 Calibrating the Compass 51 Auto Takeoff and Auto Landing 52 Starting Stopping the Motors 53 Flight Test 53 FAQ Appendix Specifications 60 Firmwares Update 62 Intelligent Flight Mode 62 After Sales Information 63 FCC Compliance 63 ...

Страница 5: ... 2016 DJI All Rights Reserved 5 Product Profile This section introduces the Phantom 4 and lists the components of the aircraft and remote controller ...

Страница 6: ...previous flying camera HD Video Downlink The low latency long range up to 5 km HD downlink is powered by an enhanced version of DJI Lightbridge DJI Intelligent Flight Battery The new 5350 mAh DJI Intelligent Flight Battery features upgraded battery cells and an advanced power management system to provide flight at up to around 28 minutes Flight Controller The next generation flight controller has ...

Страница 7: ...as so they are facing outward 1 Press the button on the top right side of the mobile device holder to release the clamp then adjust the clamp to fit the size of your mobile device 2 Secure your mobile device in the clamp by pressing down and connect your mobile device to the remote controller using a USB cable 3 Plug one end of the cable into the mobile device and the other end into the USB port o...

Страница 8: ...ick Controls the orientation and movement of the aircraft 4 Return Home RTH Button Press and hold the button to initiate Return to Home RTH 1 2 4 5 6 7 8 3 1 GPS 2 Propeller 3 Motor 4 Front LED Indicator 5 Gimbal and Camera 6 Obstacle Sensing System 7 Intelligent Flight Battery 8 Aircraft Status Indicator 9 Camera Linking Status Indicator and Link Button 10 Micro USB Port 11 Camera Micro SD Card S...

Страница 9: ...e Button Press once to allow the aircraft to eixt from TapFly ActiveTrack and Advanced mode 11 Shutter Button Press to take a photo If burst mode is selected the set number of photos will be taken with one press 12 Flight Mode Switch Switch between P mode S mode and A mode 13 Video Recording Button Press to start recording video Press again to stop recording 14 Gimbal Dial Use this dial to control...

Страница 10: ...10 2016 DJI All Rights Reserved Aircraft This section introduces the features of the Flight Controller Vision Positioning System and the Intelligent Flight Battery ...

Страница 11: ...um flight speed of the aircraft is increased to 20 m s in this mode Note that Obstacle Sensing system is disabled in this mode A mode Attitude When neither the GPS nor the Obstacle Sensing System is available the aircraft will only use its barometer for positioning to control the altitude The Obstacle Sensing System is disabled in S mode Sport which means the aircraft will not be able to automatic...

Страница 12: ...Status Indicator Aircraft Status Indicator Description Normal Red Green and Yellow Flash Alternatively Turning On and Self Diagnostic Testing Green and Yellow Flash Alternatively Warming Up Green Flashes Slowly Safe to Fly P mode or S mode with GPS Vision Positioning and Obstacle Sensing X2 Green Flashes Twice Safe to Fly P mode or S mode with GPS Vision Positioning and Obstacle Sensing Yellow Fla...

Страница 13: ... Height over HP 20m 5 RTH adjustable altitude Fast Blinking Yellow 1 Record Home Point Blinking Green 3 Remote Controller Signal Lost Fast Blinking Yellow 2 Confirming Home Point Blinking Green 6 Landing after hovering for 5 secs Fast Blinking Yellow 4 Signal Lost Lasts after 3 sec Fast Blinking Yellow Height over HP 20m Elevate to 20m 20m 3S Aircraft cannot return to the Home Point when GPS signa...

Страница 14: ... RTH button on the remote controller The thresholds for these warnings are automatically determined based on the aircraft s current altitude and distance from the Home Point The aircraft will land automatically if the current battery level can only support the aircraft long enough to descend from its current altitude The user can still use the remote controller to alter the aircraft s orientation ...

Страница 15: ...t is important to set an suitable Failsafe altitude before each flight Launch the DJI GO app and enter Camera and select MODE Advanced Settings Failsafe mode to set the Failsafe altitude 20 m 20 m H If the aircraft is flying under 20 meters 65 feet and Failsafe including Smart RTH Lower Battery RTH is triggered the aircraft will first automatically ascend to 20 meters 65 feet from the current alti...

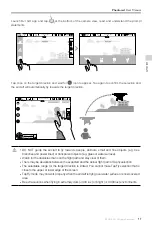
Страница 16: ...e Point at the current altitude TapFly Introduction With the TapFly feature use now can tap on the mobile device screen to guide the aircraft to fly toward the designated direction without using the remote controller Aircraft can automatically avoid obstacle or initiate break and then hover automatically during the flight provided that the lighting is not too dark 300 lux nor too bright 10 000 lux...

Страница 17: ...ch for the obstacles that is on the flight path and stay clear of them There may be deviations between the expected and the actual flight path of Tapfly selection The selectable range for the target direction is limited You cannot make TapFly selection that is close to the upper or lower edge of the screen TapFly mode may not work properly when the aircraft is flying over water surface or snow cov...

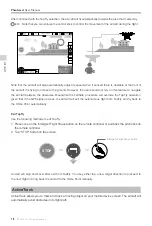
Страница 18: ...tacles Meanwhile the FailSafe procedure will override the TapFly operation given that if the GPS signal is week the aircraft will exit the autonomous flight from TapFly and fly back to the Home Point automatically Exit TapFly Use the following methods to exit TapFly 1 Press once on the Intelligent Flight Pause button on the remote controller or pull back the pitch stick on the remote controller 2 ...

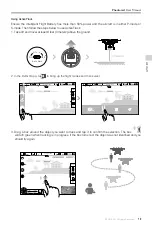
Страница 19: ...rs ON OFF Auto Hold 2 In the DJI GO app tap to bring up the flight modes and then select 3 Drag a box around the object you want to track and tap it to confirm the selection The box will turn green when tracking is in progress If the box turns red the object was not identified and you should try again ACTMETRACK SMART OPTI OPTI MENU Safe to Fly GPS Safe to Fly GPS TapFly Smart ActiveTrack Normal 1...

Страница 20: ...rcraft loses track of the subject because it is moving too fast or obscured re select the subject to resume tracking Exiting ActiveTrack There are two ways to exit ActiveTrack 1 Press the Intelligent Flight Pause button on the remote controller 2 Pull the pitch stick backward After exiting ActiveTrack the aircraft will stop and hover in place at which point you may choose to start a new mission or...

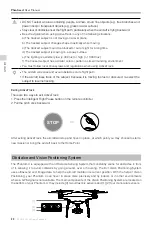
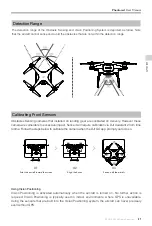
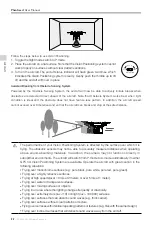
Страница 21: ...w to calibrate the camera when the DJI GO app prompt you to do so Detection Range The detection range of the Obstacle Sensing and Vision Positioning System is depicted as follow Note that the aircraft cannot sense and avoid the obstacles that are not within the detection range Using Vision Positioning Vision Positioning is activated automatically when the aircraft is turned on No further action is...

Страница 22: ...n in the following situations Flying over monochrome surfaces e g pure black pure white pure red pure green Flying over a highly reflective surfaces Flying at high speeds over 10 m s at 2 meters or over 5 m s at 1 meter Flying over water or transparent surfaces Flying over moving surfaces or objects Flying in an area where the lighting changes frequently or drastically Flying over extremely dark l...

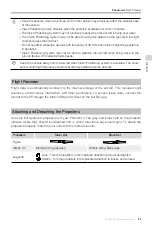
Страница 23: ...opellers in the indicated direction to mount and tighten Unlock Turn the propellers in the indicated direction to loosen and remove Keep the sensors clean at all times Dirt or other debris may adversely affect the effectiveness of the sensors Vision Positioning is only effective when the aircraft is at altitudes of 0 3 to 10 meters The Vision Positioning System may not function properly when the a...

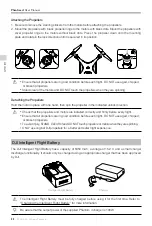
Страница 24: ... safer flight experience Attaching the Propellers 1 Be sure to remove the warning stickers from the motors before attaching the propellers 2 Mount the propellers with black propeller rings to the motors with black dots Mount the propellers with sliver propeller rings to the motors without black dots Press t he propeller down onto the mounting plate and rotate in the lock direction until it is secu...

Страница 25: ... 9 Short Circuit Protection Automatically cuts the power supply when a short circuit is detected 10 Battery Cell Damage Protection The DJI GO app displays a warning message when a damaged battery cell is detected 11 Battery Error History Browse the battery error history in the DJI GO app 12 Sleep Mode To save power the battery enters sleep mode after 20 minutes of inactivity 13 Communication Infor...

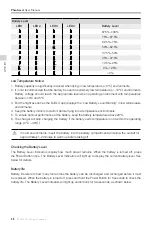
Страница 26: ...battery if the battery cell s temperature is not within the operating range 0 C 40 C In cold environments insert the battery into the battery compartment and allow the aircraft for approximately 1 2 minutes to warm up before taking off Checking the Battery Level The Battery Level Indicators display how much power remains When the battery is turned off press the Power Button once The Battery Level ...

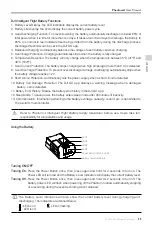
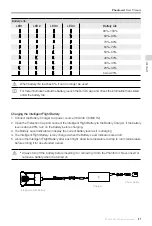
Страница 27: ...g 4 The Intelligent Flight Battery is fully charged when the Battery Level Indicators are all off 5 Air cool the Intelligent Flight Battery after each flight Allow its temperature to drop to room temperature before storing it for an extended period Always turn off the battery before inserting it or removing it from the Phantom 4 Never insert or remove a battery when it is turned on Battery Life LE...

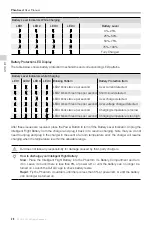
Страница 28: ...cond Charging temperature is too high After these issues are resolved press the Power Button to turn off the Battery Level Indicator Unplug the Intelligent Flight Battery from the charger and plug it back in to resume charging Note that you do not need to unplug and plug in the charger in the event of a room temperature error the charger will resume charging when the temperature is within the allo...

Страница 29: ... 2016 DJI All Rights Reserved 29 Remote Controller This section describes the features of the remote controller and includes instructions for controlling the aircraft and the camera ...

Страница 30: ...rottle To prevent transmission interference do not operate more than three aircrafts in the same area Using the Remote Controller Turning the Remote Controller On and Off The Phantom 4 remote controller is powered by a 2S rechargeable battery that has a capacity of 6000 mAh The battery level is indicated via the Battery Level LEDs on the front panel Follow the steps below to turn on your remote co...

Страница 31: ...er Press down on the dial to toggle between these settings 2 Shutter Button Press to take a photo If burst mode is activated multiple photos will be taken with a single press 3 Video Recoding Button Press once to start recording video then press again to stop recording 4 Gimbal Dial Use this dial to control the tilt of the gimbal Controlling Aircraft This section explains how to control the orient...

Страница 32: ...t to rotate the aircraft clockwise If the stick is centered the Phantom 4 will maintain its current orientation The more the stick is pushed away from the center position the faster the Phantom 4 will rotate Moving the right stick up and down changes the aircraft s forward and backward pitch Push the stick up to fly forward and down to fly backward Phantom 4 will hover in place if the stick is cen...

Страница 33: ...uverability of the aircraft in S mode The maximum flight speed of the aircraft is increased to 20 m s in this mode Note that Obstacle Sensing system is disabled in this mode A mode Attitude When neither the GPS nor the Obstacle Sensing System is available the aircraft will only use its barometer for positioning to control the altitude RTH Button Press and hold the RTH button to start the Return to...

Страница 34: ...k of the remote controller Optimal Transmission Range The transmission signal between the aircraft and the remote controller is most reliable within the area that is depicted in the image below Optimal Transmission Range Ensure that the aircraft is flying within the optimal transmission zone To achieve the best transmission performance maintain the appropriate relationship between the operator and...

Страница 35: ... will blink red and sound an alert when the battery level is critically low Linking the Remote Controller The remote controller is linked to your aircraft before delivery Linking is only required when using a new remote controller for the first time Follow these steps to link a new remote controller 1 Turn on the remote controller and connect to the mobile device Launch the DJI GO app 2 Turn on th...

Страница 36: ... is controlled Do not change unless familiar with your new mode You can customize the C1 and C2 buttons on the back of the RC RC Control Setting Linking RC Searching for aircraft frequency timeout in 54 seconds Cancel Press the linking button on the aircraft to link this remote controller 5 Locate the linking button on the side of the aircraft as shown in the figure below Press the link button to ...

Страница 37: ... 2016 DJI All Rights Reserved 37 Camera and Gimbal This section provides the technical specifications of the camera and explains the gimbal s operation modes ...

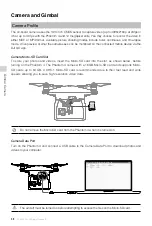
Страница 38: ...ia the DJI GO app Camera Micro SD Card Slot To store your photos and videos insert the Micro SD card into the slot as shown below before turning on the Phantom 4 The Phantom 4 comes with a 16 GB Micro SD card and supports Micro SD cards up to 64 GB A UHS 1 Micro SD card is recommended due to their fast read and write speeds allowing you to save high resolution video data Do not remove the Micro SD...

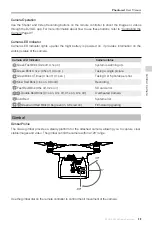
Страница 39: ...nk 0 2s off 0 1s on System is warming up Green Blink Once 0 5s off 0 4s on Taking a single picture Green Blink 3 Times 0 3s off 0 1s on Taking 3 or 5 photos per shot Slow Red Blink 1 6s on 0 8s off Recording Fast Red Blink 0 5s off 0 2s on SD card error Double Red Blink 0 1s on 0 1s off 0 1s on 0 1s off Overheated Camera Solid Red System error Green and Red Blink 0 8s green on 0 8s red on Firmware...

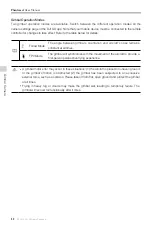
Страница 40: ...ion and aircraft s nose remains constant at all times FPV Mode The gimbal will synchronize with the movement of the aircraft to provide a first person perspective flying experience A gimbal motor error may occur in these situations 1 the aircraft is placed on uneven ground or the gimbal s motion is obstructed 2 the gimbal has been subjected to an excessive external force such as a collision Please...

Страница 41: ... 2016 DJI All Rights Reserved 41 DJI GO app This section introduces the four main functions of the DJI GO app ...

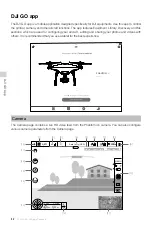
Страница 42: ...os and videos with others It is recommended that you use a tablet for the best experience Camera The Camera page contains a live HD video feed from the Phantom 4 s camera You can also configure various camera parameters from the Camera page Connect your Aircraft Take to the Skies iPad Equipment Library Discorvery Me Learn More Use AEB shoot to get more dynanic image Enter Camera View 80 PHANTOM 4 ...

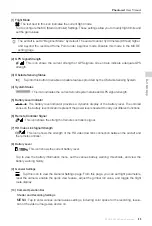
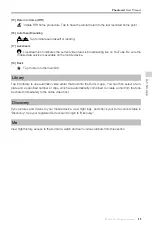
Страница 43: ...he battery level indicator provides a dynamic display of the battery level The colored zones on the battery level indicator represent the power levels needed to carry out different functions 6 Remote Controller Signal This icon shows the strength of remote controller s signal 7 HD Video Link Signal Strength This icon shows the strength of the HD video downlink connection between the aircraft and t...

Страница 44: ... the current flight Tap to switch from the Camera GUI to the Map GUI 12 Vision Positioning The distance of the aircraft from the Home Point When the aircraft is near the ground this icon will change to to display the height the Vision Position System s sensors from the ground 13 Flight Telemetry The Vision Positioning Status icon is highlighted when the Vision Positioning is in operation Flight at...

Страница 45: ...e mobile device 18 Back Tap to return to the main GUI Library Tap into library to use automatic video editor that built into the DJI GO app You can then select a tem plate and a specified number of clips which are automatically combined to create a short film that can be shared immediately to the online video host Discovery Sync pictures and videos to your mobile device view flight logs and check ...

Страница 46: ...46 2016 DJI All Rights Reserved Flight This section describes safe flight practices and flight restrictions ...

Страница 47: ... feet 6000 meters above sea level as the performance of the battery and aircraft may be affected 6 The Phantom 4 cannot operate within the polar areas Flight Limits and No Fly Zones All unmanned aerial vehicle UAV operators should abide by all regulations set forth by government and regulatory agencies including the ICAO and the FAA For safety reasons flights are limited by default which helps use...

Страница 48: ...en countries or sensitive institute The details of the No Fly Zones are explained as follow Airport 1 Airport No Fly Zone are comprised of Take off Restricted zones and Restricted Altitude Zones Each zone features circles of various sizes 2 R1 miles value of the R1 depends on the size and shape of the airport around the airport is a Take off restricted zone inside of which take off is prevented 3 ...

Страница 49: ... off Restricted area Aircraft cannot take off within this zone The value of R varies based on the definition of the restricted areas 3 A warning zone has been set around the Restricted Area When the aircraft approaches within 0 062 miles 100 m of this zone a warning message will appear on the DJI GO app R1 66 feet 1 mile 320 feet R2 1640 feet 100m R R1 66 feet 1 mile 320 feet R2 1640 feet 100 m R ...

Страница 50: ...scending to safe altitude R2 Warning You are in a restricted zone Maximum flight altitude is restricted to between 20m and 500m Fly cautiously Warning zone No flight restriction applies but there will be a warning Warning You are approaching a restricted zone Fly cautiously Free zone No restrictions None None Semi automatic descent All stick commands are available except the throttle stick command...

Страница 51: ...optimal performance Do not calibrate your compass where there is any possibility of strong magnetic interference Sources of potential interference include magnetite parking structures and subterranean metal structures Do not carry ferromagnetic materials with you during calibration such as keys or cellular phones Do not calibrate in direct proximity to large metal objects DO NOT calibrate indoors ...

Страница 52: ...cation or in a location that is different from the most recent flight 3 When the mechanical or physical structure of the Phantom 4 has been changed 4 When severe drifting occurs in flight i e Phantom 4 does not fly in straight line Auto Takeoff and Auto Landing Auto Takeoff Use auto takeoff only if the Aircraft Status Indicators are blinking green Follow the steps below to use the auto takeoff fea...

Страница 53: ...rst then the Remote Controller Stopping the Motors There are two methods to stop the motors Method 1 When Phantom 4 has landed push the throttle down then conduct the same CSC that was used to start the motors as described above Motors will stop immediately Release both sticks once motors stop Method 2 When the aircraft has landed push and hold the throttle down The motors will stop after three se...

Страница 54: ...ht information Video Suggestions and Tips 1 Go through the full pre flight checklist before each flight 2 Select the desired gimbal operation mode in the DJI GO app 3 Only shoot video when flying in P mode 4 Always fly in good weather and avoid flying in rain or heavy wind 5 Choose the camera settings that suit your needs Settings include photo format and exposure compensation 6 Perform flight tes...

Страница 55: ... 2016 DJI All Rights Reserved 55 FAQ ...

Страница 56: ... to the Phantom 4 remote The Phantom 4 introduces a Sport mode accessible through a new trio of modes P S and A P Position mode is the standard mode giving access to normal flight as well as Intelligent Flight Modes ActiveTrack and TapFly S Sport Mode unlocks maximum flight speeds of up to 44mph 72kmh A Attitude Mode remains the same and removes satellite stabilization in flight It allows the Phan...

Страница 57: ... it closer to the aircraft s center of gravity It is also made of a rigid and strong composite material What makes the Phantom 4 camera better The Phantom 4 camera has been improved in terms of image quality Chromatic aberration has been reduced by 56 and lens distortion had been reduced by 36 compared to Phantom 3 Professional In addition to lens improvements camera firmware has been tweaked to e...

Страница 58: ...sitioning System to achieve precision while hovering In ATTI Mode GPS and Vision Positioning System will not function to aid the aircraft in terms of hovering or navigation In ActiveTrack how do you untrack the subject What happens to the aircraft after you stop tracking Tap the Stop button on the left of the screen or pull the pitch stick backward for 3 seconds to exit ActiveTrack After exiting t...

Страница 59: ... 2016 DJI All Rights Reserved 59 Appendix ...

Страница 60: ...dequate lighting lux 15 Vision Positioning System Velocity Range 10 m s 2 m above ground Altitude Range 0 33 feet 0 10 m Operating Range 0 33 feet 0 10 m Operating Environment Surfaces with a clear pattern and adequate lighting lux 15 Camera Sensor 1 2 3 Effective pixels 12 M Lens FOV Field Of View 94 20 mm 35 mm format equivalent f 2 8 focus at ISO Range 100 3200 video 100 1600 photo Electronic S...

Страница 61: ...attery Type LiPo 4S Energy 81 3 Wh Net Weight 462 g Operating Temperature 14 to 104 F 10 to 40 C Max Charging Power 100 W Aircraft Status Indicator Description Normal Red Green and Yellow Flash Alternatively Turning on and Self Diagnostics Green and Yellow Flash Alternatively Aircraft Warming Up Green Flashes Slowly Safe to Fly P mode with GPS and Vision Positioning X2 Green Flashes Twice Safe to ...

Страница 62: ...locked directions regardless of its orientation yaw angle Home Lock Pull the pitch stick backward to move the aircraft toward its recorderd Home Point Point of Interest The aircraft will orbit around the subject automatically to allow the operator can be more focus on framing their shoot on the subject in Point of Interest Follow Me A virtual tether is created between the aircraft and the mobile d...

Страница 63: ...ding interference that may cause undesired operation FCC Radiation Exposure Statement This equipment complies with FCC radiation exposure limits set forth for an uncontrolled environment This equipment should be installed and operated with minimum distance 20cm between the radiator your body This transmitter must not be co located or operating in conjunction with any other antenna or transmitter N...

Страница 64: ...illage est susceptible d en compromettre le fonctionnement IC Radiation Exposure Statement This equipment complies with IC RF radiation exposure limits set forth for an uncontrolled environment This transmitter must not be co located or operating in conjunction with any other antenna or transmitter This equipment should be installed and operated with minimum distance 20cm between the radiator your...

Страница 65: ...ntent is subject to change Download the latest version from http www dji com product phantom 3 If you have any questions about this document please contact DJI by sending a message to DocSupport dji com DJI Support http www dji com support ...

Отзывы: