Page 57
Installing a DISH 500 Antenna
•
Make sure the skew angle you wrote down on page 51 is exactly the
same as the skew angle you set in step 5 on page 53. If it is not, reset the
skew angle as described on page 53. After you reset the skew angle, go
back page 55 and start over from step 16.
•
If “119” is shown under
Dish Input 2
, move the dish approximately 9°
to the east and restart the procedure at step 12.
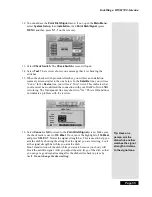
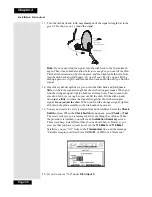
21. Look at the
Point Dish/Signal
menu. If you have good signal strength
with the check mark in
119 West
, move the check mark to
110 West
. If
you have good signal strength on
110 West
, go to step 22.
If you do not have good signal strength with the check mark in
110 West
,
go back to Step 17, and fine-tune the dish but with the check mark in
110
West
instead of
119 West
. While the 110 West and 119 West signals will
not be equal, you should be able to fine-tune the dish until you have the
strongest possible signal from both satellites.
22. Select Cancel to exit the
Point Dish/Signal
menu. An Attention screen
will open asking the mounting and positioning of your dish is complete with
a “Locked” indication in the Point Dish/Signals screen. If the answer is yes,
select
Yes
.
If the answer is
No,
you will need to repoint your dish following the
preceding steps until the mounting and positioning is complete and you do
have the “Locked” indication.
23. After you select
Yes
, the receiver will begin taking a software upgrade. You
will see a
Warning
that “Vital program information will now be
downloaded into your receiver.” You will also see a status bar showing the
progress of this upgrade.
24. Once the software upgrade is complete, you will see a message that your
receiver’s memory is being upgraded.
Do not disturb the receiver while the receiver’s memory is being upgraded.
Note
: If you are installing other DishPro receivers, be sure to run
Check
Switch
on all of them, and allow them to take the necessary software
upgrade.
25. When the memory has been upgraded, your installation is complete.
Содержание DP111
Страница 21: ...Page 16 Chapter 2 Parts of the System Notes...
Страница 75: ...Page 70 Chapter 4 Installation Instructions Notes...
Страница 104: ...Page 99 Index Notes...
Страница 105: ...Index Page 100 Notes...


