EN-1
FD 9711
English
KNX WPM
1 Installation
To prevent damage to electrical components, at least the follow-
ing precautions must be taken:
Before handling the components, touch an earthed object. It
is not sufficient to avoid touching the dangerous compo-
nents, as static electricity can result in voltage peaks of up to
10 kV and electric arcs of around 1 cm.
All materials must be stored in their original packaging for as
long as possible. If necessary, remove the PCB from the
packaging and place it in an anti-static packaging. Do not
touch the equipped side of the PCB!
Do not use static plastic bags, polystyrene or packaging
foam.
To avoid electro-static induction and discharge, the PCB
must not be passed directly from one user to the next.
The heat pump manager (HPM) must be disconnected from the
power supply / de-energised before the KNX extension can be in-
stalled.
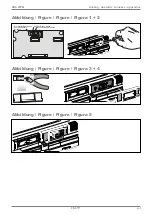
1) Remove the "Serial Card/BMS Card" cover using a screw-
driver (see figure 2);
2) Remove the pre-punched cut-out on the cover using angled
tongs to free the opening for the 2-pin plug (see Figure 3);
3) Install the KNX expansion in the designated slot; ensure that
the KNX expansion is seated correctly (see Figure 4);
ATTENTION!
!!
The installation of the KNX expansion and the plug can prove difficult due
to the small amount of space available and the two plastic overlays; the
circuit board should be inserted diagonally and turned until the plug is in
the correct position.
4) Close the cover. Ensure that the plug is fed through the
opening in the cover (see figure 5).
2 Settings
For the communication between the KNX expansion and the
heat pump manager, settings must be made depending on the
software version.
3 Meaning of the LEDs
4 Configuration
The DCA (Device Configuration Apps) device for integration in
the ETS can be loaded under www.knx.org. Further information
and a detailed description of the configuration for the KNX ex-
pansion can be found under www.dimplex.de/wiki.
5 Technical data
Software ver-
sion
Menu
Submenu
Set value
from WPM_H
Modem: select with key com-
bination MENU and ENTER
Protocol
Modbus
Baud rate
9600
Address
001
from WPM_L
Network: select with the
MENU key
Protocol
EIB/KNX
from
WPM_L20.2
Network: select with the
MENU key
Protocol
EIB/KNX
Address range 1 to 127
from
WPM_L23.1
Network: select with the
MENU key
Protocol
EIB/KNX
Address range 1 to 207
LED
Meaning
Error / solution
Red
Lit
No communication between
the KNX expansion and the
heat pump manager.
Configuration:
- Heat pump manager
address incorrect
- Heat pump manger baud
Green Lit
The key for assigning the
address was pressed and the
KNX expansion is waiting for
the physical address of the
ETS to be assigned.
Quickly
flashing
The configuration was not
loaded.
Configuration via the ETS
must be loaded
Slowly
flashing
The configuration is loaded
from the ETS.
The configuration is loaded
from the ETS.
Green
+ red
Both lit
No power supply from the KNX
bus.
Check:
• Check the power supply of
the KNX bus,
• check electrical connection,
• check po/- of the
connection.
Both
flashing
The firmware of the KNX
expansion is updated.
Power supply
12 to 33 V from the control panel
Consumption: 300 mW
BUS power supply
21 to 32 V Consumption: 5 mA
BUS
TP1 9600 Baud
Screw terminals
Wire cross-section min. 0.2 to max. 1.5 mm
2
;
YCYM 1 x 2 x 0.8 mm
2
Insulation
TP bus optically isolated from the earthing of
the controller (function isolation)
Degree of protection
IP00
Operating conditions
-20 to 60 °C, <85% rel. humidity
Non-condensing
Storage conditions
-20 to 80 °C, <85% rel. humidity
Non-condensing
Degree of soiling
2
Heat and fire resistance class
Like heat pump manager
PTI of the insulating material
PTI<175
Software class and structure
A
Duration of the electrical load
of the insulating parts
long
Protection against
electric shock
The device only guarantees a function isola-
tion between the power supply of the control-
ler and the serial bus, meaning that the
controller on which the KNX expansion is
installed must be supplied via a SELV source
Can be used
from heat pump manager WPM 2006 with
software version from H50, ETS5


