


9
LIGHT HARNESS REPLACEMENT
Tools Required:
Philips Head Screwdriver
Needle Nose Pliers
Wire Cutters
CAUTION:
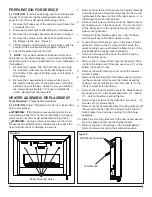
Follow “Preparation for Service” instructions
before proceeding.
WARNING:
If the fireplace was operating prior to ser
-
vicing allow at least 10 minutes for light bulbs and heating
elements to cool off to avoid accidental burning of skin.
WARNING:
Unplug or disconnect power at the circuit
breaker before attempting any maintenance to reduce the
risk of electric shock or damage to persons.
Carefully turn the fireplace back over, onto it’s back
1.
with the switches and bottom closest to you.
Locate the switch-housing cover on the lower, interior
2.
right side. Remove the 2 screws, which secure the
upper housing cover, just below the flame motor, to the
electrical/switch-housing cover beneath it.
Remove 3 screws which secure the switch housing
3.
from the bottom panel
Remove the screw, which secures the switch housing
4.
from the lower part of the side panel, and the one on
the bottom, front right corner.
Remove the switch housing cover out of the chassis
5.
and set it aside.
Remove the flicker rod from the flicker assembly by
6.
pulling and twisting the rubber gasket piece on the rod
away from the flame motor.
With needle nose pliers, gently grasp the plastic bush-
7.
ing on the center flicker rod bracket; slightly squeeze
and turn it ¼ turn to release it out of the bracket.
Slide the rod out of the plastic bushing in the left brack-
8.
et. Take care to keep the rod as straight as possible so
that it won’t rub against the casing when in operation.
Remove the 4 screws on the flicker mounting bracket
9.
that secure the light housing.
Guide the light housing forward and upward to release
10.
it from below the reflective flame panels on the back.
Carefully rest it inside on the rear flame panels.
!
NOTE:
It is recommended to protect the rear flame
panels from scratches prior to resting the light housing on
them using cloth or piece of cardboard.
Remove the 12 screws, which secure the light block
11.
(housing lid) to the rest of the light housing.
Remove the 3 screws, which secure the wire-harness
12.
channel cover to the light block, (housing lid).
Remove the bulbs by turning them counter clockwise.
13.
Remove the screws rings on each socket to release the
14.
socket from the light housing.
With needle nose pliers, slightly bend the flanges that
15.
are holding the wire harness in the channel. Bend
them just enough to feed the wires out of the channel.
Remove the 2 screws that are securing the wire har-
16.
ness to the relative terminal on the terminal block,
located in the switch housing area of the fireplace.
!
NOTE:
Be sure to note the original configuration of
the wires on the terminal block.
Pull the original wire harness out through the protective
17.
sheath and the opening in the upper electrical housing
cover just below the flicker motor.
Feed the new sockets into the mounting panel and
18.
secure with the socket rings.
Replace wires into their original location following their
19.
original configuration.
Re-assemble the firebox in reverse order.
20.
SWITCH REPLACEMENT (MAIN
POWER OR HEAT ON/OFF)
Tools Required:
Phillips Head Screwdriver
Needle Nose Pliers
CAUTION:
Follow “Preparation for Service” instructions
before proceeding.
WARNING:
If the fireplace was operating prior to ser
-
vicing allow at least 10 minutes for light bulbs and heating
elements to cool off to avoid accidental burning of skin.
WARNING:
Unplug or disconnect power at the circuit
breaker before attempting any maintenance to reduce the
risk of electric shock or damage to persons.
Carefully turn the fireplace back over, onto it’s back
1.
with the switches and bottom closest to you.
Locate the switch-housing cover on the lower, interior
2.
right side. Remove the 2 screws, which secure the
upper housing cover, just below the flame motor, to the
electrical/switch-housing cover beneath it.
Remove 3 screws which secure the switch housing
3.
from the bottom panel
Remove (1) screw, which secures the switch housing
4.
from the lower part of the side panel, and (1) on the
bottom, front right corner.
Remove the switch housing cover out of the chassis
5.
and set it aside.
Taking note of the original location of each wire con-
6.
nected to the switch that needs replacing, (either the
Main ON/OFF or the Heat ON/OFF switch) remove the
wires.
!
NOTE:
Using a flat head screwdriver gently pry be
-
tween the end of the connector and the switch to release
the wires.
Noting the orientation of the switches - the markings
7.
on the face, depress the tabs that secure the switch to
the housing from behind the panel and push the switch
out to the front. Using needle nosed pliers will give you
a better grip and fit to depress both these tabs at the
same time.
Push the new switch in place, ensuring that both tabs
8.
are engaged.
Re-assemble in reverse order as described above.
9.
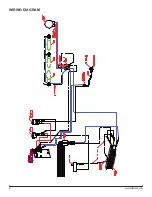
Содержание EWF-SS
Страница 6: ...6 www dimplex com Wiring Diagram...


