Digisol DH-bg1100n Скачать руководство пользователя страница 45


                 DG-BG1100N User Manual 


45


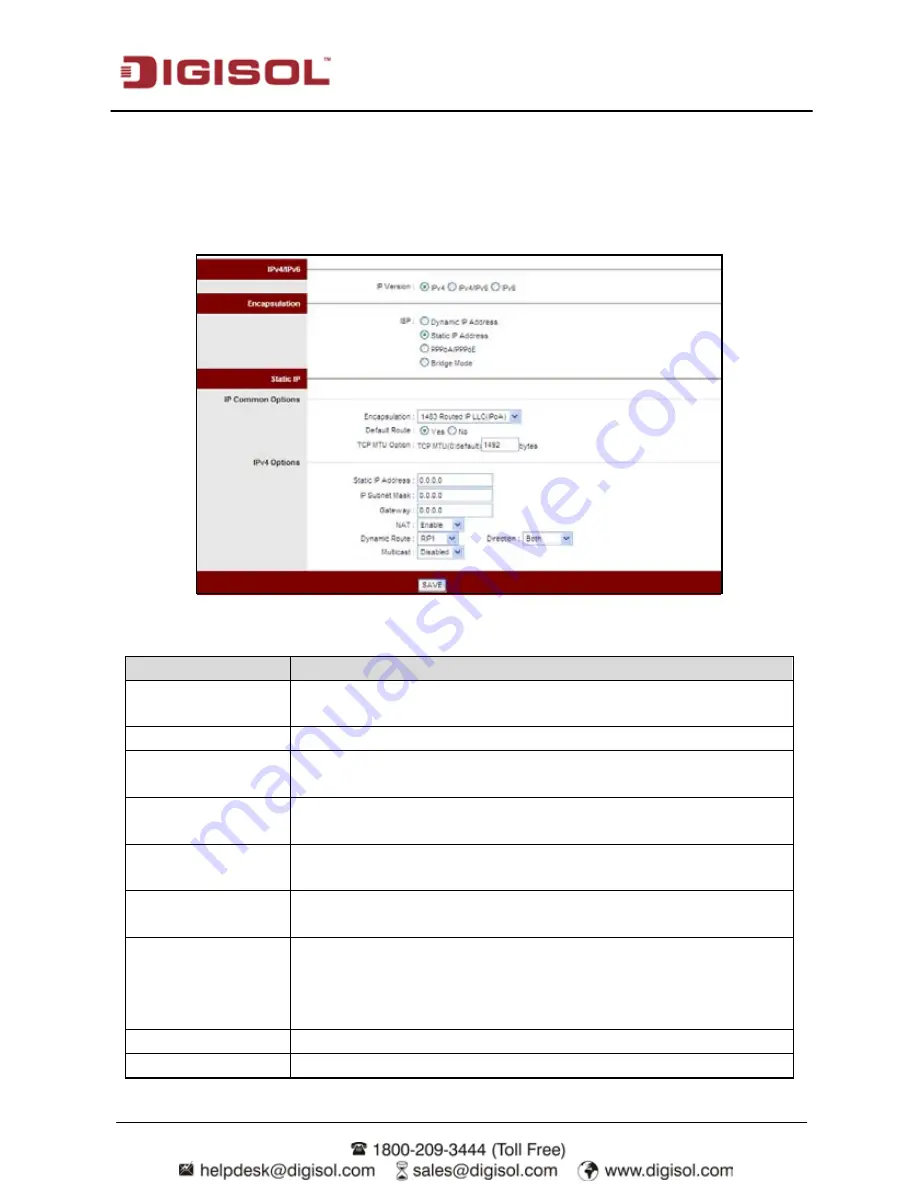
Select Static  IP Address in the  ISP  encapsulation  to set static IP information. You will need to 

enter in the Connection type, IP address, subnet mask and gateway address, provided to you by 

your ISP. Each IP address entered in the fields must be in the appropriate IP form, which are four 

IP octets separated by a dot (x.x.x.x). The Router will not accept the IP address if it is not in this 

format. 


The following table describes the parameters of this page: 


Field 

Description 

Encapsulation 

You can choose  1483 Bridged IP LLC, 1483 Bridged IP VC-Mux, 

1483 Routed IP LLC(IPoA) or 1483 Routed IP VC-Mux. 

Default Route 

You can enable or disable default route. 

TCP MTU Option 

You can set a tcp MTU value. The range is from 100 to 1500. The 

default is 0. 

Static IP Address 

You can enter the IP address for dial-up, which is provided by your 

ISP. 

IP Subnet Mask 

You can enter the IP subnet mask for dial-up, which is provided by 

your ISP. 

Gateway 

You can enter the gate way IP for dial-up, which is provided by your 

ISP. 

NAT 

Select it to enable Network Address Translation (NAT)  function. If 

you  do not select it but want  to access the Internet normally, you 

must add a route on the uplink equipment. Otherwise, the access to 

the Internet fails. Normally, it is enabled. 

Dynamic Route 

You can select RIP1, RIP2-B or RIP2-M. 

Direction 

You can select None, Both, IN Only or OUT Only. 

Содержание DH-bg1100n

Страница 1: ...DG BG1100N 802 11N 150MBPS SINGLE PORT WIRELESS ADSL2 2 ROUTER User Manual V1 0 2013 12 12 As our products undergo continuous development the specifications are subject to change without prior notice...

Страница 2: ...ternet 23 3 1 Accessing the Internet by Wireless Connection 23 3 2 Accessing the Internet in Bridge Mode 25 4 Web Configuration 26 4 1 Access the Router 26 4 1 1 Status 27 4 1 2 Device Info 27 4 1 3 S...

Страница 3: ...ser Manual 3 4 5 3 SNMP 67 4 5 4 UPnP 68 4 5 5 DDNS 69 4 5 6 CWMP 70 4 6 Maintenance 71 4 6 1 Administration 71 4 6 2 Time Zone 72 4 6 3 Firmware 73 4 6 4 SysRestart 74 4 6 5 Diagnostics 75 4 7 Troubl...

Страница 4: ...outlet or prolonged lines An overburden power outlet or damaged lines and plugs may cause electric shock or fire accident Check the power cords regularly If you find any damage replace it at once Prop...

Страница 5: ...Guide 1 3 Features The device supports the following features Various line modes Wireless network access External PPPoE dial up access Internal PPPoE PPPoA dial up access 1483Bridged 1483Routed with d...

Страница 6: ...uirements are as follows A 10 100 base T Ethernet card is installed on your PC A hub or Switch To connect several PCs through one of the Ethernet interfaces on the device Operating system Windows 98 S...

Страница 7: ...d Internet Green On Internet connection is established Blinking Data is beihng transmitted or received Off Set as bridge mode Red On PPPoE PPPoA user name password not set or is wrong LAN Green On PC...

Страница 8: ...switch Power on or off the device Power Power interface for connecting to the power adapter of DC 12 V 0 5 A EU LAN RJ 45 interface for connecting to the Ethernet interface of PC or other Ethernet dev...

Страница 9: ...ress the button to enable WPS WLAN Press the button to enable WLAN Reset Reset to the factory defaults Keep the device powered on then insert a paper clip in to the hole press and hold for over 3 seco...

Страница 10: ...e interface of the splitter through a cable Connect the incoming line to the Line interface of the splitter The splitter has three interfaces Line Connect to a wall phone jack RJ 11 jack Modem Connect...

Страница 11: ...nual 11 2 1 Software Installation Insert the Setup CD into your CD ROM drive of notebook desktop computer Explore the CD and execute the DG BG1100N EXE file Screen given below will be displayed Click...

Страница 12: ...al 12 Connect the ADSL line to the router Click Next Connect the power adapter to the AC Mains and the other end to the power interface on the router Push the power button on the router to power up th...

Страница 13: ...Connect the Ethernet interface on the router to the LAN card on the computer using the Ethernet cable Click Next After powering up the router verify the status of the LED indicators on the front panel...

Страница 14: ...DG BG1100N User Manual 14 Please select your Country and ADSL service provider VPI and VCI values will auto fill Select the network protocol for WAN interface Click Next...

Страница 15: ...tion steps till here are the common steps to be followed for the modes Following are the steps for configuring PPPoE connection Enter the username and password provided by your ISP Click Next Configur...

Страница 16: ...DG BG1100N User Manual 16 Configure the wireless security for your router Click Next A screen with the summary of wireless setting will appear as shown below Click Next...

Страница 17: ...DG BG1100N User Manual 17 Click on Next the following screen will appear Once the connection is established the router connection status will appear...

Страница 18: ...DG BG1100N User Manual 18 To configure the router in bridge mode select Bridging option Click Next Bridging Mode Configure a wireless name SSID for your router Click Next...

Страница 19: ...DG BG1100N User Manual 19 Configure the wireless security for your router Click Next A screen with the summary of wireless setting will appear as shown below...

Страница 20: ...DG BG1100N User Manual 20 Click on Next the following screen will appear Click on Finish to complete the configuration of the router in Bridge mode...

Страница 21: ...in an IP address using the network DHCP server DSL router provides a DHCP server on its LAN and it is recommended to configure your LAN to automatically obtain its IP address and DNS server IP address...

Страница 22: ...omponent and click Properties Step 4 The Internet Protocol TCP IP Properties window appears Step 5 Select the Obtain an IP address automatically radio button Step 6 Select the Obtain DNS server addres...

Страница 23: ...d If you use a wireless network adapter do as follows to establish the connection Step 1 Turn on the Router The WLAN is enabled by default Step 2 Enable the wireless network adapter on your PC and ens...

Страница 24: ...p 3 In the Wireless Network Connection page click Refresh network list and the network list is refreshed Select the SSID of the router Step 4 Click Connect enter the username and password in the pop u...

Страница 25: ...te a new connection in Network Tasks to display the New Connection Wizard window and then click Next Step 5 Select Connect to the Internet and then click Next Step 6 Select Set up my connection manual...

Страница 26: ...etailed description of accesing the router for the first time Step 1 Open the Internet Explorer IE browser and enter http 192 168 1 1 Step 2 In the Login page that is displayed enter the username and...

Страница 27: ...atus In the Status page that is displayed contains Device Info System Log and Statistics 4 1 2 Device Info Choose Status Device Info This page displays the current information for the ADSL Router It w...

Страница 28: ...ically cleared 4 1 4 Statistics Choose Status Statistics The Statistics page that is displayed contains Ethernet Statistics and ADSL Statistics The ADSL Router keeps statistic of traffic that passes t...

Страница 29: ...owing figure appears In this page you can view the statistics such as total Bytes Collision Error Frames and CRC Errors ADSL Statistic Click ADSL in the Traffic Staticstics page the page shown in the...

Страница 30: ...rameters Whether you configure these parameters or use the default ones click NEXT to enable your Internet connection When subscribing to a broadband service you should be aware of the method by which...

Страница 31: ...DG BG1100N User Manual 31 Click RUN WIZARD a new pop up page as shown in the following figure appears Click EXIT this page will be closed Click NEXT the page as shown in the following figure appears...

Страница 32: ...the admin account s password and you can make it blank if you do not want to change it Click NEXT the page as shown in the following figure appears In this page you can select a local time zone Click...

Страница 33: ...Static IP Address PPPoE PPPoA and Bridge Mode Select the appropriate WAN connection type which is provided by your ISP For example if you subscribed PPPoE or PPPoA service from your ISP you can select...

Страница 34: ...nter the Username and Password provided by your ISP Internet Service Provider 2 Enter the VPI and VCI values provided by your ISP 3 Select the connection type according to the information that your IS...

Страница 35: ...e or disable WLAN change the WLAN SSID and authentication type The configuration of six authentication types is introduced as below Disabled When the authentication type Disabled is selected the follo...

Страница 36: ...36 WEP 64Bits When the authentication type WEP 64Bits is selected the following figure will appear Enter 5 characters or 10 hexadecimal digits 0 9 A F preceded by 0x for each Key 1 4 and then click N...

Страница 37: ...37 WEP 128Bits When the authentication type WEP 128Bits is selected the following figure will appear Enter 13 characters or 26 hexadecimal digits 0 9 A F preceded by 0x for each Key 1 4 and then click...

Страница 38: ...l 38 WPA PSK When the authentication type WPA PSK is selected the following figure will appear Select an encryption from TKIPAES TKIP and AES enter a pre shared key of 8 64 characters and then click N...

Страница 39: ...ngs Click NEXT to save the settings Click EXIT to cancel the settings For Dynamic IP Address and Static IP Address please set the parameters according to the information provided by your ISP and then...

Страница 40: ...up The Interface Setup page that is displayed contains Internet LAN and Wireless 4 3 1 Internet Choose Interface Setup Internet Select PPPoA PPPoE encapsulation Click Internet pane the page shown in t...

Страница 41: ...e transmitted along a connection in the ATM network Its value ranges from 1 to 65535 SCR Sustain cell rate SCR is the maximum rate that traffic can pass over a PVC without the risk of cell loss Its va...

Страница 42: ...elected you can enter the IP subnet mask for dial up which is provided by your ISP Gateway When Static is selected you can enter the gateway IP for dial up which is provided by your ISP NAT Select it...

Страница 43: ...Manual 43 If your ISP provides you an IP address automatically you may select Dynamic IP in the ISP encapsulation Dynamic IP is typically used for Cable services Please enter the Dynamic IP informati...

Страница 44: ...ou must add a route on the uplink equipment Otherwise the access to the Internet fails Normally NAT is enabled Dynamic Route Select this option to specify the Routing Information protocol RIP version...

Страница 45: ...C IPoA or 1483 Routed IP VC Mux Default Route You can enable or disable default route TCP MTU Option You can set a tcp MTU value The range is from 100 to 1500 The default is 0 Static IP Address You ca...

Страница 46: ...nterface Setup LAN The LAN page that is displayed contains Router Local IP DHCP Server DNS Radvd and DHCPv6 In this page you can change IP address of the router The default IP address is 192 168 1 1 w...

Страница 47: ...If set to DHCP Server the router can assign IP addresses IP default gateway and DNS Servers to the host under Windows95 Windows NT and other operation systems that support the DHCP client Starting IP...

Страница 48: ...otocol DHCP allows the individual PC to obtain the TCP IP configuration from the centralized DHCP server You can configure this router as a DHCP server or disable it The DHCP server can assign IP addr...

Страница 49: ...DG BG1100N User Manual 49 In the DHCP field choose Relay the page shown in the following figure appears Enter a server IP address running on WAN side...

Страница 50: ...3 3 Wireless Choose Interface Setup Wireless The page as shown in the following figure appears The Wireless page contains Access Point Settings 11n Settings Multiple SSIDs Settings WDS Settings and W...

Страница 51: ...st broadcast data on the access point Wireless Mode Comply with the IEEE 802 11b g and IEEE802 11n standards You can select 802 11b 802 11g 802 11b g 802 11n 802 11g n or 802 11b g n Channel Bandwidth...

Страница 52: ...shared secret shared between wireless devices using some secured channel WDS Mode Wireless Distribution System or Wireless Bridge between 2 or more AP s WDS Encryption type You can select TKIP or AES...

Страница 53: ...L 4 4 1 Firewall Choose Advanced Setup Firewall The page shown in the following figure appears You can select this option to automatically detect and block Denial of Service DoS attacks such as Ping o...

Страница 54: ...e IP Subnet Mask Enter the subnet mask of the destination device Gateway IP Address You can enter the IP address of the next hop in the IP route to the destination device or bind with a PVC interface...

Страница 55: ...e parameters and buttons of this page Field Description Virtual Circuit Enter Virtual Circuit Index that you plan to setup for the NAT function NAT Status This field shows the current status of the NA...

Страница 56: ...and DNS servers In the NAT page choose DMZ and the page shown in the following figure appears The following table describes the parameters of this page Field Description DMZ Select Enable DMZ to enabl...

Страница 57: ...or select a name from the right drop list menu like FTP or TELNET Protocol Choose the transport layer protocol You can choose ALL TCP or UDP Start End Port Number Enter the specific Start and End Por...

Страница 58: ...NAT page choose IP Address Mapping for Multiple IP Service and the page shown in the following figure appears The IP Address Mapping rule is per VC based only for Multiple IPs VCs Select Multiple to u...

Страница 59: ...s Rule Type Choose the One to One Many to One Many to Many Overload Many to Many No Overload or Server Local Start End IP Enter the local IP Address you plan to map to Local Start IP is the starting l...

Страница 60: ...nstead of physical connections it is very flexible for user host management bandwidth allocation and resource optimization In the VLAN page choose Activated and then Assign VLAN PVID for each Interfac...

Страница 61: ...le describes the parameters of this page Field Description VLAN Index Choose a vlan index from 1 to 8 Active Choose to activate or deactive the current vlan settings VLAN ID VLAN ID is from 1 to 4094...

Страница 62: ...your Internet service provider The router supports these modulations G Lite T1 413 G DMT ADSL2 ADSL2 and Auto Sync Up The router negotiates the modulation modes with the DSLAM The following table desc...

Страница 63: ...ccess the ADSL Router once setting his IP as a Secure IP Address through selected applications With the default IP 0 0 0 0 any client would be allowed to remotely access the ADSL Router The following...

Страница 64: ...Filter and the page shown in the following figure appears Select IP MAC Filter type The user can set IP MAC Filter Application Filter and URL Filter 4 5 2 1 IP MAC Filter Choose Access Management Fil...

Страница 65: ...tion Choose Both Incoming or Outgoing Rule Type Supports IP or MAC Source IP Address Enter the Source IP Address 0 0 0 0 means don t care Port Number Enter the Port Number 0 means don t care Destinati...

Страница 66: ...Filter rule ICQ Set Allow or Deny ICQ packets MSN Set Allow or Deny MSN packets YMSG Set Allow or Deny YMSG packets Real Audio Video Set Allow or Deny Real Audio Video packets 4 5 2 3 URL Filter Choo...

Страница 67: ...e SNMP Simple Network Management Protocol is used for exchanging information between network devices The following table describes the parameters of this page Field Description Get Community Select to...

Страница 68: ...rk obtain an IP address convey its capabilities and learn about other devices on the network In turn a device can leave a network smoothly and automatically when it is no longer in use UPnP broadcasts...

Страница 69: ...gned to your ADSL Router by your Dynamic DNS provider The user also can decide to turn on DYNDNS Wildcard or not The following table describes the parameters of this page Field Description Dynamic DNS...

Страница 70: ...uthenticate the CPE when making a connection to the ACS using the CPE WAN Management Protocol Password Password used to authenticate the CPE when making a connection to the ACS using the CPE WAN Manag...

Страница 71: ...e Administration the page shown in the following figure appears There is only one account that can access Web Management interface The default account is admin and the password is 1234 Admin has read...

Страница 72: ...only need to set the time zone If you manually set the time you may also set Daylight Saving dates and the system time will automatically adjust on those dates The following table describes the parame...

Страница 73: ...on Browse to browse the local hard drive and locate the firmware to be used for upgrade The following table describes the parameters of this page Field Description New Firmware Location Click browse...

Страница 74: ...rs User can restart the device with current settings or factory default settings The following table describes the parameters of this page Field Description Current Settings Save the current settings...

Страница 75: ...in the following figure appears This page shows the test results for the connectivity of the physical layer and protocol layer for both LAN and WAN sides The following table describes the parameters...

Страница 76: ...Check the connection between the DSL port of the device and the wall jack Internet access fails while the ADSL indicator is on Check whether the VPI VCI user name and password are correctly entered F...

Отзывы: