background image

Most computers are connecting to a local network with dynamic IP (DHCP) 
setting.  To  access  the  web  UI  of  the  device,  you  have  to  change  your 
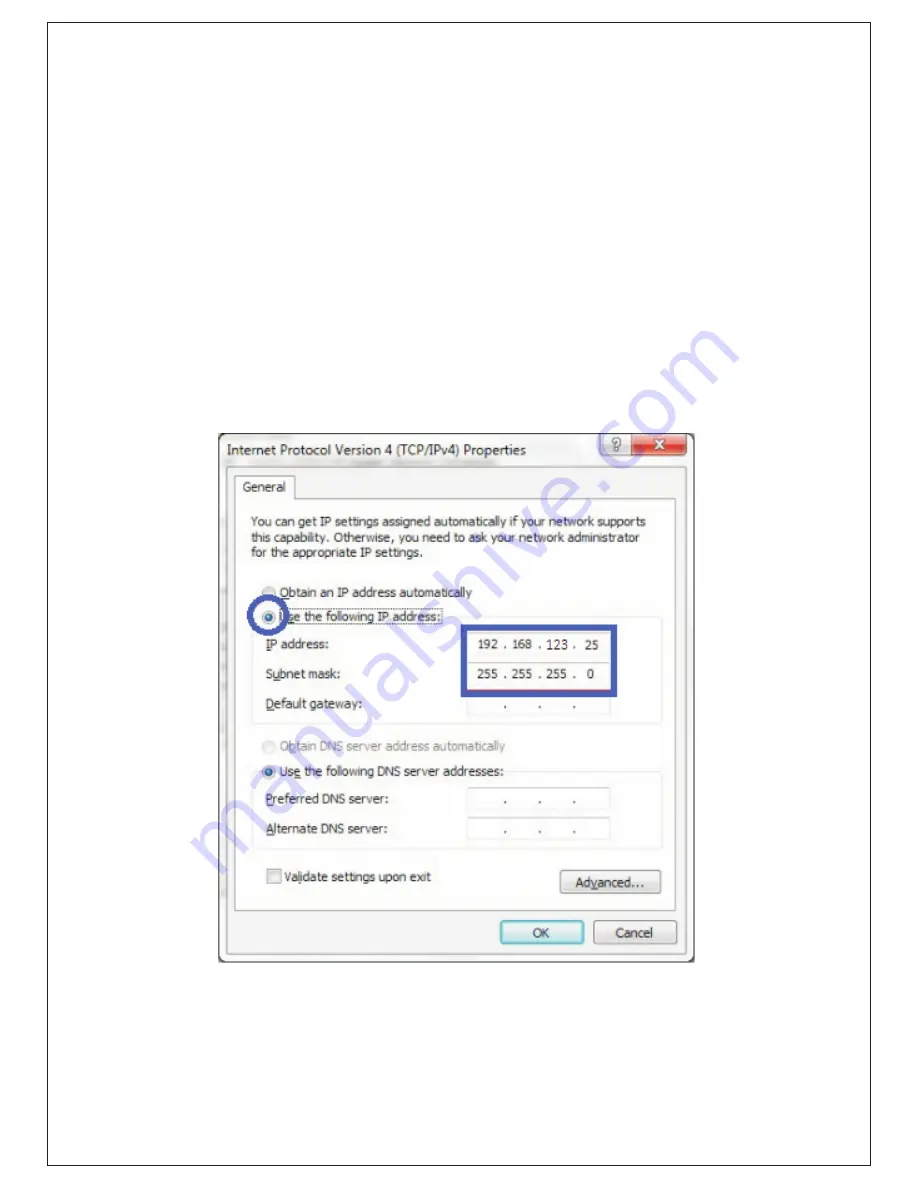
computer's  TCP/IPv4  settings  into  a  static  IP  setting  for  the  Ethernet 
Interface. You can refer to Appendix A for how to assign a Static IP address 
you your computer.
The device's default IP address is 192.168.123.50, and your computer must 
be assigned with a 192.168.123.x IP address to get access to the device.

Software Preperation 

Referring to Appendix A, and set the TCP/IPv4 address of your computer to 
192.168.123.25, and subnet mask to 255.255.255.0.

After  applying  this  setting,  you  can  now  access  to  the  web  UI  for 
configuring the device.

Содержание DG-WM2005SI

Страница 1: ...V1 0 2014 05 19 RANGER SERIES 300Mbps CEILING MOUNT ACCESS POINT DG WM2005SI N 300 Mbps...

Страница 2: ...ested and found to comply with the limits for a Class B digital device pursuant to Part 15 of the FCC Rules These limits are designed to provide reasonable protection against radio interference in a c...

Страница 3: ...Fi 2 4G N 300 Ceiling Access Point designed for small and medium sized businesses to extend the existing wired networks and has the ability to operate in different modes and can be used in a wide vari...

Страница 4: ...duration Stage 1 1 5 sec Flash very fast Stage 2 6 10 sec Flash twice per second Stage 3 11 15 sec Flash once per second Stage 4 16 30 sec Solid Green OFF The device is powered off WiFi Green LED Devi...

Страница 5: ...as other equipment Only use the power adapter that comes with the package Using a different voltage rating power adaptor may damage the device l Do not open or repair the case yourself If the Product...

Страница 6: ...llustrations show you how to mount this device on the ceiling wall Description Illustration A Drill 2 holes for wall plugs Self tapping screws Diameter 3mm If you run the cable above the ceiling invis...

Страница 7: ...D Attached this device to mounting bracket by rotating it clock wisely to click into place E Installation completed...

Страница 8: ...ion first 3 After a few seconds normally about 30 60 seconds The Master and Slave APs can be paired automatically and auto duplicates the VAP1 wireless setting of the Master AP as that of the Slave AP...

Страница 9: ...LED Device is in Master Mode WiFi Amber LED Device is in Slave Mode Reset Slave AP Configuration WEC Reset Press 13 sec 1 Press the WEC Reset button for about 11 15 seconds and release it 2 The Slave...

Страница 10: ...e device setting to fit in your network environment Hardware Preparation a Connect an Ethernet cable between this device and the computer that you will operate to set up the device b Power on the devi...

Страница 11: ...endix A for how to assign a Static IP address you your computer The device s default IP address is 192 168 123 50 and your computer must be assigned with a 192 168 123 x IP address to get access to th...

Страница 12: ...finish the basic setup process Activate the setup wizard Type in the IPAddress http 192 168 123 50 Type the default password admin in the system authentication fields and then click login button Sele...

Страница 13: ...art the Setup Wizard Configure with Setup Wizard Step 1You can change the password of administrator here Step 2 LAN IP Address You have to change the IP address of this device according to your networ...

Страница 14: ...Step 3 1Wireless settings You can specify theWireless setting forVAP1 Step 3 2 Wireless settings Specify VAP1 s wireless authentication and encryption...

Страница 15: ...Step 4 Check the information again Step 5 System is applying the setting Step 6 Click finish to complete it...

Страница 16: ...ve AP modes defined for the device to operate with WEC Wireless Easy Connection feature One is the Master Mode by default and the other is the Slave Mode Before starting to use WEC to configure your A...

Страница 17: ...P3 via WEC Master to Slave WEC 1 Trigger AP1 into WEC configuration process via pressing the WEC button for 3 second 2 Trigger AP3 into WEC configuration process via pressing the WEC button for 3 seco...

Страница 18: ...ily extend the wireless network with a series repeaters that are wireless concatenated to build up the wireless network without running Ethernet cables to each repeater As illustrated in above figure...

Страница 19: ...a pressing the WEC button for 3 second 2 Trigger AP3 into WEC configuration process via pressing the WEC button for 3 second 3 It takes 30 60 seconds for the device to finish the WEC configuration pro...

Страница 20: ...ata rate and environment Besides if one of the AP say AP2 is disconnected the APs behind it will be disconnected as well Such topology needs more maintenance effort to keep the whole wireless network...

Страница 21: ...Frequently Asked Questions...

Страница 22: ......

Отзывы: