9
Setting Up The Expansion Bay
Adding A Hard Drive In Bay #1
Note that the hard drive in Bay #1 is installed upside down, with the underside of the hard drive
exposed.
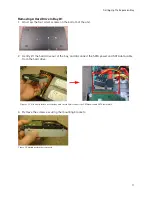
To install a hard drive in Bay # 1:
1. Remove the two metal brackets by unscrewing the four silver screws underneath the unit.
Bay # 1
Bay # 2
Bay # 3
Figure 2.8 Internal layout of expansion bay with three hard drives installed. Note that
the hard drive in Bay #1 is upside down. This is the correct way of installing the hard drive.
Note!
A hard drive may be installed in
any bay. There is no "Primary"
hard drive bay.
The bays are labeled Bays #1~3
for description purposes.
Hard drive mounting brackets.
Silver screws
Figure 2.9 Remove the two hard drive mounting brackets by removing the four silver screws.
Содержание VBAY3HD
Страница 8: ...viii...


