9
Vision-64 User Guide
Issue 1.02
Copyright
©
2002-2004 Digflex Pty Ltd
System Programming
Access > PIN Codes >
Change Own PIN
MENU 1-1-0
This menu lets you change your own PIN. It is recommended that
you write down your old PIN and the new one before you begin.
The new PIN must have the same number of digits as your old
PIN. Once the change is complete you should destroy the written
copy.
At factory default, each PIN is fixed to 4 digits in length. The default
PIN for User 1 (Master user) is 2580. Only the security installer
can change the PIN length.
1. Ensure that the system (or area) is turned off.
2. Enter your PIN, and then press [MENU] + [1] + [1] + [0].
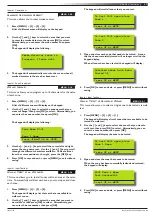
The keypad will prompt you to enter a new PIN.
Enter New PIN for
DEBBIE SMITH U002
Press OK or MENU
3. Enter your new PIN, and then press [OK]. If an error tone
sounds, try a different PIN. The keypad will now prompt you
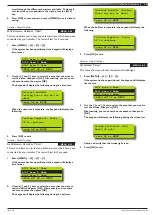
to enter your new PIN again.
Confirm New PIN for
DEBBIE SMITH U002
Press OK or MENU
4. Enter your new PIN again.
5. Press [OK] to save and exit, or press [MENU] to exit without
saving Your PIN has now been changed.
PROGRAMMING TEXT USING THE KEYPAD
When programming text via the keypad, various keys on the keypad
operate differently.
A group of characters is assigned to each of the numeric keys on
the keypad. Pressing the same numeric key again will toggle to
the next character assigned to the key (eg. Press the [2] key will
display the ‘A’ character, press the [2] key again will toggle to the
‘B’ character, press the [2] key again will toggle to the ‘C’ character
etc).
Once the correct character is display use the arrow keys to move
to the next letter of the word you are entering.
The key assignments are identical to those found on most fixed and
mobile phones.
When programming text, each numeric key represents a different
group of characters.
Pressing the same numeric key repeatedly will step you through
the available characters assigned to the key. The text key layout
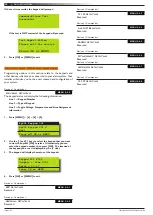
is the same as most phones. Refer to the table below for detailed
character information.
Refer to the table below for more information.
Key
Characters Assigned To Each Numeric Key
1
.
,
?
!
-
&
<
>
1
2
A
B
C
a
b
c
2
3
D
E
F
d
e
f
3
4
G
H
I
g
h
i
4
5
J
K
L
j
k
l
5
6
M
N
O
m
n
o
6
7
P
Q
R
S
p
q
r
s
7
8
T
U
V
t
u
v
8
9
W
X
Y
Z
w
x
y
z
9
0
SPACE
_
@
#
$
%
*
0
Scroll Up through entire character list
Scroll Down through entire character list
Move to left one character position
Move to right one character position
OFF
Clear from cursor postiion to end of line
Table 4: Text Keypad Character Set
Once the desired character is displayed press the right [
] arrow
key to move to the next character position.To save programming
changes, press [OK], or press [MENU] to exit without saving.


