DFI MDPi Series Скачать руководство пользователя страница 13

User's Manual | MDPi Series

13

Chapter 3

Cleaning the display

Chapter 3 - Cleaning the display


X

3.1 Cleaning instructions

User's Manual | MDPi Series

To clean the display

Cleaning the display using a sponge, cleaning cloth, or soft tissue with lightly moistened rec-

ognized cleaning product for medical equipment. Read and follow all labeled instructions on 

the cleaning product. In case of doubt about a certain cleaning product, use plain water.

CAUTION:

•  Take care not to damage or scratch the front glass or LCD. Be careful with rings or other 

jewelry and do not apply excessive pressure on the front glass or LCD.

•  Do not apply or spray liquid directly to the display as excess liquid may cause damage to 

internal electronics. Instead, apply the liquid to a cleaning sponge, cloth, or tissue.

ATTENTION :

•  Veillez à ne pas endommager ou rayer la vitre avant ou l'écran LCD. Soyez prudent lorsque 

vous portez des bagues ou autres bijoux et n'appliquez pas une pression excessive sur le 

verre avant ou l'écran LCD.

•  N'appliquez ou ne vaporisez pas de liquide directement sur l'écran car l'excès de liquide 

peut endommager l'électronique interne. Appliquez plutôt le liquide sur une éponge, un chiffon 

ou un mouchoir en papier.


X

3.2 EMC notice

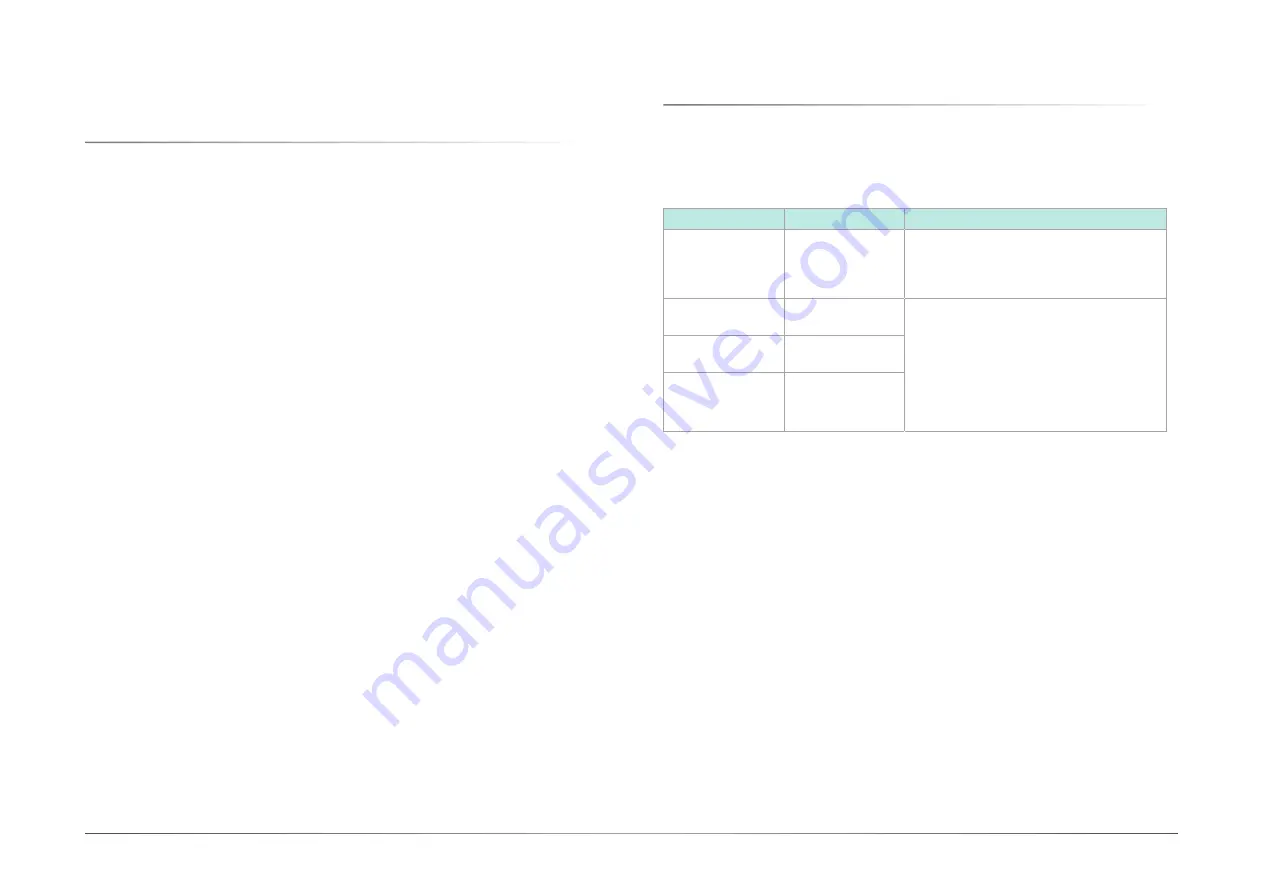
Electromagnetic emissions

The monitor is intended for use in the electromagnetic environment specified below. The cus-

tomer or the user of the monitor should assure that it is used in such an environment.

Emissions test

Compliance

Electromagnetic environment – Guidance

RF emissions 

CISPR 11

Group 1

The monitor uses RF energy only for its internal 

function. Therefore, its RF

emissions are very low and are not likely to 

cause any interference with nearby

electronic equipment.

RF emissions

CISPR 11

Class B

The monitor is suitable for use in all establish-

ments, including domestic establishments 

and those directly connected to the public low-

voltage power supply network that supplies

buildings used for domestic purposes.

Harmonic emis-

sions

IEC 61000-3-2

N/A 

(power consumption

less than 75W)

Voltage fluctua-

tions/ flicker emis-

sions

IEC 61000-3-3

Complies

This monitor complies with appropriate medical EMC standards on emissions to, and interfer-

ence from surrounding equipment. Operation is subject to the following two conditions:

(1) this device may not cause harmful interference, and (2) this device must accept any inter-

ference received, including interference that may cause undesired operation.

Interference can be determined by turning the equipment off and on.

If this equipment does cause harmful interference to, or suffer from harmful interference of, 

surrounding equipment, the user is encouraged to try to correct the interference by one or 

more of the following measures:

• Reorient or relocate the receiving antenna or equipment.

• Increase the separation between the equipment and receiver.

• Connect the equipment into an outlet on a circuit different from that to which the receiver is 

connected.

• Consult the dealer or an experienced technician for help.

Содержание MDPi Series

Страница 1: ...True Flat Healthcare Display with color calibration User s Manual MDPi Series ver A_MP_3 1521_13 13...

Страница 2: ...fication purpose only and are the properties of the respective owners Notice 1 The changes or modifications not expressly approved by the party responsible for compli ance could void the user s author...

Страница 3: ...r 4 Monitor Installation 15 4 1 Cleaning instructions 15 4 2 Stand removal VESA mount installation 16 Chapter 5 Daily operation 18 5 1 Main power switch 18 5 2 Power Status indication 18 Chapter 6 OSD...

Страница 4: ...ortable on a table Intended location Medical environment Intended User Profile Intended User Profile X 1 2 Box of contents 21 5 23 8 27 LCD Touch Screen Monitor AC Power Cord VGA Cable DVI or HDMI Cab...

Страница 5: ...ION Chapter 1 INTRODUCTION Side View The image below shows the control keys located in the right bottom corner of the display 1 Menu Enter key Scrolling key Rear View 1 Rear cover 2 IO cover 3 Monitor...

Страница 6: ...User s Manual MDPi Series 6 Chapter 1 INTRODUCTION Available Connections 1 USB 2 RS232 3 Audio 4 Display Port 5 DVI 6 HDMI RGD model 7 VGA 8 POWER 9 User s Manual MDPi Series...

Страница 7: ...AC Input External power adapter 100 250V External power adapter 100 250V External power adapter 100 250V Power Consumption 40W Max 40W Max 40W Max Mechanical Chassis Material Plastic ABS Plastic ABS P...

Страница 8: ...8 Chapter 1 INTRODUCTION User s Manual MDPi Series X 1 5 Outline Dimension...

Страница 9: ...s and receptacles The power supply cord should be replaced by the designated operator only at all time Use a power cord that matches the voltage of the power outlet which should be approved and in com...

Страница 10: ...indicates that under the European Directive 2012 19 EU governing waste from electrical and electronic equipment this product must not be disposed of with other municipal waste Please dispose of your...

Страница 11: ...determined by turning the device off and on the user is encouraged to try to correct the interference by one or more of the following measures Reorient or relocate the receiving antenna Increase the...

Страница 12: ...WEEE Waste Electrical and Electronic Equipment directive Indicates Direct Current DC Indicates Alternating Current AC Stand by Power ON Power connection to the mains Power OFF Protective earth ground...

Страница 13: ...it is used in such an environment Emissions test Compliance Electromagnetic environment Guidance RF emissions CISPR 11 Group 1 The monitor uses RF energy only for its internal function Therefore its R...

Страница 14: ...tery Power fre quency 50 60 Hz mag netic field IEC 61000 4 8 30 A m Not applicable Power frequency mag netic fields should be at levels characteristic of a typical location in a typical commercial or...

Страница 15: ...n function 3 Connect the Audio cable for audio function 4 Connect the power cord input to a power adapter with a grounded Power Outlet 5 Connect the power adapter input to the monitor 6 Install cable...

Страница 16: ...t 1 Place the monitor face down on a flat solid and stable surface 2 Remove the hinge cover 3 Unscrew the 4x M4 length 10mm screws fixing the stand and rear cover 4 Remove the stand and install the VE...

Страница 17: ...nstallation User s Manual MDPi Series 5 Attach the monitor in landscape position to a 100 mm VESA mounting bracket Mounting in portrait position is not feasible Image 4 2 4 VESA mount is located at th...

Страница 18: ...detection before going into normal operation mode Depending on the detection result the status LED on the side of the monitor will show different LED color Below is an overview of the possible status...

Страница 19: ...th a status bar will appear The status bar indicates in which direction form the fac tory preset your adjustments arebeing made Rotate the Control Dial to adjust the control When you have finished mak...

Страница 20: ...DPi Series X 6 4 Main Menu 6 4 1 Exit 6 4 2 Auto Setup Only Support Analog Exit To exit the auto setup of the OSD menu Yes Automatically adjust the analog settings of the image No Enter Clock Phase OS...

Страница 21: ...t Analog H Position The function allows user manually adjust the image position horizontally on the screen This function allows the user to adjust the monitor s brightness setting manually This functi...

Страница 22: ...er can adjust and set tones Red Adjust red and equivalent colors at the range from 0 to 100 The greater the value is the deeper the color is and vice versa Yes Automatically adjust the analog settings...

Страница 23: ...reset gamma curve of the display setting Preset gam ma curve are Neutral Gamma 2 2 DICOM Allows users to select preset DICOM curve of the display setting 6 4 7 Clock Phase Only support Analog 6 4 8 Au...

Страница 24: ...o output of the display setting Input Allows users to select the audio input source of the display setting Digital Line In audio input source are available Mute Allows users to Mute On Unmute Off the...

Страница 25: ...lows users to select preferred image scaling of the display setting Full screen Expands the current image to the full size of the monitor Aspect ratio 5 4 4 3 16 9 Expands the video image until its la...

Страница 26: ...nction of the display set ting 6 4 9 3 Scaling 6 4 9 4 Source VGA DVI Display Port DP HDMI sources are available for user to select preferred input source Exit To exit the Language of the OSD menu Eng...

Страница 27: ...of the OSD menu Locked Allows users to Enable the DC power key function of the display setting Unlocked Allows users to Disable the DC power key function of the display setting Exit To exit the Recal...

Страница 28: ...28 Chapter 6 OSD menu operation User s Manual MDPi Series 6 5 Supported Video Modes Compliant Graphic Signal Timing VGA DVI HDMI DP...

Отзывы: