background image

www.dfi.com

23

Chapter 3 Software User Guide

Chapter 3

Download Uboot Images to SPI with MFGTool

1.  First complete above “Download Images to eMMC with MFGTool” steps.

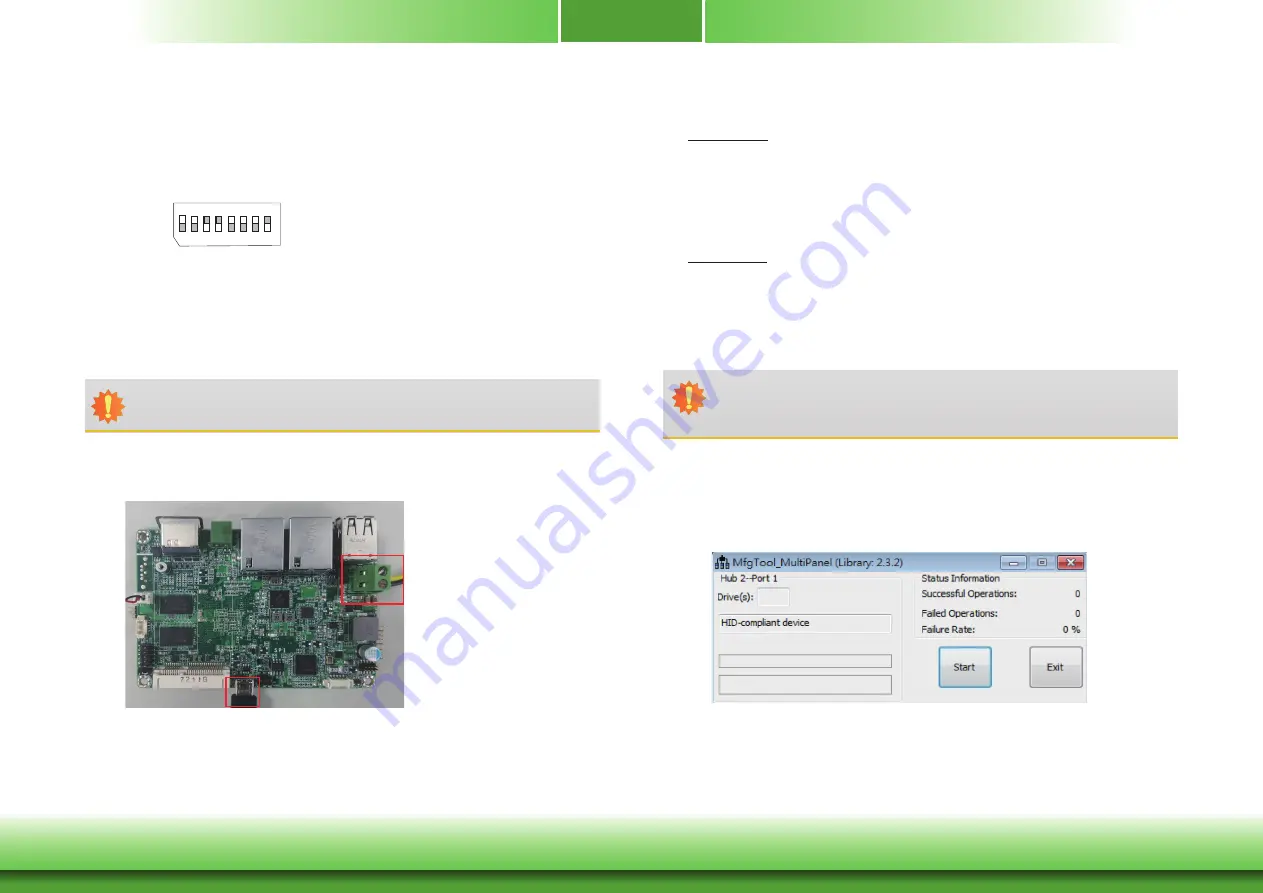
2.  Set the finger switch SW5 to “Serial Downloader Mode”: pins 7 on and 8 off.

3. Plug in the Micro USB cable to your PC and power-on the FS053.

Important:

The adapter output voltage is 9~36V for FS053.

Boot Mode/Device Select

(SW5)

Pins 1, 2, 5, 6, 7 ON

ON

1 2 3 4 5 6 7 8

+

-

Micro USB Cable

4. Unzip Image package on your PC.

5-1. For Rev. A only

    Yocto image: execute “\\

[core type]

\yocto-spi-fs053_

[core type]

-u-boot.vbs”.

    For example, for DualLite CPU, execute “\\

DualLite_core

\yocto-spi-fs053_

DualLite

-u-boot.vbs”.

    Android image: execute “\\

[core type]

\android-spi-fs053_

[core type]

-u-boot.vbs”.

    For example, for DualLite CPU, execute 

    “\\

DualLite_core

\android-spi-fs051_

DualLite

-u-boot.vbs”.

5-2. For Rev. B only

    Yocto image: execute “\\

[core type]

\yocto-spi-fs053_

[core type]

-all.vbs”.

    For example, for Quad CPU, execute “\\

Quad

\yocto-spi-fs053_

Quad

-all.vbs”.

    Android image: execute “\\

[core type]

\android-spi-fs053_

[core type]

-all.vbs”.

    For example, for Quad CPU, execute “\\

Quad

\android-spi-fs053_

Quad

-all.vbs”.

6. You will see the device connected as “HID-compliant device.”

7. After all preparation is done, 

click “Start” to burn the file. Wait until the process ends.

Important:

Failure in loading a compatible image (i.e. Rev. A or Rev. B) onto the system may 

result in malfunction and unexpected errors.

Содержание FS053

Страница 1: ...1 FS053 Embedded SBC 2 5 User s Manual A45930937...

Страница 2: ...Statement on Class B This equipment has been tested and found to comply with the limits for a Class B digital device pursuant to Part 15 of the FCC rules These limits are designed to provide reason a...

Страница 3: ...RJ45 LAN Ports 13 USB Ports 14 Serial Port 14 Front Panel I O Ports 15 USB 2 0 OTG Port 15 Internal I O Connectors 15 Digital I O Connector 15 COM Serial Port 16 Front Panel Connector 17 SATA Serial A...

Страница 4: ...xtra care in han dling them to ensure against electrostatic build up 1 To prevent electrostatic build up leave the system board in its anti static bag until you are ready to install it 2 Wear an antis...

Страница 5: ...may not come similar to the information listed above This may differ in accordance to the sales region or models in which it was sold For more information about the standard package in your region ple...

Страница 6: ...l 1 x RS 485 2 wire USB 2 x USB 2 0 Display 1 x HDMI Front I O USB 1 x USB 2 0 OTG Port INTERNAL I O Serial 1 x RS 232 422 485 8 wire USB 1 x USB 2 0 Display 1 x LVDS LCD Panel Connector SATA 1 x SATA...

Страница 7: ...additional Serial ATA 2 0 port is provided for storing system and user data Gigabit LAN The Ethernet LANs are built around the Atheros AR8033 Ethernet controller 10 100 1000Mbps and LAN7500 Ethernet c...

Страница 8: ...Panel Power Select JP1 1 SATA 2 0 for i MX6 Quad Debug 1 7 1 4 DDR3L DDR3L Debug LED 1 5 2 USB 3 USB 2 0 USB OTG COM 1 HDMI LAN 2 LAN 1 Chapter 2 Hardware Installation Board Layout Top View Bottom Vi...

Страница 9: ...OR Flash Full size Mini PCIe USB 2 0 GLAN RGMII RS 232 422 485 RS 485 SATA 2 0 SATA 1x SPI SD SD e MMC USB OTG GPIO 3 3V USB 2 0 HDMI HDMI LVDS LVDS USB 1x I2 C Bus USB 2 0 UART TEST USB HOST USB2517...

Страница 10: ...contact with the system chassis throughout any procedures requiring ESD protection Important The Debug LED lights red until the operating system is being accessed Power off the PC then unplug the pow...

Страница 11: ...rsions i e Rev A and Rev B the boot device may be pre configured differently Please refer to Appendix A for a thorough comparison Boot Device Select SW5 1 2 3 4 5 6 7 8 eMMC Note On On Off Off On On O...

Страница 12: ...ports 2 LAN ports 1 serial RS 485 port 1 HDMI port 1 USB 2 0 OTG port 9 36V DC in This 2 pin terminal block is considered a low power solution Connect a DC power cord to this terminal block Using a vo...

Страница 13: ...ect a LCD monitor or a digital TV that has a HDMI port RJ45 LAN Ports Features 1 Atheros AR8033 Ethernet controller 10 100 1000Mbps 1 LAN7500 Ethernet controller 10 100 1000Mbps The LAN ports enable t...

Страница 14: ...or allows you to connect 1 additional USB 2 0 port USB 3 The additional USB port may be mounted on a card edge bracket Install the card edge bracket to an available slot at the rear of the system chas...

Страница 15: ...used for USB communication USB 2 0 OTG The Digital I O connector supports 8 bit digital input output signals to provide powering on function of the connected devices Pin Pin Name 1 GPIO7 2 GPIO6 3 GP...

Страница 16: ...RS485 communication supports auto flow control The serial port is asynchronous communication ports with 16C550A compatible UARTs that can be used with modems serial printers remote display terminals...

Страница 17: ...SATA Serial ATA Connector for i MX6 Quad only 1 Serial ATA 2 0 port with data transfer rate up to 3Gb s The Serial ATA connector is used to connect the Serial ATA device Connect one end of the Se ria...

Страница 18: ...and is used to install a Mini PCIe card microSD Socket The microSD socket allows you to install a microSD card for the expansion of available storage Mini PCIe ON 1 2 3 4 5 6 7 8 microSD The I2 C con...

Страница 19: ...GND 3 LVDS_CLK 4 LVDS_CLK 5 LVDS_Out3 6 LVDS_Out3 7 LVDS_Out2 8 LVDS_Out2 9 LVDS_Out1 10 LVDS_Out1 11 LVDS_Out0 12 LVDS_Out0 13 Panel Power 14 Panel Power Pin Pin Name 1 Panel Backlight SATA Power 5V...

Страница 20: ...power when the main power is shut off Safety Measures Danger of explosion if battery incorrectly replaced Replace only with the same or equivalent type recommended by the manufacturer Dispose of used...

Страница 21: ...sa Failure in loading a compatible image onto the system may result in malfunction and unexpected errors Check Board Type The CPU core type of the system board dictates which images and only which ima...

Страница 22: ...1 2 3 4 5 6 7 8 3 Unzip Image package on your PC 4 Yocto image execute core type yocto emmc fs053 core type all vbs For example for DualLite CPU execute DualLite_core yocto emmc fs053 DualLite all vbs...

Страница 23: ...execute DualLite_core yocto spi fs053_DualLite u boot vbs Android image execute core type android spi fs053_ core type u boot vbs For example for DualLite CPU execute DualLite_core android spi fs051_D...

Страница 24: ...W5 to SD Card Download Mode pins 1 3 6 7 on and 2 4 5 8 off 2 Plug in the Micro USB cable to your PC and power on the FS053 Important 1 The adapter output voltage is 9 36V for FS053 2 Do not insert SD...

Страница 25: ...After the burning is done click Stop and turn the power off SD Card 3 Unzip Image package on your PC 4 Yocto image execute core type SDBoot yocto sdcard fs053 core type all vbs For example for Quad C...

Страница 26: ...escription Detail Linux Yocto 1 8 Kernel 3 14 52 It is an open source project that delivers a set of tools which create operating system images for embedded Linux systems Support X 11 Demo Image Only...

Страница 27: ...ole command FAT filesystem Support Kingston micro SDHC 4GB class 4 4GB 16GB For standard product we do not port any SDIO module Mini PCIe Support lspci console command for check PCIe card status For s...

Страница 28: ...roid standard product dual display is by default enabled 3 Multi panel selection function for backward compatibility activation required please refer to Appendix A LVDS Backlight 1 Support Android Set...

Страница 29: ...t listed above 5 Suppot Android Airplane mode to disable BT function Android Build Type ENG Build without SELinux Android ADB Support Android Factory Reset Support Android Fastboot Not support Android...

Страница 30: ...cally for Rev B design and for a verified panel AM 800480R3TMQW T31H For the previous Rev A version the software parameters were optimized specifically for Rev A design and for a verified panel OT070U...

Страница 31: ...e software parameters will then support the panel model inserted previously in step 3 3 Restart the system and the new settings will be applied The software parameters will then support the panel mode...

Отзывы: