36
,;
EN
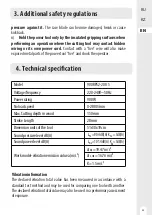
The vibration emission during actual use of the power tool
can differ from the declared total value depending on the
ways in which the tool is used. There is the need to identify safety measures to
protect the operator that are based on an estimation of exposure in the actual
conditions of use (taking account of all parts of the operating cycle such as the
times when the tool is switched off and when it is running idle in addition to
the trigger time)
WARNING
4. Technical specification
5. Functional description
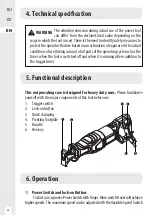
This reciprocating saw is designed for heavy duty uses.
Please familiarize
yourself with the major components of this tool before use.
1. Trigger switch
2. Lock-on button
3. Quick clamping
4. Pivoting footplate
5. Handle
6. Hex key
4
3
1
2
5
6
6. Operation
1)
Power Switch and lock-on Button:
To start saw, squeeze Power Switch with finger. More switch travel will achieve
higher speeds. The maximum speed can be adjusted with the Variable Speed Switch.
FR
ES
PT
IT
PL
UA
RU
RO
GR
EN
164
6. Operation
2) General Cutting:
Hold your saw firmly in front and clearly away from you. Make sure saw blade is
clear of any foreign material and that power cord and extension cord are out of the
blade path. Be sure material to be cut is held firmly. Small work pieces should be
securely clamped in a vice or with clamps to the work bench or table. Mark the line
of cut clearly. Pull in the power switch to start the cutting action. Set the shoe on
the work. DO NOT FORCE. Use only enough pressure to keep the saw cutting. Allow
the blade and saw to do the work.
3)
Plunge Cutting:
Clearly mark the line of cut. From a convenient starting point within the cut out
area, place the tip of the blade over that point with saw parallel to the line of cut.
Slowing lower the saw until the button edge of the shoe rests on the workpiece.
Start the saw and allow it to attain full speed. With the saw resting on the shoe,
slowly let the saw forward to lower the blade onto the cut line. Continue this
motion until the saw blade is perpendicular to the workpiece.
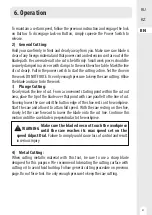
Make sure the blade does not touch the workpiece
until the saw reaches its max speed set on the
speed Adjust Dial.
Failure to comply could cause loss of control and result
in serious injury.
WARNING
4) Metal Cutting:
When cutting metallic material with this tool, be sure to use a sharp blade
designed for this purpose. We recommend lubricating the cutting surface with
cutting oil to avoid heat buildup. Follow general cutting procedure on previous
page. Do not force tool. Use only enough pressure to keep the saw cutting.
To maintain a certain speed, follow the previous instruction and engage the lock
on Button. To disengage Lock-on Button, simply squeeze the Power Switch to
release.
FR
ES
PT
IT
PL
UA
RU
RO
GR
EN
165
Содержание 900RPS2-200.5
Страница 2: ......
Страница 4: ...A x1 B x1 4 ...
Страница 36: ...a DEXTER b 900RPS2 200 5 3 c d e f g h i EN KZ Қылышты ара 900Вт ...
Страница 53: ... ...
Страница 54: ...1 2 1 2 1 3 CLICK ...
Страница 55: ...3 4 1 2 3 ...
Страница 56: ......
Страница 57: ......

