4
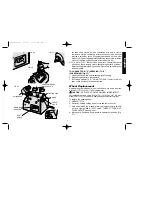
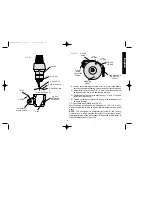
SHIFTING FROM “S” (SHARPEN) TO “D” (DRESS)
NOTE: Be sure to do Step 1 before Step 2. Otherwise, the
swinghead will not move up to the eye shield.
1. Pivot swinghead to normal sharpening position (Fig.6).
2. Rotate swinghead until it touches the eyeshield (Fig.7).
3. Move mode selector switch to “D” (Fig.8).
SHIFTING FROM “D” (DRESS) TO “S” (SHARPEN)
1. Line up mark on dress knob with parting line of housing. Position
swinghead close to the eyeshield (Fig. 9).
2. Shift mode selector to “S.” DO NOT FORCE. If selector switch
will not seat, rock dress knob back and forth while keeping slight
pressure on selector switch until it snaps into place (Fig. 10).
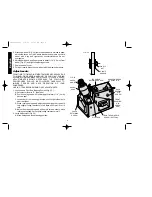
Sharpening of Drill Bits
(Figs. 11, 12, 13, 14, 15, 16)
PREPARING TO SHARPEN
NOTE: First, check the unit for the adjustments explained in the
“Adjustments” section of this manual.
1. The swinghead has two indexing positions, 180° apart. Rotate sleeve
to make sure it is seated, with locator in top position. Make sure selector
switch on top of the tool is in the “S” (sharpen) position (Fig. 11).
2. Press latch toward swinghead and move swinghead toward
loading position (Fig. 12).
3. Open chuck jaws by turning chuck nut counter-clockwise (Fig.13).
4. Insert smaller diameter bits past the locator directly into the chuck
(Fig. 14).
5. Insert larger diameter bits through the opening in the chuck head
(Fig. 15).
6. Position bit so that tip is approximately 1/16" (1.6 mm) below end
of locator. Be sure straight edge at end of locator is flat against
flute. This positioning of the bit with the locator is the key to
satisfactory sharpening (Fig. 16).
English
FIG. 6
FIG. 7
FIG. 9
D
SH
AR
PE
N
IN
G
IN
ST
RU
C
TI
O
N
S
LO
AD
G
R
IN
D
T
O
1
/3
2
"
FIG. 8
S
SH
AR
PE
N
IN
G
IN
ST
RU
C
TI
LO
AD
FIG. 10
PARTING LINE
MARK
DW751/385103 5/2/02 12:51 PM Page 4

