2
•
OUTDOOR USE EXTENSION CORDS. When tool is used
outdoors, use only extension cords intended for use outdoors and
so marked.
•
STAY ALERT. Watch what you are doing. Use common sense. Do
not operate tool when you are tired.
•
CHECK DAMAGED PARTS. Before further use of the tool, a guard
or other part that is damaged should be carefully checked to
determine that it will operate properly and perform its intended
function. Check for alignment of moving parts, binding of moving
parts, breakage of parts, mounting, and any other conditions that
may affect its operation. A guard or other part that is damaged
should be properly repaired or replaced by an authorized service
center unless otherwise indicated elsewhere in this instruction
manual. Have defective switches replaced by authorized service
center. Do not use tool if switch does not turn it on and off.
Additional Safety Rules for Drill Bit
Sharpener
WARNING: This professional tool is designed for fast, accurate
sharpening of right-hand, 2-flute twist drill bits from 1/8" (3 mm) to
1/2" (13 mm) in diameter. DO NOT attempt to sharpen carbide-
tipped or cobalt bits. Since proper procedure is essential to
satisfactory results, read the operating instructions carefully, and,
for your own protection, pay close attention to the safety rules.
•
Wear eye protection.
•
Use grinding wheel suitable for speed of grinder.
•
Replace cracked wheel immediately. Handle grinding wheels
carefully to avoid bumping or dropping. DO NOT use a grinding
wheel that has been dropped. Before using, inspect each grinding
wheel for cracks or flaws and if these are evident, discard the
wheel.
•
Always use guards and eye shields. Keep the eye shield mounted
in proper positions.
•
Do not overtighten wheel nut. Before mounting a new wheel, be
sure that it is marked with an R.P.M. that is the same as, or higher
than, the no-load speed of the tools as marked on the nameplate.
•
Use only flanges furnished with the grinder.
•
Bolt the drill bit sharpener to a bench to prevent movement.
•
Adjust distance between wheel and guards to maintain 1/16" (1.6
mm) or less separation as the diameter of the wheel decreases
with use.
•
Use accessories only in proper and intended manner.
SAVE THESE INSTRUCTIONS
Drill Bit Terminology
A primary requirement for drilling accurately sized holes is that there
be minimal difference between the lip heights of the two flutes.
Variations in the two lip heights will alter the centrality of the point
which will produce eccentric drilling. (See Figures 1, 2, and 3.) See
paragraph 6 of the “Troubleshooting” section in this manual. Your
D
E
WALT sharpener is engineered to produced equal lip heights and
a centrally located point.
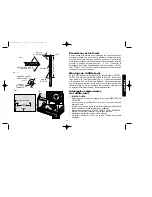
Mounting the Sharpener
FOR BEST RESULTS YOUR SHARPENER SHOULD BE
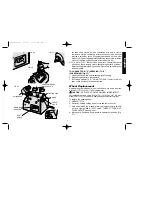
MOUNTED TO A FIRM WORK SURFACE. Drill two 5/16" (8 mm)
holes in work bench as shown in Fig. 4. Insert two 1/4" (6 mm)
diameter carriage bolts. Slide Sharpener over bolt heads and fit bolt
heads into openings provided in bottom of tool (Fig. 5.) Tighten nuts
on bolts evenly with moderate force. Do not overtighten!
English
DW751/385103 5/2/02 12:51 PM Page 2

