background image

ElectroVap®

 ELMC-SB 


45 


6.6


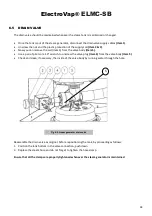
WATER INLET VALVE 


Maintenance of the water inlet valve is to be done after the first 50 
hours of operation. Thereafter, twice a year (minimum). 


Switch the appliance off. 


Switch  off  the  water  supply  to  the  steam  generator  and 
unscrew the water supply hose. 


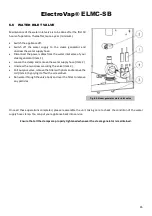
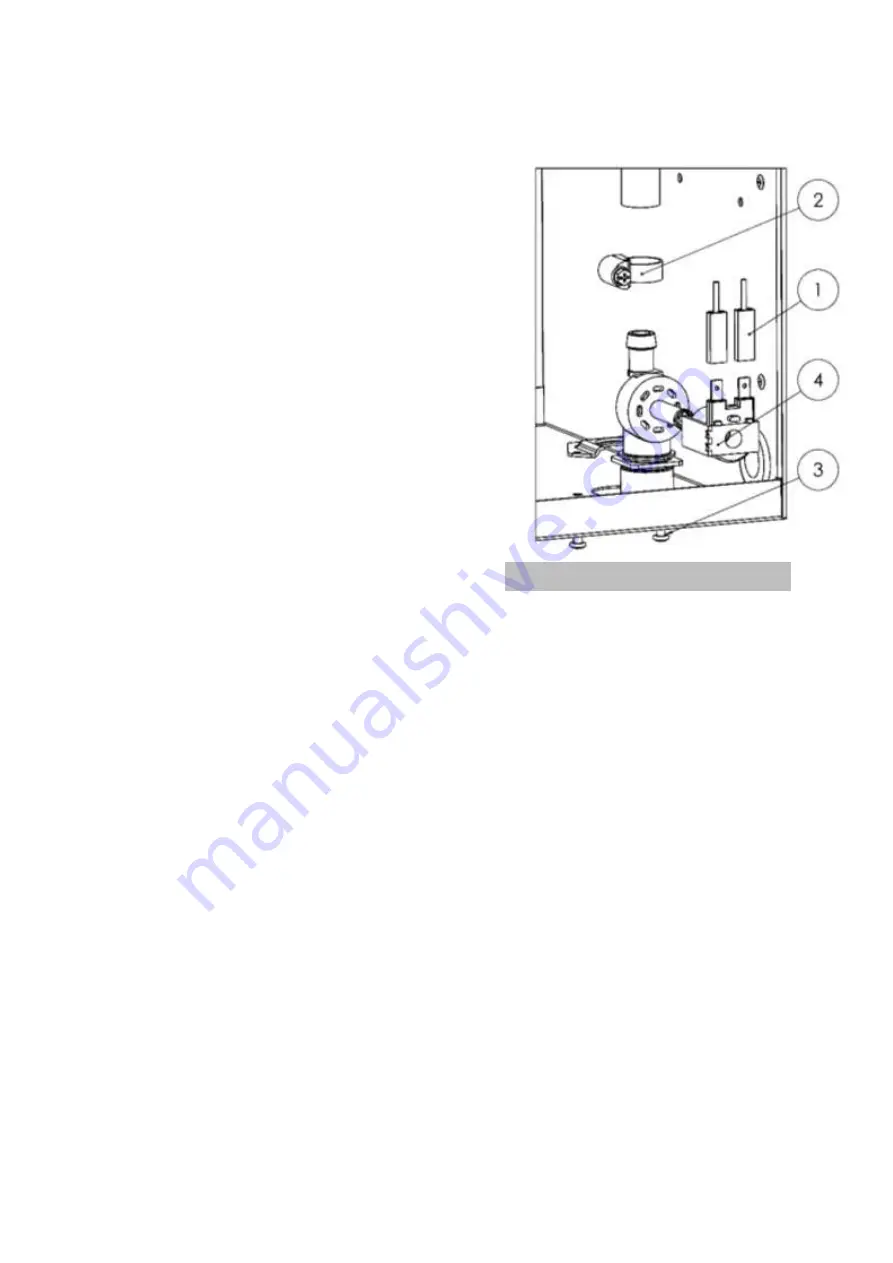
Disconnect the power cables from the water inlet valve of your 
steam generator (Item 1). 


Loosen the clamp and remove the water supply hose. (Item 2) 


Unscrew the two screws securing the valve (Item 3). 


Pull out your valve, remove the filter with pliers and remove the 
coil (Item 4) by prying it off with a screwdriver. 


Run water through the valve body and over the filter to remove 
any particles. 


Once  all these operations completed, please reassemble  the  unit, taking care to check  the  condition of the  water 
supply hose clamp. You can put your appliance back into service. 
 

Ensure that all the clamps are properly tightened whenever the steam generator is maintained. 


Fig. 6-4. 

Steam generator water inlet valve


Содержание ElectroVap ELMC 20-30 SB

Страница 1: ...STEAM GENERATOR FOR STEAM ROOM ElectroVap ELMC SB Series Instruction Operation Manual ...

Страница 2: ...OSE CONNECTION 14 3 6 TEMPERATURE SENSOR POSITIONING 16 3 7 ELECTRICAL CONNECTIONS 17 3 8 ELECTRICAL WIRING 19 3 9 OPTION TRANSFORMER CONNECTION 29 4 COMMISSIONING 30 5 SYSTEM MANAGEMENT 31 5 1 USER INFORMATION MENU READ ONLY 31 5 2 STEAM GENERATOR STATUS MENU 33 5 3 CHANGE SETTINGS MENU 34 5 4 MAINTENANCE ALERTS 37 5 5 DEFAULT MESSAGE 38 6 MAINTENANCE 41 6 1 GENERAL INFORMATION 41 6 2 STEAM CYLIN...

Страница 3: ... of this warning can lead to serious bodily injury or death to people and or significant material malfunctions Danger High temperature The ElectroVap ELMC uses steam during the operation and therefore surfaces and pipe work become very hot Ensure that equipment not sustaining high temperatures is kept away Electrostatic hazard The components of the device may be subject to deterioration as they ar...

Страница 4: ...ors can be used with potable demineralized or softened water It is absolutely forbidden to inject a chemical into the hydraulic system Make sure that the water supply pressure does not exceed 6 bar Always be careful that the installation meets local standards ELECTRICITY The user ensures that electrical installation will be carried out by an authorized technician in this field The installer must p...

Страница 5: ...ersigned hereby declare that the equipment specified above conforms to the above Directive s and Standard s Valid for units with serial number starting from n 500 001 FRAMBOT Jean François General Manager 05 01 2021 1 4 ROHS DECLARATION Devatec Confirms that the ElectroVap ELMC SB steam generator is manufactured in compliance with the following European regulations 2011 65 UE This guideline regula...

Страница 6: ...team hose and 1 for the drain hose ACCESSORIES Not supplied Steam distribution nozzle Touch screen Steam Bath remote control with 3 or 8 dry contacts Perfume dispensor Disinfecting system Emergency button Steam and condensate hose Stainless steel braided hose in 3 4 FF with gaskets for connection to water network Drain hose Timer bath device Bluetooth kit for mobile application Filling cup extensi...

Страница 7: ...11 137 137 137 E3 Distance between steam outputs 275 275 G1 Drain water position 350 417 372 372 G2 Drain water position 111 137 137 137 G3 Distance between draining water 275 275 H1 Water inlet position 222 222 222 222 H2 Water inlet position 141 181 181 181 I Condensate outlet diameter Ø 25 Ø 25 2 x Ø 25 3 x Ø 25 K Steam output diameter Ø 25 or 40 Ø 40 or 25 Ø 40 or 25 Ø 40 or 25 Mass kg Weight ...

Страница 8: ...LCD display board 13 Funnel 4 Main circuit board 14 Overflow hose 5 Power contactor 15 Drain valve 6 Fuse holders 16 Filling hose 7 3 relay board optional 17 Steam Cylinder 8 Transformer 18 High water level electrode 9 ON OFF Switch 19 Power electrode 10 Power rail 20 Cylinder retaining clip Fig 2 3 Steam generator component parts ...

Страница 9: ...ounting Please be careful that the support material receiving the device pillar wall etc can support it Fixation use a fastening system adapted to the support material Make sure that the mounting distances are met Please read and follow the enclosed safety information and the warning labels inside the steam generator before installation or maintenance Some steps can be dangerous Visit our website ...

Страница 10: ...he top screws into the dowels M6 recommended let them protrude by about 10 mm 0 39in Hang the device to the top screws and align it vertically and horizontally with a bubble level Tighten up all 4 screws SC Small Cylinder MC Medium Cylinder ELMC 1 SC ELMC 1 MC ELMC 2 MC ELMC 3 MC Has 400 450 750 1000 A1 500 A2 35 53 23 38 B 400 510 510 510 B1 81 81 81 81 Fig 3 1 Installation holes ...

Страница 11: ...between 2 bar and 8 bar MAX in case the water pressure exceeds 8 bar a water regulator calve must be used Network water temperature 40 C Please note that the water supply is connected at the lower part of the unit For easy maintenance the water inlet valve is equipped with a filter strainer which should be checked periodically It is essential to install an isolation valve near the steam generator ...

Страница 12: ...r The quantity of nozzles as well as the diameter change according to the model of the steam generator Model ELMC SB 1 CYL SC 10 MONO 1 CYL MC 2 CYL 3 CYL Quantity of steam nozzle s 1 1 1 2 3 Steam inlet diameter Ø 40 ou 25mm Ø 40 ou 25mm Ø 40mm Ø 40mm Ø 40mm Fig A 3 3 Steam distribution nozzle SC Small Cylinder MC Medium Cylinder Mounting Check that your wall is not thicker than 90mm Drill a hole...

Страница 13: ...our environment please respect the recommendations below and use the appropriate tangential clamps Flexible steam hose max length 3 m Rigid stainless steel or copper tube with a slightly larger diameter connected to earth A flexible steam hose sleeve should be used to connect the generator to the rigid steam pipe The length of the pipe should not exceed 6 m and it should be insulated Steam Bath Ri...

Страница 14: ... any obstacles It is recommended that each generator has its own drain hose If possible use a water trap with a cover see picture below Hose minimum Ø 60 mm option Collecting water tank option Drain hose option α Fig A 3 5 Example of an installation with a collecting water tank Keep a minimum pitch α of 10 for both the draining hose of the generator and for general drain pipe see picture Collectin...

Страница 15: ...it to prevent any steam and or condensation from getting into the cabinet Note ELMC SB are by design equipped with a condensate cooling system that guarantees the following cooling performance Fig B 3 6 Example of Installation with funnel Drain hose option Funnel not supplied α Sewer pipe minimum downward slope α of 10 ...

Страница 16: ... opposite put in the dowels Make a silicone seal between the Ø 60mm washer and the wall then fix the temperature sensor with 3 screws To avoid a possible steam leakage you can fill the hole of the cable passage with silicone Positioning If you fix the temperature sensor to the ceiling of your steam room it is possible to have a slight water retention at the end of the white strainer of the sensor ...

Страница 17: ... 1 6 6 8 2 12 3 16 3 24 5 26 5 32 7 41 1 49 1 53 1 73 6 79 6 Prod kg h 5 1 8 2 10 2 15 4 20 5 30 7 33 2 41 0 51 4 61 4 66 5 92 2 99 7 Cylinder 1 x MC 1 x MC 1 x SC 1 x SC 1 x MC 1 x MC 1 x MC 2 x MC 2 x MC 2 x MC 2 x MC 3 x MC 3 x MC 440V 3ph I A 5 3 8 5 10 6 15 8 21 1 31 7 34 0 42 2 52 8 63 3 68 0 95 0 102 0 P kW 4 0 6 5 8 1 12 1 16 2 24 2 26 0 32 3 40 4 48 5 52 0 72 7 78 1 Prod kg h 5 1 8 1 10 1...

Страница 18: ...cal connections check that your installation has been determined from the values in the below table Respect local regulation concerning electrical connections Electronic components are sensitive to electrostatic charges When working on these components take appropriate measures to avoid electrostatic discharges Steam generator electrical compartment Power supply Installation of an electrical isola...

Страница 19: ...olator Protection Up V Up V 3x200 230Vac 50 60Hz ELMC SB 3 4 1 2 L 1 L 2 L 3 N L Electrical isolator Protection Up V ELMC SB 3 4 1 2 L 1 L 2 L 3 N L Up V 3x380 690Vac 50 60Hz Uc V 1x200 230Vac 50 60Hz Uc V Up V Electrical isolator Protection Up V 3x380 420Vac 50 60Hz with neutral ELMC SB 3 4 1 2 L 1 L 2 L 3 N L Up V Neutral Electrical isolator Protection ...

Страница 20: ...ElectroVap ELMC SB 20 Up V 3x380 690Vac 50 60Hz OPTION Transformer sec 2x115V ELMC SB 3 4 1 2 L 1 L 2 L 3 N L Up V Electrical isolator Protection OPTION Transfo 100 VA sec prim F ...

Страница 21: ...S CONFIGURATION S6 S5 S4 CTRL SIGNAL TYPE TEMP oC SENSOR Control signal type setting inELMC SB menu Make a bridge with an electrical wire between terminals 1 and 2 of the DIN rail 17 16 15 X04 Main Board 3 4 1 2 ELMC SB Red White Red Technical room Steam Bath Temperature sensor ...

Страница 22: ...rn line resistance on or off Depending on your needs these resistances can be activated or deactivated see diagram X22 Connector 36 37 38 Remote steam production dry contact X21 Connector 33 34 35 Remote general fault dry contact X20 Connector 30 31 32 Remote tank maintenance dry contact 1 2 3 4 3 2 1 J2 SW1 On Off K4A X10 Main board SW1 2 J2 1 Data 2 Data 3 GND 5V 680 SW1 3 120 SW1 1 680 Main boa...

Страница 23: ...t switch 1 is opened 0 is closed 10004 BI 3 00C00003 Fill valve 1 filling 0 no filling 10005 BI 4 00C00004 Drain valve 1 draining 0 no draining 10006 BI 5 00C00005 relay X10 term 3 4 Blower pack remote ON OFF service default 1 relay ON 0 relay OFF 10007 BI 6 00C00006 maintenance returns 1 is ON 0 is OFF 10008 BI 7 00C00007 Alarm returns 1 is ON 0 is OFF 1 BO 0 01000000 On Off BMS command 1 ON Star...

Страница 24: ...al DI water 4 DI water 30012 Have 11 00000000B type of control 20 On Off 21 Digital Ctrl 22 Digital Sensor 23 0 10V CTRL 24 0 5V CTRL 25 0 20mA CTRL 26 0 10V Sensor 27 0 5V Sensor28 4 20mA Sensor 29 Temp Sensor 30014 Have 13 00000000D Application 30015 Have 14 0000000E steam production 10 x Kg hr 40004 Av 3 00800003 End of season EOS hours mini 1 and maxi 168 40005 Av 4 00800004 Steam capacity lim...

Страница 25: ...ElectroVap ELMC SB 25 3 8 6 Wiring diagrams ELMC 5 to 10 Up V 1x200 240V 50 60Hz ...

Страница 26: ...ElectroVap ELMC SB 26 ELMC 5 to 30 Up V 3x200 690V 50 60Hz ...

Страница 27: ...ElectroVap ELMC SB 27 ELMC 40 to 60 Up V 3x200 690V 50 60Hz ...

Страница 28: ...ElectroVap ELMC SB 28 ELMC 90 Up V 3x200 690V 50 60Hz ...

Страница 29: ...ElectroVap ELMC SB 29 3 9 OPTION Transformer connection ...

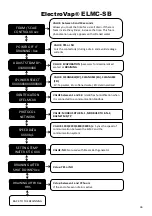
Страница 30: ... Switch on the unit switch If the unit asks you for a commissioning code note the serial number on the nameplate and contact your agent to obtain this code Enter your three digit code by doing this Press one of the keys 1 2 3 and the display will show you 0XX with the flashing zero to eventually change it by pressing 2 or 3 Once arrived at your digit validate it by pressing key 1 and your second d...

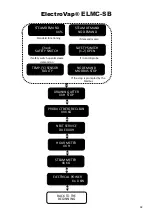
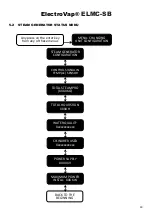
Страница 31: ...ONFIGURATION WWW DEVATEC COM ELECTROVAP V3 35 ACTUAL CONTROL SIGNAL Y XX ACTUAL CONTROL SIGNAL Y XX Xuu CHECK RH SENSOR Y XX SET POINT Hr HR MEASURE If in digital control Uu mA or V depending on the regulation If HR 7 If in an HR probe MENU STEAM GENERATOR STATUS STEAM STEAM GENERATOR ELMC 10 3x400V STEAM PRODUCED XX Xkg XX XKG h ACTUAL CURRENT Xx X A ...

Страница 32: ...tioning If demand is zero If safety switch open steam demand on If in an HR probe TEMP C SENSOR FAULTY DRAINING AFTER XX H STOP PRODUCT BEFORE CLEAN XXX KG NEXT SERVICE DUE XXXH HOUR METER XX H STEAM METER XX KG ELECTRICAL POWER Xx X KW BACK TO THE BEGINNING NO DEMAND MODBUS STOP If the stop is prompted by the Modbus ...

Страница 33: ...any of these menus MENU CHANGING UNIT CONFIGURATION STEAM GENERATOR CONFIGURATION CONTROL SIGNAL IN TEMP oC SENSOR TOTAL STEAM PRO XXXX KG TOTAL HOURS RUN XXXX H WATER QUALITY Xxxxxxxxxxxx CYLINDRER USED Xxxxxxxxxxxx POWER SUPPLY XXXXX V MAXIMUM POWER INSTAL XXX KW BACK TO THE BEGINNING ...

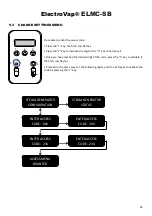
Страница 34: ...t Once you have reached the desired digit of the code press the 1 key to validate it the 2nd cross flashes Proceed in the same way for the following digits and do not forget to validate the code by pressing the 1 key STEAM GENERATOR CONFIGURATION STEAM GENERATOR STATUS ENTER ACCESS CODE XXX ENTER ACCESS CODE 2XX ENTER ACCESS CODE 23X ENTER ACCESS CODE 234 ACCESS MENU GRANTED 5 1 2 3 4 ...

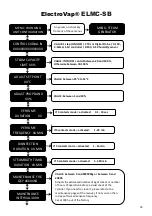
Страница 35: ...X VALUE between 25 C to 55 C VALUE between 1 and 20 MAINTENANCE FRE QCY XXXXXKG MAINTENANCE INTERVAL 300H VALUE between 0 and 999000kg or between 0 and 2000h Adjusts the estimated number of kg of steam or number of hours of operation before a visual check of the cylinder If you need to clean it please refer to the maintenance pages of the manual if not you can then increase this maintenance freque...

Страница 36: ...XXXXXXX XXXXXXXXXXXXXXXX XXXXXXXXXXXXXXXX XXXXXXXXXXXXXXXX XXXXX IDENTIFICATION OF ELMC XX VALUE CLEANABLE EV CLEANABLE EA CLEANABLE ED EV Tap water EA softened water ED demineralized water VALUE between 1 and 32 Identifies humidification when it is connected to a communication Modbus PROTOCOL NETWORK SPEED DATA XXXXb s VALUE MODBUS RTU 8 N 1 MODBUS RTU 8 N 2 BACNET MS TP VALUE 1200 2400 4800 9600...

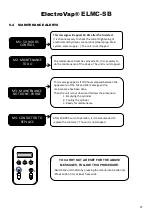
Страница 37: ...nder 2 2 Cooling the cylinder 3 3 Ready for maintenance M2 MAINTENANCE TO DO The maintenance timer has arrived at 0 it is necessary to do the maintenance of the device The unit is not stopped M1 50 HOURS CONTROL This message will appear 50 Hrs after the first start It is then necessary to check the correct tightening of electrical and hydraulic connections steam pipe drain system water supply The ...

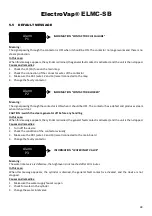
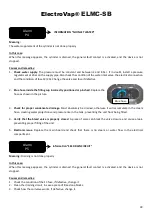
Страница 38: ...ould not CAUTION switch the steam generator off before any handling In this case When this message appears the cylinder is drained the general fault contact is activated and the unit is then stopped Causes and remedies 1 Turn off the device 2 Check the condition of the contactors visually 3 Make sure the X01 wire 12 and 13 is well connected to the main board 4 Change the faulty contactor Meaning T...

Страница 39: ...t absolutely be drained otherwise it will accumulate in the steam hose creating water projections and pressure rise in the tank preventing the unit from being filled 4 Verify that the bleed valve is properly closed A piece of scale can block the valve closure and cause a leak preventing proper filling of the unit 5 Electronic issue Replace the main board and check that there is no steam or water f...

Страница 40: ...f the cylinder Check if there is limestone in the valve Alarm P8 Information CLEAN CYLINDER DRAIN VALVE TO CARRY OUT A RESET FOR THE ABOVE MESSAGES FOLLOW THIS PROCEDURE Switch the unit to drain by pressing the manual drain button 4 Press button 3 for at least 5 seconds 5 1 2 3 4 TEMP C SENSOR FAULTY TEMP C SENSOR MISSING Defective probe thermal shock or incorrect probe installation Connection pro...

Страница 41: ...d deposits on the electrodes which can increase the concentration of water If electrical arcs appear inside the cylinder your steam generator works under abnormal conditions and these arcs can cause A significant heat increase that could overheat the plastic and even melt it causing a hole and then a leak into the unit A disjunction of the device due to a high intensity created by the electrical a...

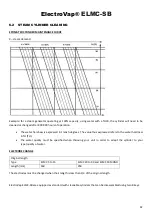
Страница 42: ... French degrees The value thus expressed refers to the water hardness in fH TH The water quality must be specified when choosing your unit in order to adapt the cylinder to your type quality of water ELECTRODE CHANGE Original length Type ELMC 5 to 15 ELMC 20 to 90 and ELMC 10 MONO Length mm 160 250 The electrodes must be changed when their length is less than 1 3 of the original length ElectroVap ...

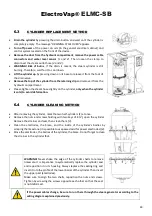
Страница 43: ...old to avoid deformation 6 4 CYLINDER CLEANING METHOD After removing the cylinder mark the two half cylinders 1 at once Remove the nuts and screws holding with two keys of 8 2 open the cylinder Remove the strainer and seal then clean them 3 Clean the electrodes the brace and the inside of the cylinder s bodies by scraping the limestone it is possible to use passed acid for power electrodes 4 Rinse...

Страница 44: ...m 5 Use a pair of pliers or a 19 wrench to unscrew the valve plug Item 6 from the valve body Item 5 Check and clean if necessary the inside of the valve body by running water through the hole Reassemble the drain valve as original before repositioning the tank by proceeding as follows 1 Position the tank bottom in the valve connection push down 2 Replace the steam hose and do not forget to tighten...

Страница 45: ...remove the water supply hose Item 2 Unscrew the two screws securing the valve Item 3 Pull out your valve remove the filter with pliers and remove the coil Item 4 by prying it off with a screwdriver Run water through the valve body and over the filter to remove any particles Once all these operations completed please reassemble the unit taking care to check the condition of the water supply hose cl...

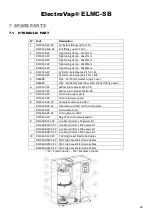
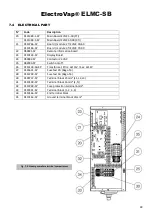
Страница 46: ...er inlet valve ELMC 5 30 D110771 SP Water inlet valve ELMC 40 90 7 D110154 SP Drain cup upper part D110154 SP Drain cup lower part 8 D116726 24 SP Complete drain valve 24V D110148 24 SP Operator with 24V coil for drain valve D110149 SP Drain valve body D116656 24 SP Drain valve coil 24V D110153 SP Bag of 10 drain valve gaskets 9 D119698 1SC SP 3 cable cylinder 1 SC power kit D119698 1MC SP 3 cable...

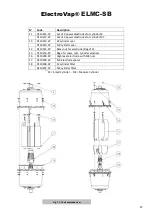
Страница 47: ...0212 SP SC cylinder seal D110213 SP MC cylinder seal 13 D110221 SP Brass nut for electrode Bag of 3 15 D110233 SP Bag of screws nuts cylinder washers 16 D110209 SP High level electrode with M4 nuts 17 D110200 SP MC Electrode spacer 18 D110206 SP SC cylinder filter D110207 SP MC cylinder filter SC Small Cylinder MC Medium Cylinder Fig 7 1 Tank exploded view ...

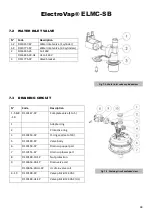
Страница 48: ...tion 1 5 8 10 D110147 SP Complete valve 1 to 5 1 Adapter ring 2 Protective ring 3 D110153 SP O ring seal set of 10 5 D110149 SP Valve body 6 D110154 SP Drain cup upper part 7 D110155 SP Drain cup lower part 8 D110148 10 SP Nut protection 9 D116656 24 SP Drain valve coil D116656 24 UL SP UL drain valve coil 4 10 D110148 SP Valve pilot kit 24 VAC D110148 UL SP Valve pilot kit 24 VAC UL Fig 7 2 Water...

Страница 49: ... Display Board 24 D50932 SP Contactor 24 VAC 25 D92393 SP Switch on off 26 D110128 50 SP Transformer Prim 2x115V Sec 2x12V 27 D116631 SP Fuse fast 2A Bag of 6 28 D116718 SP Fuse fast 5A Bag of 6 30 D109737 SP Terminal block 35mm L1 L2 L3 31 D110168 SP Terminal block 16mm L N 32 D110768 SP Fuse protection terminal 6mm 33 D107491 SP Terminal block 1 2 3 4 34 D110166 SP End terminal block 35 D110163 ...

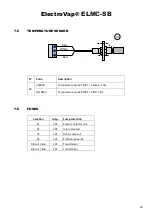
Страница 50: ... Temperature probe KTY81 3 wires 10m D116655 Temperature probe KTY81 3 fils 25m Location Amp Fuse protection F1 2AT Power contactor coil F2 2AT Inlet valve coil F3 2AT Drain valve coil F4 2AT Electronic boards Din rail 5 6 2AT Transformer Din rail 7 8 5AT Transformer White Red Red 40 ...

Страница 51: ...ElectroVap ELMC SB 51 ...

Страница 52: ...tions may change without notice This is a translated version of the original version ELMC 05 21 Edition V 3 0 X program version 185 Boulevard des Frères Rousseau 76550 Offranville France www devatec com Export Tel 33 0 2 35 83 06 44 Email export devatec com France Tel 33 0 2 35 04 61 41 Email france devatec com ...

Отзывы: