18
GASOLINE CHAIN SAW
GASOLINE CHAIN SAW
EN
1. Open the fuel tank cap carefully to excess pressure in the fuel tank discharged slowly. Drain off any
remaining fuel.
2. Start the engine and let it run until it stops so that fuel evaporates from the carburetor.
3. Allow the engine to cool (about 5 minutes).
4. Use the spark plug key to remove the spark plug.
5. Add 1 teaspoon of pure 2-stroke engine oil to the plug hole. Pull the starter cord slowly a few times so that
the internal components are coated with oil. Replace the spark plug.
NOTE:
Keep the chain saw in a dry place, away from possible sources of fire, such as a stove, gas boiler, etc.
Preparing the machine for work after preservation
1. Remove the spark plug.
2. Pull the starter cord with a jerk to remove excess oil from the fuel tank.
3. Clean and adjust the spark plug clearances or insert a new spark plug with a suitable clearance.
4. Prepare the chain saw for work.
5. Fill the tank with a suitable fuel mixture of gasoline and oil.
Tool cleaning
ATTENTION!
Do not use water or other liquids for cleaning!
Use caution when cleaning the tool. Always use protective gloves.
Turn off the device. Wait approximately 10-15 minutes for the engine to cool completely. Wipe all surfaces and
ventilation openings with a dry cloth or rag; if necessary, use a special brush.
To ensure perfect operation of the oil pump, it is necessary to periodically clean the oil-conducting groove and
the oil-conducting hole in the saw bar.
The bar service
Regularly lubricate the gear at the top of the bar. Proper bar care, described in this section, is essential to the
quality of the chainsaw.
To lubricate the sprocket, the use of a grease gun is recommended (not included). To service the bar sprocket:
1. Disconnect the device from the mains.
2. Clean the sprocket of the bar.
3. Place the needle-shaped nozzle of the syringe into the grease hole and inject grease until it appears on the
outer edge of the bar sprocket (Fig. 19).
4. Move the chain manually. Repeat the above lubrication procedure until the entire bar sprocket is lubricated.
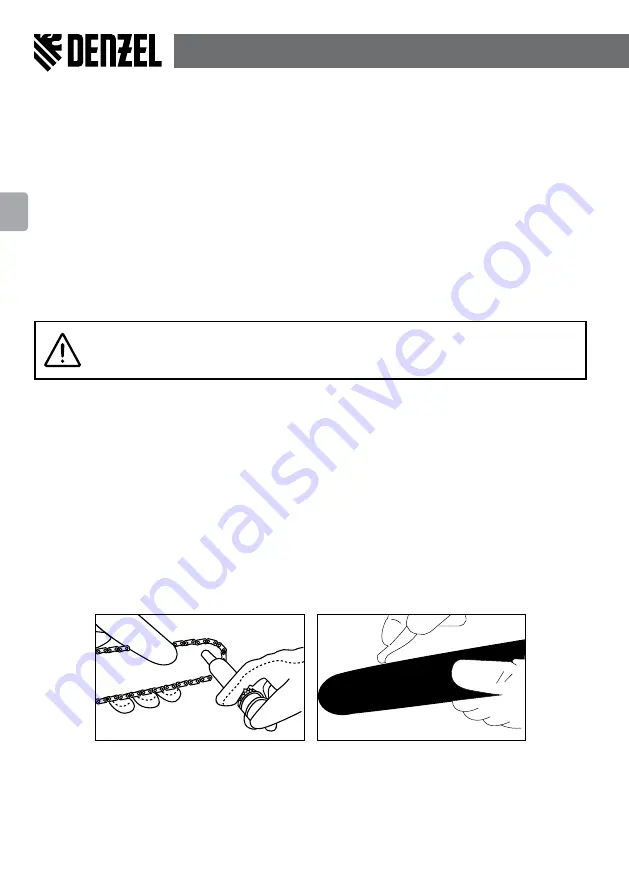
For uniform wear, the bar should be rotated every 8 hours of operation. Keep the bar groove and lubrication
hole clean with a cleaning tool (not supplied) (Pic. 27).
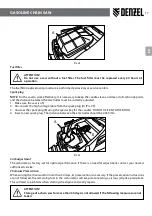
Pic. 26
Pic. 27
Regularly check the rails of the bar for wear, if necessary, remove burrs, and use a flat file to clean the rails at
right angles (Pic. 28).
Содержание 952307
Страница 22: ...22 BG 23 23 24 24 26 27 27 28 32 37 41 42 42 42 42 42 42...
Страница 23: ...23 BG 10 C 35 C 80...
Страница 24: ...24 BG 1 2 4 3 5 6 7 1 1 2 1 3 1 4 1 5 1 6 1 7 1 16...
Страница 25: ...25 BG 1 2 P c 1...
Страница 26: ...26 BG 2 A A A A B A B B P c 2 CO...
Страница 28: ...28 BG 1 2 4 3 A B 5 A B P c 4 P c 5 4 C 6 5 D 7...
Страница 29: ...29 BG C D P c 6 P c 7 6 E 8 7 F 8 E E F P c 8 8 9 9 P c 9 10...
Страница 30: ...30 BG 5 8 10 A B C P c 10 1 D D 11 2 2 4 D P c 11...
Страница 31: ...31 BG 1 A 12 2 B 12 A B P c 12 1 2 3 1...
Страница 32: ...32 BG 2 260 3 4 13 P c 13 AI 92 1 40 30 1 2...
Страница 33: ...33 BG 3 4 4 5 5 6 50 60 7 1 2 15 A B 14 A B P c 14...
Страница 34: ...34 BG C D C E C F D 3 5 C 15 D F C P c 15 F A B 16 A B P c 16...
Страница 35: ...35 BG 17 P c 17 A 18 P c 18...
Страница 36: ...36 BG 1 P c 19 1 19 1 20 2 1 3 21 1 2 P c 20 P c 21 3 1 3 22 23 1 2 3 2 1 2 1 3 P c 22 P c 23...
Страница 37: ...37 BG 10 20 V V V V V 1 A 24 2 3 P c 24...
Страница 38: ...38 BG 20 1 2 A 25 3 B 4 0 635 A B P c 25 30 30 1 2 3 5 4 5 1 2...
Страница 39: ...39 BG 1 2 3 4 5 10 15 1 2 3 19 8 20 P c 26 P c 27 28...
Страница 41: ...41 BG 30 2 1 P c 32 P c 33 33...
Страница 64: ...64 UA 65 65 66 66 68 69 69 70 74 78 83 84 84 84 84 84 84...
Страница 65: ...65 UA 15 40 80...
Страница 66: ...66 UA 1 2 4 3 5 6 7 1 1 2 1 3 1 4 5 6 7 16...
Страница 67: ...67 UA 1 P c 1 2...
Страница 68: ...68 UA A A A A B A B B P c 2...
Страница 70: ...70 UA 1 2 4 3 5 A B P c 4 P c 5 4 6 5 D 7...
Страница 71: ...71 UA C D P c 6 P c 7 6 8 7 F 8 E E F P c 8 8 9 9 P c 9 10...
Страница 72: ...72 UA 5 8 10 P 10 1 D D 11 2 2 4 D P 11...
Страница 73: ...73 UA 1 A 12 2 B 12 A B P 12 1 2 3 1 2 260 3 4 13...
Страница 74: ...74 UA P 13 92 2 1 40 2 30 1 2 3 4 4 5 5 6 50 60...
Страница 75: ...75 UA 7 1 2 15 14 A B P 14 D F...
Страница 76: ...76 UA D 3 5 15 D F C P 15 F 16 A B P 16 17 P 17...
Страница 77: ...77 UA 18 P 18 1 P 19 1 19 1 20 2 1 3 21...
Страница 78: ...78 UA 1 2 P 20 P 21 3 1 3 22 23 1 2 3 2 1 2 1 3 P 22 P 23...
Страница 79: ...79 UA 10 20 V V V V V 1 24 2 3 P 24 20 1 2 25 3 4 0 635...
Страница 80: ...80 UA A B P 25 30 30 1 2 3 5 4 5 1 2 1 2 3 4 5 10 15...
Страница 81: ...81 UA 1 2 3 26 8 27 P 26 P 27 28 P 28 3 29 30 85 30 4 31...
Страница 82: ...82 UA 3 0 11 a a a 0 64 0 025 0 64 0 025 90 85 85 30 30 P 29 P 30 P 31 30 4 5 32 30 2 1 P 32 P 33 33...
Страница 83: ...83 UA 2...


