


8
ENGLISH
CONTENTS
z
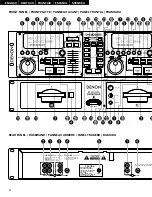
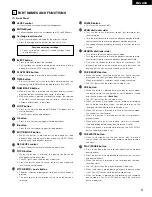
PART NAMES AND FUNCTIONS ……………………………9 ~ 11
(1)
Front Panel …………………………………………………9, 10
(2)
Rear Panel ………………………………………………………10
(3)
Display Window ………………………………………………11
x
ABOUT MINIDISCS …………………………………………………11
c
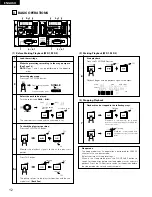
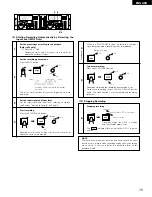
BASIC OPERATIONS …………………………………………12 ~ 16
(1)
Before Starting Playback (MD 1, MD 2) ……………………12
(2)
Starting Playback (MD 1, MD 2)
……………………………12
(3)
Stopping Playback ……………………………………………12
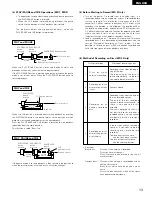
(4)
PLAY/PAUSE and CUE Operations (MD 1, MD 2)
………13
(5)
Before Starting to Record (MD 2 Only)
……………………13
(6)
Method of Recording on Discs (MD 2 Only) ………………13
(7)
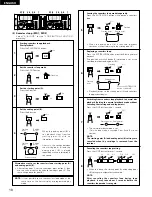
Starting to Record (MD 2 Only) ………………………………14
(8)
Stopping Recording ……………………………………………14
(9)
Starting Recording Automatically by
Detecting the Input Level (MD 2 Only)………………………15
(10) Stopping Recording ……………………………………………15
(11) Incrementing Track Numbers (MD 2 Only) …………………16
(12) Pre-UTOC Function (MD 2 Only) ……………………………16
v
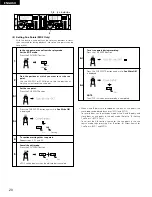
HANDY OPERATIONS ………………………………………17 ~ 22
(1)
Starting Playback from the Middle of a Track
(Manual Search) (MD 1, MD 2) ………………………………17
(2)
Playing at a Different Speed (Pitch) (MD 1, MD 2) …………17
(3)
Seamless Loop (MD 1, MD 2) ………………………………18
(4)
Instantaneous Play (Hot Start) (MD 1, MD 2) ………………19
(5)
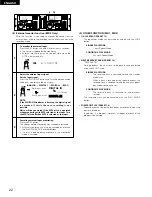
Setting Cue Points (MD 2 Only)………………………………20
(6)
Direct Search for Cue Points (MD 1, MD 2)
………………21
(7)
1
/
2 SYNCHRO REC Function (MD 1, MD 2) ……………21
(8)
External monitor function (MD 2 Only)………………………22
(9)
OTHER FUNCTION (MD 1, MD 2)
…………………………22
b
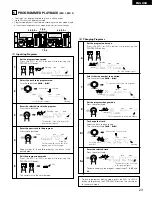
PROGRAMMED PLAYBACK (MD 1, MD 2) ………………23 ~ 25
(1)
Inputting Programs ……………………………………………23
(2)
Changing Programs ………………………………………23, 24
(3)
Playing Programs ………………………………………………24
(4)
Presetting Programs …………………………………………25
n
EDITING FUNCTIONS (MD 2 Only) …………………………26 ~ 32
(1)
Editing Functions ………………………………………………26
(2)
Erasing Tracks ‹Track erase function› ………………………27
(3)
Erasing All the Tracks on the Disc
‹All erase function› ……………………………………………27
(4)
Erasing Cue Signals ‹Cue erase function›
…………………28
(5)
Dividing Tracks into Two Parts ‹Divide function›
…………28
(6)
Combining Two Tracks ‹Combine function›
………………29
(7)
Moving Tracks ‹Move function›
……………………………29
(8)
Inputting (Changing) Names ‹Title function›
………………30
(9)
Exit the Edit Mode or Undoing Editing
‹Undo functions› ………………………………………………31
(10) Error Messages
………………………………………………32
m
PRESET FUNCTIONS AND OPERATIONS
(MD 1, MD 2) ……………………………………………………33, 34
(1)
Preset Functions ………………………………………………33
(2)
Presetting Procedure …………………………………………33
(3)
Detailed Description of Preset Functions
…………………34
,
HANDLING CARTRIDGES …………………………………………35
.
MESSAGES …………………………………………………………35
⁄0
SYSTEM LIMITATIONS ……………………………………………36
⁄1
SPECIFICATIONS ……………………………………………………37
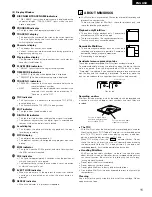
Checking the Contents
Check that the carton contains the following items in addition to the main unit.
q
Operating instructions ……………………………………………1
w
Connection cords for signal output (RCA)
……………………3
e
Remote control unit (RC-45) ……………………………………1
r
Remote control connection cable ………………………………1
Installing the Units
Mount the units onto your console or rack with 19” EIA rack rails.
•
DECLARATION OF CONFORMITY
We declare under our sole responsibility that this product, to which this declaration relates,
is in conformity with the following standards:
EN60065, EN55013, EN55020, EN60555-2 and EN60555-3.
Following the provisions of 73/23/EEC, 89/336/EEC and 93/68/EEC Directive.
Caution on handling
Do not move or transport the recorder with a disc loaded. Doing so may scratch the disc or damage the recorder.
CAUTION:
• If the power is turned off during the recording pause, recording, playing, UTOC write or editing
mode, the cartridge cannot be ejected when the power is off.
• If the cartridge cannot be ejected when the power is off, turn on the power to eject it.
• Be sure turn on POWER switch after a Remote cable of RC-45 is connected to the Player unit,
otherwise, the apparatus may not work correctly.
• DN-M2300R (RECORDER UNIT) and RC-45 (REMOTE CONTROL UNIT) are designed exclusively to
connect each other. Do not connect it to a different model. Otherwise the unit may be damaged.
• Be sure to use the remote control connection cable which has been supplied. Use of another cable
type might cause damage.


