


17
ENGLISH
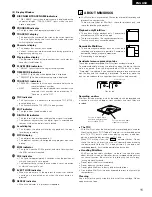
HANDY OPERATIONS
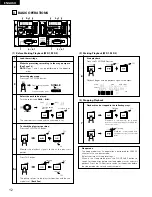
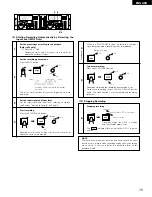
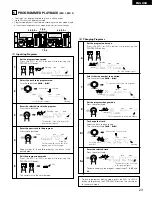
(1) Starting Playback from the Middle of a Track
(Manual Search) (MD 1, MD 2)
1-
1
Find the play start position.
Turn the SEARCH dial.
1-
2
2
3
The fast forward/reverse mode is set
when the SCAN dial (outer side) is
turned.
The speed changes according to the
angle at which the dial is turned.
Turn the SCAN dial to change the playback position
quickly.
• When operated during playback, playback resumes
after the operation.
To check the play start position.
Press the PLAY/PAUSE button.
Monitor the play signal to check the play start position.
The pickup returns to the play start position and the cue
mode is set.
Cue the play start position.
Press the CUE button.
• When a track is selected and PLAY/PAUSE button is pressed,
playback starts from the beginning of that track. To start from a
different position in the track, use the procedure described
below to find the desired position.
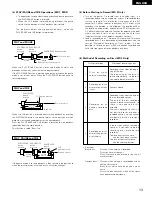
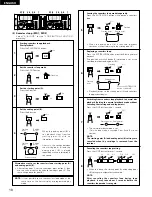
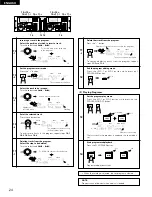
(2) Playing at a Different Speed (Pitch) (MD 1, MD 2)
There are two ways to change the playing speed.
• Adjust the Pitch using the pitch slider (±8 %).
• Press a PITCH BEND button to temporarily change the Pitch.
Use this after adjusting the Pitch with the pitch slider.
When the dial is turned clockwise, the playback position moves
as follows:
Listen to the sound and find the desired play start position.
Backward Forward
Backward Forward
Playback starts.
Lit
DISC NAME
dB -0 -40 -20 -12 -6 -2 0 OVER PITCH %
R
L
m
s
f
TRACK NO.
SINGLE
REMAIN
NEXT NO.
EOM
Lit
Flashing
1-
1
1-
2
2
Pitch slider.
Set the variable speed mode.
Press the PITCH button.
The Pitch decreases when the pitch slider is moved
upwards, increases when the pitch slider is moved
downwards.
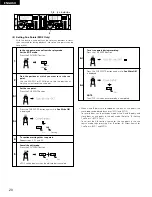
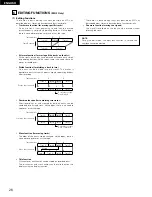
Pitch bending.
Press the PITCH BEND + (or PITCH BEND –) button.
• The Pitch increases or decreases temporarily while the
PITCH BEND + or PITCH BEND – button is pressed.
• The extent to whitch the PITCH BEND button changes
the Pitch is proportionate to the amount of time the
button is pressed. The longer the button is held down,
the greater the percentage of change.
• The Pitch changes within a range of ±9.9 %.
• The diagram below shows how the PITCH BEND
function is used. In this example, the MD 1 and MD 2
are playing and the Pitch is already matched using the
pitch slider.
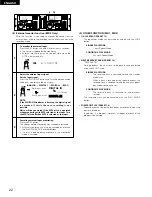
NOTE:
When the play speed (PITCH) is set, the display shows the set
pitch, but the disc is played at the standard speed until the
PITCH button is pressed (and the LED is lit).
When PITCH is lit, the sound skips if the pitch slider is operated
continuously.
Lit
Pitch down
Pitch up
MD 2
bass beat
MD 1
bass beat
Pitch are matched but
the bass beats are off
The bass beats are
match
Bass beat
Bass beat off
4
2
3
1-
1
,1-
2
2
3
1-
1
,1-
2
1-
1
2
1-
2
1-
1
2
1-
2
When the SEARCH dial (inner side) is
turned, the frame move mode is set.
The playback position moves one frame
for each click.
m
s
f
f
f


