3
ENGLISH
This function allows you to adjust the time delay of the video and audio signals and store these settings for the
different input sources.
The setting is made while watching a DVD or other software, so it is not made here.
By default, this is not displayed when no digital signals are being input.
For instructions on making the setting, refer to page 8.
Adjusting the Audio Delay
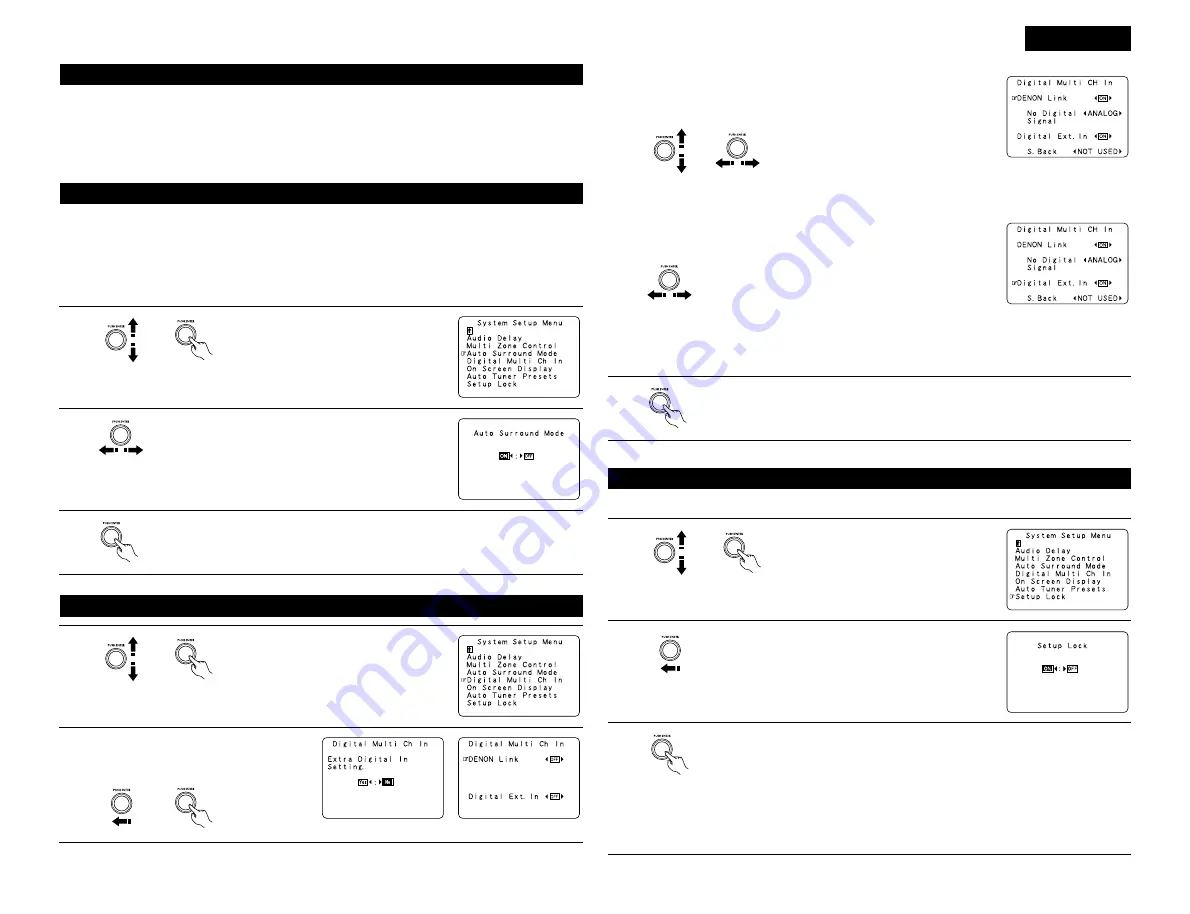
Setting the Auto Surround Mode
The surround mode last used for the three types of input signals shown below is stored in the memory and the
signal is automatically played with that surround mode the next time it is input.
Note that the surround mode setting is also stored separately for the different input sources.
q
Analog and PCM 2-channel signals
w
2-channel signals of Dolby Digital, DTS or other multichannel format
e
Multichannel signals of Dolby Digital, DTS or other multichannel format
1
Select “Auto Surround Mode” on the System
Setup Menu screen, then press jog stick
“ENTER”.
2
Select “ON” if you want to use the auto surround mode,
“OFF” if you do not want to use it.
3
This is set for the Digital Ext. In input using the Coaxial 1 to 4 inputs.
When set to “ON”, the four terminals (Coaxial 1 to 4) are
assigned to the desired input source as a single digital
multichannel input.
When set to “OFF” the four terminals (Coaxial 1 to 4) are
assigned to individual input sources.
3
Enter the setting.
The System Setup Menu reappears.
Digital Ext. In setting :
Setting the Digital Multi CH In
1
Select “Digital Multi Ch In” on the System
Setup Menu screen, then press jog stick
“ENTER”.
Set this when connecting a Denon DVD player using the Denon Link
terminal.
Set to “ON” if you want to use the terminal,
“OFF” if you do not want to use it.
When set to “ON”, also set the playback
input when there is no digital signal.
ANALOG: The analog input of the input source assigned to Denon Link is
played.
EXT.-1:
The EXT.IN-1 input is played.
EXT.-2:
The EXT.IN-2 input is played.
DENON Link setting :
4
Enter the setting.
The System Setup Menu reappears.
The system setup settings can be locked so that they cannot be changed easily.
Protecting the settings
1
Select “Setup Lock” on the System Setup
Menu screen, then press jog stick “ENTER”
to switch to the Setup Lock screen.
2
Select “ON”, to lock the system setup settings.
3
Press jog stick “ENTER” to finalize the setting and exit the system setup mode.
When the setup lock function is activated, the settings listed below cannot be changed,
and “Setup Locked” is displayed when related buttons are operated.
• System setup settings
• Surround parameter settings
• Tone control settings
• Channel level settings (including test tones)
To unlock, press the System Setup button again and display the Setup Lock screen, then
select “OFF”.
2
To set, select “Yes” and press jog stick
“ENTER”.
When “ON” was selected at “Digitl Ext. In”, set the surround back channel input.
If you do not want to use the surround back channel ........NOT USED
If you do want to use the surround back channel, set according to the specifications of the connected
player.


