


TB20061
Page 9
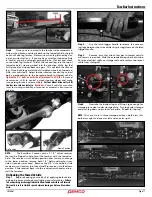
Latch Disassembly
You may leave the Excalibar 3 in the hitch receiver or take
it out and work on it on a work bench.
Latch Reassembly
NOTE:
Apply Blue
R
to all fasteners and torque
fasteners according the torque chart on page 7.
Torque the 1/4” button head screws to 6 ft/lbs.
1. Collapse the connecting leg all the way in, With a straight
screwdriver, remove two E-clips from latch assembly
pins and remove pins.
3. Slide connecting leg shaft so you can see latch washer
through latch opening, and inspect latch sear washer
through slot in rail tube, for dirt, wear or damage.
5. Clean shaft and connecting leg assembly, replace worn
or damaged parts. Repeat process for other connect-
ing leg.
NOTE:
Keeping matching side together for
reassembly.
1. Reinstall connecting leg shaft and push shaft all the
way in to reinstall latch assembly. Install latch as an as-
sembly, put pin on bottom latch sear hole first and the
latch trigger handle second. Hold the trigger handle
down like you are releasing the latch to aid in getting
the 5/16” pin in. Be sure to install e-clips on pins.
2. Reassemble the rest of the tow bar in reverse order as
the disassembly.
4. If sear washer has excessive dirt or wear, the shaft will
need to removed. Remove connecting clevis from
shaft, note location of washers. Remove eight fasten-
ers from receiver end of connecting leg and slide rail
tube off of front clevis adaptor and slide shaft out of
tube.
2. Remove trigger latch, latch sear and spring from bottom
side of latch housing. Clean and inspect parts for wear
and damage. Replace worn & damaged parts.
Latch Maintenance Instructions
Содержание Excalibar 3
Страница 1: ...TB20061 Rev 2 09 19 SELF ALIGNING TOW BAR Excalibar 3...
Страница 19: ...TB20061 Page 19...
Страница 20: ......


