


TB20061
Page 11
Tow Bar Instructions
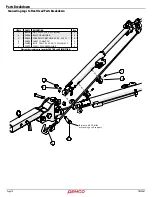
Step 3.
Remove pins that attach tow bar to towed vehicle.
will remain in position. Slide the extendable legs back into tube.
Position electrical cable on storage rod and insert pin to prevent
cable from sliding off.
Step 4.
Now take the bottom leg and lift up high enough for
storage pin to clear under storage plate. Turn leg under storage
and push leg down so pin locks into plate. Repeat for top leg.
NOTE:
Your can store in three storage positions, both arms left,
both arms right and one arm left and one arm right.
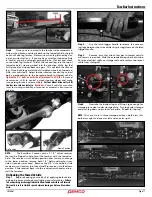
Step 8.
Once you are secured to the tow bar, release towed ve-
hicle parking brake, and slowly back up the towed vehicle straight
back until one leg latches. Determine which leg latched by hav-
ing an assistant tell you. If you are by yourself put towed vehicle
in neutral or park, and apply parking brake. Get out and check
to see which leg latched. To latch the second leg, turn the top of
towed vehicle’s steering wheel into the direction of the leg that
first latched, and slowly back up again. This will latch the second
leg. Once both legs are latched, straighten wheels on towed ve-
hicle, shut vehicle off. Adjust tow bar receiver head so the vertical
bolt is perpendicular to the baseplate height of towed vehicle.
Tighten the 1/2” bolts on each side of joint head to 85 ft/lbs.
If manual
transmission, shift to neutral, unlock steering wheel and make
sure parking brake is released.
Note:
For four wheel drive units, shift
transfer case into neutral also.
Reminder:
Consult vehicle’s manufac-
turer for towing suitability of manual or automatic transmission
vehicles.
Unhooking the Towed Vehicle
Step 1
.
Begin unhooking your unit by first applying both vehicle
parking brakes and unhook your lighting and safety cables.
Failure
to have parking brakes applied could allow towed vehicle to roll forward.
This could result in limited space between towing vehicle and towed ve-
hicle.
Step 2.
Use the latch trigger handle to release the connect-
ing legs between the two vehicles by pressing down on the latch
trigger handle.
NOTE:
The Excalibar 3 comes with a 1-1/2” off-set receiver
that can be flipped to help level the tow bar with the towed ve-
hicle. The receiver is in the down position from factory, to change
to the lower position, remove both 1/2” bolts and washer from
side of receiver joint head. Remove the 3/4” nut and bolt, slide
receiver out of receiver joint head and flip receiver into the down
position. Slide receiver back into the receiver joint head and rein-
stall the fasteners.
Up Position
Down Position
Содержание Excalibar 3
Страница 1: ...TB20061 Rev 2 09 19 SELF ALIGNING TOW BAR Excalibar 3...
Страница 19: ...TB20061 Page 19...
Страница 20: ......


