22
5 - Tycam 1100 Indoor
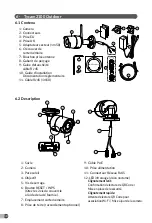
5.1 Contents
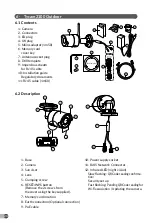
5.2 Description
5.3 Support assembly
- Screw the support to the back
of the camera.
- Place the camera on a flat surface.
- Loosen nut B,
- Point the camera correctly
then tighten nuts A and B.
- If the camera is not held correctly,
loosen screw C to tighten the nut B.
1- Camera
2- Support
3- EU plug
4- UK plug
5- Mains adaptor (1m50)
6- Installation guide
Regulatory documents
7- RJ 45 cable (1m50)
6
7
8
9
10
2
3
4
5
1
1- Memory card location
2- RESET/WPS button (Open the protective cover).
3- RJ45 Network Connector
4- Power supply socket
5- Loudspeaker
6- Microphone
7- Lens
8- Status LED
Red and steady:
Camera start.
Blue and steady:
The camera is connected to the
network.
Slow flashing red:
No connection to the server
(check the firewall and
parental controls).
Slow flashing blue:
Camera is communicating on
network.
Fast flashing red:
Safety installation.
Fast flashing blue:
Camera updating.
Red/Blue alternative
Waiting to read QR Code flashing:
flashing:
or no assigned IP address.
(check that the DHCP function
is activated on your router and that
the Wi-Fi network is in range).
9- PIR (passive infrared sensor)
10- Infrared LED (night vision)
1
2
4
3
6
7
5
0°/90°
0°/360°
0°/360°
B
A
1
2
C
B
Содержание Tycam 1100
Страница 128: ...www deltadore com 07 20 ...


