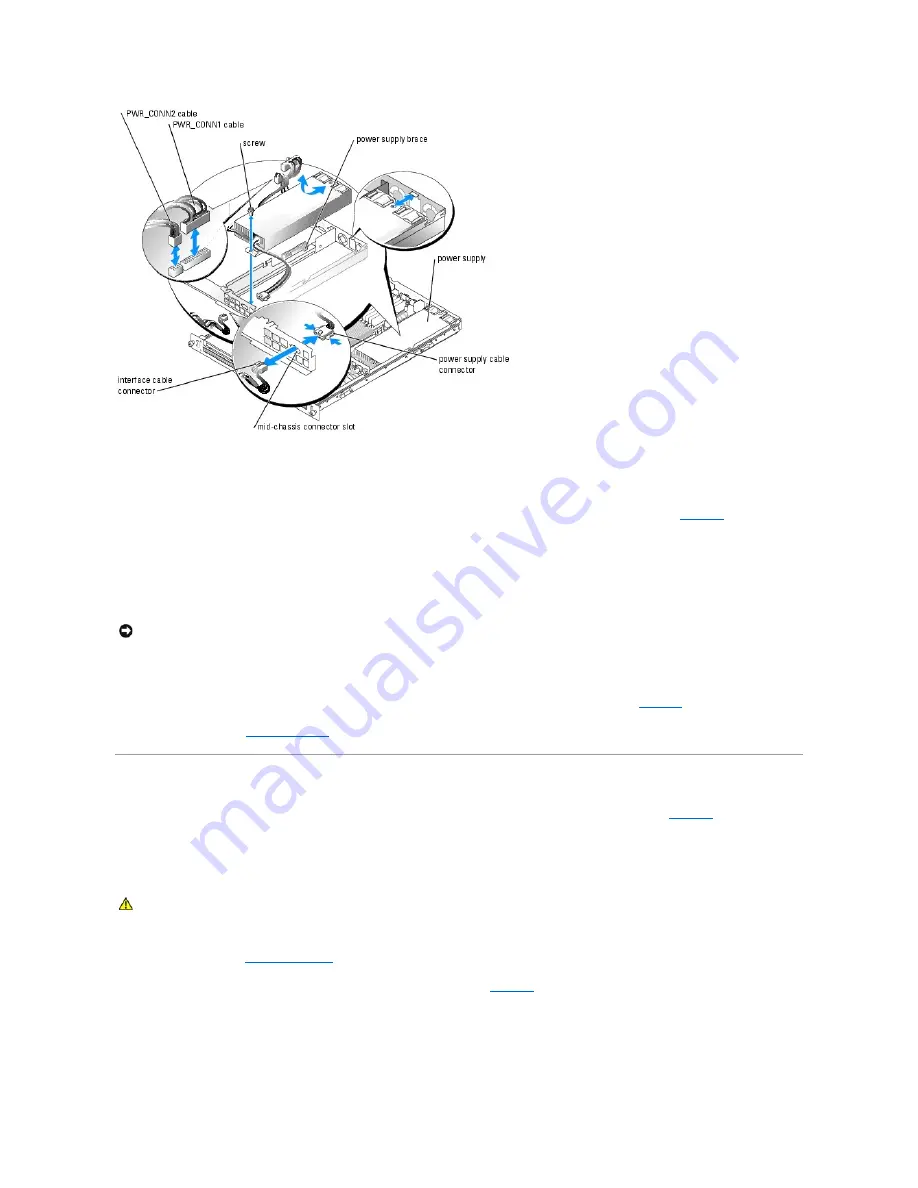
Installing the Power Supply
1.
Lower the power supply in the system and slide the new power supply backward until the power supply is fully seated. See
Figure 6
-5
).
2.
Install the screw that secures the power supply to the chassis.
3.
Fit the power supply cable connector into the mid-chassis connector slot.
4.
Connect the power supply cable to the interface cable that supplies power to the hard drives and optical drives.
5.
Route the PWR_CONN2 and PWR_CONN1 cables beside the power supply brace.
6.
Connect the two power supply cables to the PWR_CONN1 and PWR_CONN2 connectors on the system board. See
Figure 6
-1
.
7.
Close the system. See "
Closing the System
" in "Troubleshooting Your System."
Expansion Cards
Your system supports a single 3.3-V, 64-bit, 133MHz PCI-X expansion card, which is installed in a connector on a riser card. See
Figure 6
-6
.
Installing an Expansion Card
1.
Open the system. See "
Opening the System
" in Troubleshooting Your System."
2.
Lift the plastic expansion-card retainer adjacent to the expansion card slot. See
Figure 6
-6
.
Figure 6-6. Installing and Removing Expansion Cards
NOTICE:
Place the two power cables in the slot beside the power supply brace, ensuring that the PWR_CONN1 cable is placed on top of the
PWR_CONN2 cable, or the heat of the power supply may damage the power supply cables.
CAUTION:
Many repairs may only be done by a certified service technician. You should only perform troubleshooting and simple repairs as
authorized in your product documentation, or as directed by the online or telephone service and support team. Damage due to servicing that is not
authorized by Dell is not covered by your warranty. Read and follow the safety instructions that came with the product.
Содержание PowerEdge SC1425
Страница 27: ...Back to Contents Page ...


