background image


1.

Enter the System Setup program and record the option settings on the System Setup screens.  
 

See "Using the System Setup Program" in the 

User's Guide


2.

Open the system. See "

Opening the System

" in Troubleshooting Your System."  


3.

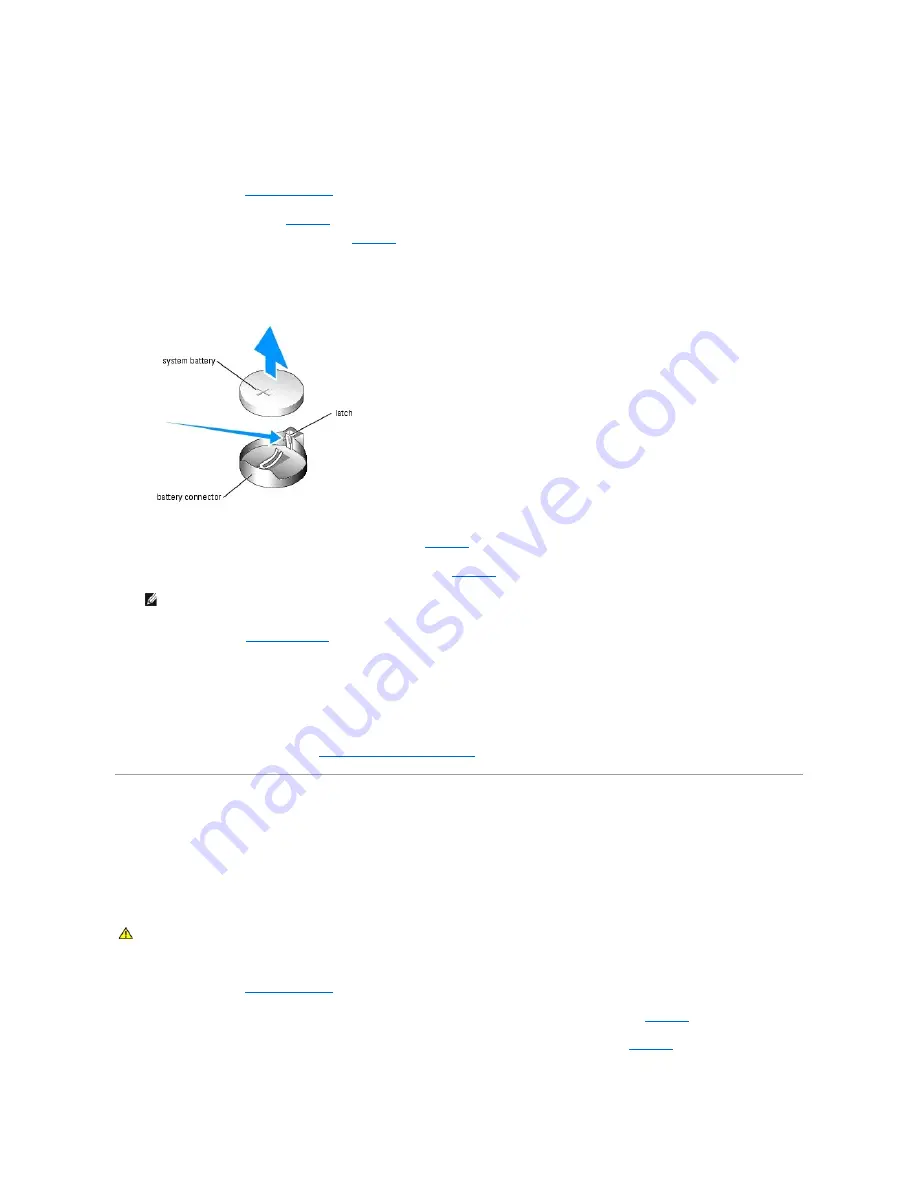
Remove the system battery. See 

Figure 6

-1

 to locate the system battery on the system board.  


a.


Pull the latch away from the battery. See 

Figure 6

-2

.  


b.


Lift the battery out of the battery socket.  


You can pry the system battery out of its connector with your fingers or with a blunt, nonconductive object such as a plastic screwdriver. 


Figure 6-2. Replacing the System Battery 


4.

To install the new system battery, hold the battery with the side labeled "+" facing up, and then press the battery straight down into the battery socket 
until the latch snaps into place over the edge of the battery. See 

Figure 6

-2

.  


5.

Install the new system battery with the side labeled "+" facing up. See 

Figure 6

-2

.  


6.

Close the system. See "

Closing the System

" in "Troubleshooting Your System."  


7.

Enter the System Setup program to confirm that the battery operates properly.  


8.

From the main screen, select 

System Time

 to enter the correct time and date.  


9.

Re-enter any system configuration information that is no longer displayed on the System Setup screens, and then exit the System Setup program.  


10.

To test the newly installed battery, see "

Troubleshooting the System Battery

" in "Troubleshooting Your System."  


Fans  

There are four sets of cooling fan modules that provide cooling for the processors and memory modules. Each fan module contains two fans. There is a single 
fan to cool the expansion card. 


Removing a Processor/Memory Fan Module 


1.

Open the system. See "

Opening the System

" in Troubleshooting Your System."  


2.

Disconnect the fan module's power cable(s) from the fan power interface cable connected to the system board. See 

Figure 6

-3

.  


3.

Using a #2 Phillips screwdriver, remove the two screws that secure the fan module brackets to the chassis. See 

Figure 6

-3

.  


4.

Slide the fan brackets toward the front of the system and remove them from the system.  


NOTE: 

You must install the new system battery with the side labeled "+" facing up. 


CAUTION: 

Many repairs may only be done by a certified service technician. You should only perform troubleshooting and simple repairs as 

authorized in your product documentation, or as directed by the online or telephone service and support team. Damage due to servicing that is not 
authorized by Dell is not covered by your warranty. Read and follow the safety instructions that came with the product.

Содержание PowerEdge SC1425

Страница 1: ...of Dell Inc is strictly forbidden Trademarks used in this text Dell the DELL logo Inspiron Dell Precision Dimension OptiPlex PowerApp PowerEdge PowerConnect PowerVault DellNet Axim Latitude and Dell OpenManage are trademarks of Dell Inc Intel and Pentium are registered trademarks of Intel Corporation Other trademarks and trade names may be used in this document to refer to either the entities clai...

Страница 2: ...ning a wire fit down over the pins The wire connects the pins and creates a circuit To change a jumper setting pull the plug off its pin s and carefully fit it down onto the pin s indicated Figure A 1 shows an example of a jumper Figure A 1 Example Jumper A jumper is referred to as open or unjumpered when the plug is pushed down over only one pin or if there is no plug at all When the plug is push...

Страница 3: ...ystem board connectors Figure A 3 System Board Connectors Jumper Setting Description PASSWD default The password feature is enabled The password feature is disabled NVRAM_CLR default The configuration settings in NVRAM are retained at system boot The configuration settings in NVRAM are cleared at next system boot jumpered unjumpered ...

Страница 4: ... CP_CONN Control panel connector DIMMn_ x Memory module connector 6 FAN_n FAN1 is the connector for the expansion card fan module and FAN2 5 is the connector for the processor and memory fan modules 4 IDE1 IDE device connector PROC_n Processor connector 2 PWR_CONNn Power supply connector 2 SATA_n SATA device connectors USB_HEADER FRONT USB device connector CAUTION Many repairs may only be done by ...

Страница 5: ... plug removed However before you assign a new system and or setup password you must install the jumper plug 7 Turn off the system including any attached peripherals and disconnect the system from the electrical outlet 8 Open the system See Opening the System in Troubleshooting Your System 9 Install the password jumper plug See Figure A 2 to locate the password jumper on the system board If necessa...

Страница 6: ... D subminiature connector Serial Connector Autoconfiguration The default designation of the integrated serial connector is COM1 When you add an expansion card containing a serial connector that has the same designation as the integrated connector the system s autoconfiguration feature remaps reassigns the integrated serial connector to the next available designation Both the new and the remapped C...

Страница 7: ...B 4 illustrates the pin numbers for the video connector and Table B 4 defines the pin assignments for the connector Figure B 4 Video Connector Pin Numbers Table B 4 Video Connector Pin Assignments Pin Signal I O Definition 1 DCD I Data carrier detect 2 SIN I Serial input 3 SOUT O Serial output 4 DTR O Data terminal ready 5 GND N A Signal ground 6 DSR I Data set ready 7 RTS O Request to send 8 CTS ...

Страница 8: ...he pin assignments for the connectors Figure B 6 NIC Connector Table B 6 NIC Connector Pin Assignments Pin Signal I O Definition 1 RED O Red video 2 GREEN O Green video 3 BLUE O Blue video 4 NC N A No connection 5 8 10 GND N A Signal ground 9 VCC N A Vcc 11 NC N A No connection 12 DDC data out O Monitor detect data 13 HSYNC O Horizontal synchronization 14 VSYNC O Vertical synchronization 15 NC N A...

Страница 9: ...gth from a workstation to a hub of 100 m 328 ft For detailed guidelines on operation of a network see Systems Considerations of Multi Segment Networks in the IEEE 802 3 standard Back to Contents Page 1 TD O Data out 2 TD O Data out 3 RD I Data in 4 NC N A No connection 5 NC N A No connection 6 RD I Data in 7 NC N A No connection 8 NC N A No connection NOTICE To avoid line interference voice and da...

Страница 10: ...nel Assembly 1 Align the control panel assembly s mounting holes with the chassis mounting studs and lower the assembly over the studs See Figure C 1 2 Using a 2 Phillips screwdriver install the two screws that secure the control panel assembly to the chassis See Figure C 1 CAUTION Many repairs may only be done by a certified service technician You should only perform troubleshooting and simple re...

Страница 11: ...ard See Figure 6 1 in Installing System Board Components 8 Remove all PCI expansion cards installed on the riser card See Removing an Expansion Card in Installing System Components 9 Using a 2 Phillips screwdriver remove the two screws that secure the riser card to the system board See Removing the Riser Card in Installing System Components 10 Disconnect the riser card from the system board card e...

Страница 12: ...ard b If SATA hard drives are installed connect the interface cable to the SATA_0 and SATA_1 connectors on the system board See Figure 6 1 in Installing System Board Components 11 Install the processor and heat sink See Replacing the Processor in Installing System Components 12 Install the memory modules See Installing Memory Modules in Installing System Components 13 Connect the two control panel...

Страница 13: ... Closing the System in Troubleshooting Your System Back to Contents Page NOTE When installing the cooling shroud ensure that the two tabs on the cooling shroud are inserted into the two retaining slots in the mid chassis wall ...

Страница 14: ...agement software documentation describes the features requirements installation and basic operation of the software l Operating system documentation describes how to install if necessary configure and use the operating system software l Documentation for any components you purchased separately provides information to configure and install these options l Updates are sometimes included with the sys...

Страница 15: ...em in Troubleshooting Your System Figure 2 1 shows the system s front panel features and indicators Table 2 1 lists the front panel LED indicators buttons and connectors Figure 2 1 Front Panel Features and Indicators Table 2 1 Front Panel LED Indicators Buttons and Connectors Front Panel Indicators and Features Back Panel Features and Indicators NIC Indicators System Messages System Beep Codes War...

Страница 16: ... button and the system is running an ACPI compliant operating system the system performs a graceful shutdown before the power is turned off If the system is not running an ACPI compliant operating system the power is turned off immediately after the power button is pressed Diagnostic indicators 4 The diagnostic indicators aid in diagnosing and troubleshooting the system For more information see Ta...

Страница 17: ... hard drives are properly connected See Troubleshooting Your System for the appropriate drive installed in your system If the problem persists see Getting Help The system is in a normal operating condition after POST Information only Indicator Type Indicator Code Description Activity Off When off at the same time that the link indicator is off the NIC is not connected to the network or the NIC is ...

Страница 18: ...a error The diskette drive or hard drive cannot read the data For the operating system run the appropriate utility to check the file structure of the diskette drive or hard drive See your operating system documentation for information on running these utilities Decreasing available memory One or more memory modules might be faulty or improperly seated Reinstall the memory modules and if necessary ...

Страница 19: ...ing value A memory module might be faulty or improperly seated Reinstall the memory modules and if necessary replace them See Troubleshooting System Memory in Troubleshooting Your System Memory parity interrupt at address Improperly seated or faulty DIMMs See Troubleshooting System Memory in Troubleshooting Your System Memory tests terminated by keystroke POST memory test terminated by pressing th...

Страница 20: ...un the System Setup program to correct the settings See Using the System Setup Program in your User s Guide Sector not found Seek error A faulty diskette drive or hard drive See Troubleshooting a USB Device or Troubleshooting a SATA Hard Drive and Troubleshooting SCSI Hard Drives in Troubleshooting Your System Shutdown failure A chip on the system board might be malfunctioning Run the system diagn...

Страница 21: ...ailure 2 1 1 through 2 4 4 Bit failure in the first 64 KB of main memory 3 1 1 Slave DMA register failure Faulty system board See Getting Help 3 1 2 Master DMA register failure 3 1 3 Master interrupt mask register failure 3 1 4 Slave interrupt mask register failure 3 2 2 Interrupt vector loading failure 3 2 4 Keyboard controller test failure 3 3 1 CMOS failure 3 3 2 System configuration check fail...

Страница 22: ...onitor and recover systems remotely BMC uses the system s serial port and integrated NIC1 to support fault logging and SNMP alerting For additional information on using BMC see the documentation for the BMC and systems management applications Back to Contents Page NOTE If the integrated network controller is used in an Ether Channel team or link aggregation team the BMC management traffic will not...

Страница 23: ...are or software Indicators Messages and Codes provides information about error messages that are hardware based If you receive an error message that is not listed see your operating system or software program documentation for troubleshooting information Input Errors Pressing a specific key or set of keys at the wrong time may produce unexpected results See the documentation that came with the sof...

Страница 24: ...RQ8 Real time clock IRQ9 ACPI functions used for power management IRQ10 Available IRQ11 Available IRQ12 PS 2 mouse port unless the mouse is disabled through the System Setup program IRQ13 Math coprocessor IRQ14 IDE OPTICAL drive controller available if IDE CDROM controller is disabled in BIOS setup IRQ15 Reserved available if IDE CDROM controller is disabled in BIOS setup ...

Страница 25: ...rol the sequence of tests l Repeat tests l Display print or save test results l Temporarily suspend testing if an error is detected or terminate testing when a user defined error limit is reached l View help messages that briefly describe each test and its parameters l View status messages that inform you if tests are completed successfully l View error messages that inform you of problems encount...

Страница 26: ...ting Selecting Diagnostics Options Use the Diagnostics Options area to select how you want to test a device You can set the following options l Non Interactive Tests Only When checked runs only tests that require no user intervention l Quick Tests Only When checked runs only the quick tests on the device Extended tests will not run when you select this option l Show Ending Timestamp When checked t...

Страница 27: ...Back to Contents Page ...

Страница 28: ...oubleshooting a Wet System Troubleshooting a Damaged System Troubleshooting the System Battery Troubleshooting the Power Supply Troubleshooting System Cooling Problems Troubleshooting System Memory Troubleshooting an Optical Drive Troubleshooting a SATA Hard Drive Troubleshooting SCSI Hard Drives Troubleshooting Expansion Cards Troubleshooting the Processors CAUTION Many repairs may only be done b...

Страница 29: ...power connections to the monitor 2 Run the appropriate online diagnostic test See Using Dell Diagnostics in Running System Diagnostics If the tests run successfully the problem is not related to video hardware See Finding Software Solutions If the tests fail see Getting Help Troubleshooting the Keyboard Problem l System message indicates a problem with the keyboard l Keyboard is not functioning pr...

Страница 30: ...nts that the program may require 3 Run the appropriate online diagnostic test See Using Dell Diagnostics in Running System Diagnostics If the tests run successfully but the problem persists see Troubleshooting a Serial I O Device Troubleshooting a Serial I O Device Problem l Device connected to the serial port is not operating properly Action 1 Enter the System Setup program and ensure that the Co...

Страница 31: ...g Dell Diagnostics in Running System Diagnostics 2 Check the appropriate indicator on the NIC connector See NIC Indicators in Indicators Messages and Codes l If the link indicator does not light check all cable connections l If the activity indicator does not light the network driver files might be damaged or missing Remove and reinstall the drivers if applicable See the NIC s documentation l Chan...

Страница 32: ...right end of the bezel and pull the bezel away from the system Figure 5 2 Installing and Removing the Optional Bezel 2 Turn off the system and attached peripherals and disconnect the system from the electrical outlet and peripherals 3 Remove the system from the rack and place it on a work surface 4 To remove the system cover loosen the two thumbscrews at the back of the system See Figure 5 3 5 Sli...

Страница 33: ...ive humidity Action 1 Turn off the system and attached peripherals and disconnect the system from the electrical outlet 2 Open the system See Opening the System 3 Remove all expansion cards installed in the system See Removing an Expansion Card in Installing System Components 4 Remove all memory modules installed in the system See Removing Memory Modules in Installing System Components 5 Remove th...

Страница 34: ... properly installed l Expansion cards l Memory modules l Processor s l Power supply l Fans 4 Ensure that all cables are properly connected 5 Close the system See Closing the System 6 Run the system board tests in the system diagnostics See Using Dell Diagnostics in Running the System Diagnostics If the tests fail see Getting Help Troubleshooting the System Battery Problem l System message indicate...

Страница 35: ...he problem is resolved replace the faulty power supply If the problem is not resolved see Getting Help Problem l Power button is not blinking green and the system does not power up Action 1 Ensure that the power cable is properly connected between the power supply and electrical outlet 2 If you have a UPS make sure that it is connected properly both to the power supply and to the electrical outlet...

Страница 36: ...led matches the system memory setting go to step 11 4 Turn off the system and attached peripherals and disconnect the system from the electrical outlet 5 Open the system See Opening the System 6 Ensure that the memory modules are populated correctly See General Memory Module Installation Guidelines in Installing System Components If the memory modules are populated correctly continue to the next s...

Страница 37: ...tion 1 Try using a different CD or DVD that you know works properly 2 Enter the System Setup program and ensure that the drive s IDE controller is enabled See Using the System Setup Program in the User s Guide 3 Run the appropriate online diagnostic test See Using Dell Diagnostics in Running System Diagnostics 4 Turn off the system and attached peripherals and disconnect the system from the electr...

Страница 38: ... 1 Run the appropriate online diagnostic test See Using Dell Diagnostics in Running System Diagnostics For information about testing the controller see the SCSI controller s documentation If the tests fail continue to the next step 2 Run the System Setup program and insure that the SCSI controller is enabled See Using the System Setup Program in the User s Guide CAUTION Many repairs may only be do...

Страница 39: ...he electrical outlet 3 Open the system See Opening the System 4 Ensure that the expansion card is firmly seated in its connector See Installing an Expansion Card in Installing System Components 5 Close the system See Closing the System 6 Reconnect the system to the electrical outlet and turn on the system and attached peripherals If the problem persists go to the next step 7 Turn off the system an...

Страница 40: ...se the system See Closing the System 12 Reconnect the system to the electrical outlet and turn on the system and attached peripherals 13 Run the appropriate online diagnostic test If the tests complete successfully go to step 19 14 Turn off the system and attached peripherals and disconnect the system from the electrical outlet 15 Open the system See Opening the System 16 Replace processor 1 with ...

Страница 41: ...22 Close the system See Closing the System 23 Reconnect the system to the electrical outlet and turn on the system and attached peripherals If the problem persists see Getting Help Back to Contents Page ...

Страница 42: ...omponents Figure 6 1 System Board Components and Connectors System Battery Replacing the System Battery System Board Components System Battery Fans Power Supply Expansion Cards Riser Card System Memory Processor CAUTION Many repairs may only be done by a certified service technician You should only perform troubleshooting and simple repairs as authorized in your product documentation or as directe...

Страница 43: ...stem configuration information that is no longer displayed on the System Setup screens and then exit the System Setup program 10 To test the newly installed battery see Troubleshooting the System Battery in Troubleshooting Your System Fans There are four sets of cooling fan modules that provide cooling for the processors and memory modules Each fan module contains two fans There is a single fan to...

Страница 44: ...em in Troubleshooting Your System Removing the Expansion Card Fan Module 1 Open the system See Opening the System in Troubleshooting Your System 2 Disconnect the fan module s power cable s from the fan power interface cable connected to the system board See Figure 6 4 3 Gently pull the fan module up and away from the peg on the system board and remove the fan module from the system Figure 6 4 Inst...

Страница 45: ... chassis mid wall The interface cable supplies power to the hard drives and optical drives See Figure 6 5 3 Disconnect the two power supply cables from the PWR_CONN1 and PWR_CONN2 connectors on the system board See Figure 6 1 4 Remove the screw at the front of the power supply that secures the power supply to the chassis See Figure 6 5 5 Slide the power supply toward the front of the system and re...

Страница 46: ...PCI X expansion card which is installed in a connector on a riser card See Figure 6 6 Installing an Expansion Card 1 Open the system See Opening the System in Troubleshooting Your System 2 Lift the plastic expansion card retainer adjacent to the expansion card slot See Figure 6 6 Figure 6 6 Installing and Removing Expansion Cards NOTICE Place the two power cables in the slot beside the power suppl...

Страница 47: ...System in Troubleshooting Your System Riser Card Removing the Riser Card NOTE Keep this bracket in case you need to remove the expansion card The filler bracket must be installed over the empty expansion card slot to maintain Federal Communications Commission FCC certification of the system The bracket also keeps dust and dirt out of the system and aid in proper cooling and airflow inside the syst...

Страница 48: ... and 2 GB registered memory modules The memory module sockets are arranged in three banks on two channels A and B The memory module banks are identified as follows l Bank 1 DIMM1_A and DIMM1_B l Bank 2 DIMM2_A and DIMM2_B l Bank 3 DIMM3_A and DIMM3_B General Memory Module Installation Guidelines CAUTION Many repairs may only be done by a certified service technician You should only perform trouble...

Страница 49: ...ked memory modules Table 6 1 Sample Memory Configurations Table 6 2 Allowable Memory Module Configurations Single Ranked and Dual Ranked Memory Modules NOTE All six memory modules must be single rank modules identical in size Total Memory DIMM1_A DIMM1_B DIMM2_A DIMM2_B DIMM3_A DIMM3_B 256 MB 256 MB none none none none none 1 GB 256 MB 256 MB 256 MB 256 MB none none 1 GB 512 MB 512 MB none none no...

Страница 50: ... may not be installed properly Repeat step 1 through step 8 of this procedure checking to ensure that the memory modules are firmly seated in their sockets 10 Run the system memory test in the system diagnostics See Using Dell Diagnostics Removing Memory Modules 1 Open the system See Opening the System in Troubleshooting Your System 2 Locate the memory module sockets See Figure 6 1 3 Press down an...

Страница 51: ...the heat sink to loosen from the processor 5 If the heat sink has not separated from the processor carefully rotate the heat sink in a clockwise then counterclockwise direction until it releases from CAUTION Many repairs may only be done by a certified service technician You should only perform troubleshooting and simple repairs as authorized in your product documentation or as directed by the onl...

Страница 52: ...ly it drops down into the socket with minimal pressure c When the processor is fully seated in the socket rotate the socket release lever back down until it snaps into place securing the processor 12 Install the heat sink a Using a clean lint free cloth remove the existing thermal grease from the heat sink b Apply thermal grease evenly to the top of the processor c Place the heat sink onto the pro...

Страница 53: ...em configuration See your User s Guide for instructions about using the System Setup program 16 Run the system diagnostics to verify that the new processor operates correctly See Using Dell Diagnostics for information about running the diagnostics and troubleshooting processor problems Back to Contents Page ...

Страница 54: ...nnect the interposer card from the optical drive 5 Press the bracket release lever that secures the optical drive to the hard drive 0 carrier See Figure 7 1 6 Lift and tilt the optical drive up and out of the bracket as shown in Figure 7 1 Figure 7 1 Removing and Installing the Optional Optical Drive Installing the Optical Drive 1 Align the optical drive s mounting holes with the retaining pins on...

Страница 55: ...tion Configuring the Boot Drive The drive or device from which the system boots is determined by the boot order specified in the System Setup program See Using the System Setup Program in your User s Guide To boot the system from a hard drive or drive array the drive s must be connected to the appropriate controller l To boot from a single SATA hard drive the master drive drive 0 must be connected...

Страница 56: ...erface cables for SCSI hard drives are connected to a controller card 4 Loosen the captive screw that secures the hard drive carrier to the chassis See Figure 7 2 Figure 7 2 Removing the Hard Drive Carrier 5 Slide the hard drive carrier backward and lift the carrier out of the chassis 6 Using a 2 Phillips screwdriver remove the four screws that secure the hard drive to the carrier and remove the d...

Страница 57: ...rd drives are connected to a controller card 7 Install the CD drive Install the CD drive if you are removing hard drive 0 See Installing the Optical Drive 8 Close the system See Closing the System in Troubleshooting Your System Installing a SCSI Controller Card See Installing an Expansion Card in Installing System Components for instructions about installing the card See the controller card docume...

Страница 58: ...all countries When prompted by Dell s automated telephone system enter your Express Service Code to route the call directly to the proper support personnel If you do not have an Express Service Code open the Dell Accessories folder double click the Express Service Code icon and follow the directions For instructions on using the technical support service see Technical Support Service and Before Yo...

Страница 59: ...stics to provide fast accurate answers To contact Dell s technical support service see Before You Call and then see the contact information for your region Dell Enterprise Training and Certification Dell Enterprise Training and Certification is available see www dell com training for more information This service may not be offered in all locations Problems With Your Order If you have a problem wi...

Страница 60: ... access the following websites l www dell com l support dell com technical support l premiersupport dell com technical support for educational government healthcare and medium large business customers including Premier Platinum and Gold customers For specific web addresses for your country find the appropriate country section in the table below NOTE Toll free numbers are for use within the country...

Страница 61: ...t 0820 240 530 14 Preferred Accounts Corporate Technical Support 0660 8779 Switchboard 0820 240 530 00 Bahamas General Support toll free 1 866 278 6818 Barbados General Support 1 800 534 3066 Belgium Brussels International Access Code 00 Country Code 32 City Code 2 Website support euro dell com E mail tech_be dell com E mail for French Speaking Customers support euro dell com be fr emaildell Techn...

Страница 62: ...toll free 800 858 2355 Large Corporate Accounts West toll free 800 858 2811 Large Corporate Accounts Spare Parts toll free 800 858 2621 Colombia General Support 980 9 15 3978 Costa Rica General Support 0800 012 0435 Czech Republic Prague International Access Code 00 Country Code 420 City Code 2 Website support euro dell com E mail czech_dell dell com Technical Support 02 2186 27 27 Customer Care 0...

Страница 63: ...te support euro dell com E mail support euro dell com gr en emaildell Technical Support 080044149518 Gold Technical Support 08844140083 Switchboard 2108129800 Sales 2108129800 Fax 2108129812 Grenada General Support toll free 1 866 540 3355 Guatemala General Support 1 800 999 0136 Guyana General Support toll free 1 877 270 4609 Hong Kong International Access Code 001 Country Code 852 Website suppor...

Страница 64: ...ox Service 044 556 3490 24 Hour Automated Order Service 044 556 3801 Customer Care 044 556 4240 Business Sales Division up to 400 employees 044 556 1465 Preferred Accounts Division Sales over 400 employees 044 556 3433 Large Corporate Accounts Sales over 3500 employees 044 556 3430 Public Sales government agencies educational institutions and medical institutions 044 556 1469 Global Segment Japan ...

Страница 65: ...support dell com Dimension nl_dimension_support dell com OptiPlex nl_optiplex_support dell com Dell Precision nl_workstation_support dell com Technical Support 020 674 45 00 Technical Support Fax 020 674 47 66 Home Small Business Customer Care 020 674 42 00 Relational Customer Care 020 674 4325 Home Small Business Sales 020 674 55 00 Relational Sales 020 674 50 00 Home Small Business Sales Fax 020...

Страница 66: ...nnesburg International Access Code 09 091 Country Code 27 City Code 11 Website support euro dell com E mail dell_za_support dell com Technical Support 011 709 7710 Customer Care 011 709 7707 Sales 011 709 7700 Fax 011 706 0495 Switchboard 011 709 7700 Southeast Asian and Pacific Countries Customer Technical Support Customer Service and Sales Penang Malaysia 604 633 4810 Spain Madrid International ...

Страница 67: ...omer Care 0870 906 0010 Corporate Customer Care 01344 373 185 Preferred Accounts 500 5000 employees Customer Care 0870 906 0010 Central Government Customer Care 01344 373 193 Local Government Education Customer Care 01344 373 199 Health Customer Care 01344 373 194 Home and Small Business Sales 0870 907 4000 Corporate Public Sector Sales 01344 860 456 Home and Small Business Fax 0870 907 4006 Urugu...

Страница 68: ...ded Service and Warranty Sales toll free 1 800 247 4618 Fax toll free 1 800 727 8320 Dell Services for the Deaf Hard of Hearing or Speech Impaired toll free 1 877 DELLTTY 1 877 335 5889 U S Virgin Islands General Support 1 877 673 3355 Venezuela General Support 8001 3605 ...

Страница 69: ... PowerApp PowerEdge PowerConnect PowerVault DellNet Axim Latitude and Dell OpenManage are trademarks of Dell Inc Intel and Pentium are registered trademarks of Intel Corporation Other trademarks and trade names may be used in this document to refer to either the entities claiming the marks and names or their products Dell Inc disclaims any proprietary interest in trademarks and trade names other t...

Отзывы: