background image

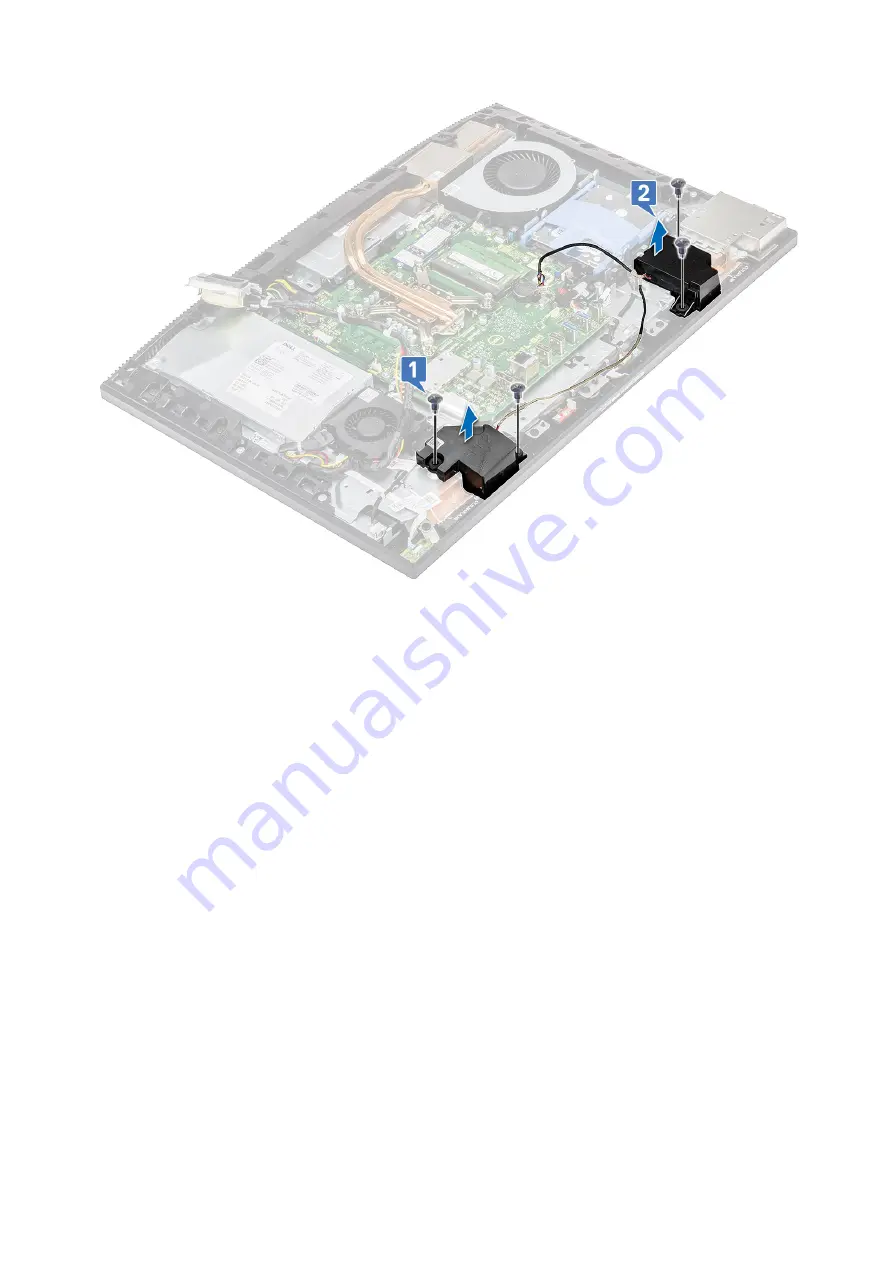
Installing the speakers

1. To replace the speakers:

a) Place the speakers on the display assembly base and align the screw slots on the speakers with the screw slots on the display 

assembly base [1].

b) Replace the eight screws (M3x4+7.1) that secure the speakers to the display assembly base [2].

74

Removing and Installing components

Содержание OptiPlex 5270 All-in-One

Страница 1: ...Dell OptiPlex 5270 All in One Service Manual Regulatory Model W20B Regulatory Type W20B001 ...

Страница 2: ...age to hardware or loss of data and tells you how to avoid the problem WARNING A WARNING indicates a potential for property damage personal injury or death 2018 2019 Dell Inc or its subsidiaries All rights reserved Dell EMC and other trademarks are trademarks of Dell Inc or its subsidiaries Other trademarks may be trademarks of their respective owners 2019 06 Rev A00 ...

Страница 3: ...nstalling the cable cover 19 Stand 20 Removing the stand 20 Installing the stand 21 Back cover 22 Removing the back cover 22 Installing the back cover 22 Hard drive 23 Removing the hard drive assembly 23 Installing the hard drive assembly 24 Memory module 25 Removing the memory module 25 Installing the memory module 26 System board shield 27 Removing the system board shield 27 Installing the syste...

Страница 4: ...ly unit PSU 56 Installing the power supply unit PSU 59 Power supply unit fan PSU fan 60 Removing the power supply unit fan PSU fan 60 Installing the power supply unit PSU fan 62 Input and Output bracket 64 Removing the Input and Output bracket 64 Installing the Input and Output bracket 66 System board 68 Removing the system board 68 Installing the system board 70 Speakers 72 Removing the speakers ...

Страница 5: ... cable 97 Installing the display cable 98 Middle frame 99 Removing the middle frame 99 Installing the middle frame 101 4 Troubleshooting your computer 104 Enhanced Pre Boot System Assessment ePSA diagnostics 104 Running the ePSA Diagnostics 104 Diagnostics 104 Camera status indicator 105 LCD built in self test BIST 105 5 Getting help 107 Contacting Dell 107 Contents 5 ...

Страница 6: ...nd support team Damage due to servicing that is not authorized by Dell is not covered by your warranty Read and follow the safety instructions that came with the product CAUTION To avoid electrostatic discharge ground yourself by using a wrist grounding strap or by periodically touching an unpainted metal surface that is grounded to ground yourself before you touch the computer to perform any disa...

Страница 7: ...before performing Step 8 CAUTION To avoid electrostatic discharge ground yourself by using a wrist grounding strap or by periodically touching an unpainted metal surface at the same time as touching a connector on the back of the computer 7 Remove any installed ExpressCards or Smart Cards from the appropriate slots After working inside your computer After you complete any replacement procedure ens...

Страница 8: ...Option DDR3 DDR4 DDR 4 Advantages Chip Densities 512 Mb 8 Gb 4 Gb 16 Gb Larger DIMM capacities Data rates 800 Mb s 2133 Mb s 1600 Mb s 3200 Mb s Migration to higher speed I O Voltage 1 5 V 1 2 V Reduced memory power demand Low voltage standard Yes DDR3L at 1 35V Anticipated at 1 05V Memory Power Reductions Internal banks 8 16 Higher data rates Bank groups BG 0 4 Faster burst accesses VREF inputs 2...

Страница 9: ... as listed below Key notch difference The key notch on a DDR4 module is in a different location from the key notch on a DDR3 module Both notches are on the insertion edge but the notch location on the DDR4 is slightly different to prevent the module from being installed into an incompatible board or platform Figure 1 Notch difference Increased thickness DDR4 modules are slightly thicker than DDR3 ...

Страница 10: ...t features Full duplex data transfers and support for new transfer types Backward USB 2 0 compatibility New connectors and cable The topics below cover some of the most commonly asked questions regarding USB 3 0 USB 3 1 Gen 1 Speed Currently there are 3 speed modes defined by the latest USB 3 0 USB 3 1 Gen 1 specification They are Super Speed Hi Speed and Full Speed The new SuperSpeed mode has a t...

Страница 11: ...n 1 Hard Drives USB 3 0 USB 3 1 Gen 1 Drive Docks Adapters USB 3 0 USB 3 1 Gen 1 Flash Drives Readers USB 3 0 USB 3 1 Gen 1 Solid state Drives USB 3 0 USB 3 1 Gen 1 RAIDs Optical Media Drives Multimedia Devices Networking USB 3 0 USB 3 1 Gen 1 Adapter Cards Hubs Compatibility The good news is that USB 3 0 USB 3 1 Gen 1 has been carefully planned from the start to peacefully co exist with USB 2 0 F...

Страница 12: ...signaling of content types between display and source devices enabling a TV to optimize picture settings based on content type Additional Color Spaces Adds support for additional color models used in digital photography and computer graphics 4K Support Enables video resolutions far beyond 1080p supporting next generation displays that will rival the Digital Cinema systems used in many commercial m...

Страница 13: ...battery Processor Base cover Power supply unit PSU Power supply unit fan PSU fan Input and Output bracket System board Speakers Power button board Microphones Input and Output board Headset port Antennas Display panel Display cable Middle frame Recommended tools The procedures in this document require the following tools Phillips 0 screwdriver Phillips 1 screwdriver Plastic scribe NOTE The 0 screw...

Страница 14: ...d M2x2 5 1 WLAN card shield M2x2 5 2 WLAN card M2x2 5 1 System fan M3 x5 3 Pop up camera assembly M3x5 2 Pop up camera bezel M3x5 5 Base cover M3x5 4 PSU cable M3x5 1 Power supply unit PSU M3x5 1 Power supply unit fan PSU fan M3x5 2 Input and Output bracket M3x5 3 System board M3x5 9 Speakers M3 4 7 1 XZN 4 Power button board M3x5 1 14 Removing and Installing components ...

Страница 15: ...phone M2x2 5 2 Input and Output board shield M3x5 2 Input and Output board M2 5x3 5 2 Headset port M3x5 1 Antennas M2x2 5 2 Display panel M3x5 8 Middle frame M3x5 11 System board layout OptiPlex 5270 All in One Removing and Installing components 15 ...

Страница 16: ..._Debug 9 Service mode jumper Password clear jumper CMOS clear jumper 10 SATA HDD slot 11 SPI header 12 DMIC connector 13 SIO signal connector 14 SIO power connector 15 UAJ connector 16 INT_SPK connector 17 Coin cell battery 18 LVDS connector 19 M 2 WLAN slot 20 Power board button connector 21 PSU fan connector 16 Removing and Installing components ...

Страница 17: ...working inside your computer 2 Remove the Stand 3 Pry the rubber feet at the bottom edge from the display assembly base and pull it out Installing the rubber feet 1 Align the rubber feet with the slots on the display assembly base and push it firmly in place Removing and Installing components 17 ...

Страница 18: ...le cover optional Removing the cable cover 1 Follow the procedure in Before working inside your computer 2 Remove the Stand 3 Remove the single M3x9 screw that secures the cable cover to the base cover 1 4 Lift the cable cover off the base cover 2 18 Removing and Installing components ...

Страница 19: ...Installing the cable cover 1 Place the cable cover on the base cover 1 2 Replace the single M3x9 screw the secures the cable cover to the base cover 2 Removing and Installing components 19 ...

Страница 20: ...tand HAS stand 1 Follow the procedure in Before working inside your computer 2 To avoid damaging the display place the system on a flat soft and clean surface 3 To remove the stand a Press and slide the release tab forward on the cover 1 b Hold the tab in the release position and lift the stand upward 2 c Slide downward to lift the stand off the back cover 3 20 Removing and Installing components ...

Страница 21: ...g procedure applies only to systems that are shipped with a Height adjustable stand HAS stand 1 To install the stand a Align the tabs on the stand 1 b Snap the stand into place on the back cover 2 Removing and Installing components 21 ...

Страница 22: ...nd slide the back cover in the direction shown to release it from the middle frame 1 4 Lift the back cover from the middle frame and the system board shield 2 Installing the back cover 1 Place the back cover on the system 2 Press and hold the tab 1 and align the notches on the back cover with the slots on the middle frame 3 Slide the back cover in the direction shown to lock the back cover tab und...

Страница 23: ...cedure in Before working inside your computer 2 Remove the following components a Stand b Back cover 3 To remove the hard drive assembly a Press down the tab securing the hard drive assembly to the system board shield 1 b Slide and lift the hard drive assembly from the slot on the display assembly base 2 Removing and Installing components 23 ...

Страница 24: ...ft it away from the bracket 2 Installing the hard drive assembly 1 To install the hard drive bracket a Align the tabs on the hard drive bracket with the slots on the hard drive 1 b Flex the hard drive bracket and replace the remaining tabs on the hard drive bracket with the slots on the hard drive 2 24 Removing and Installing components ...

Страница 25: ...ly to the metal tab on the display assembly base 2 3 Install the following components a Back cover b Stand 4 Follow the procedure in After working inside your computer Memory module Removing the memory module 1 Follow the procedure in Before working inside your computer 2 Remove the following components Removing and Installing components 25 ...

Страница 26: ...3 NOTE Depending on the configuration ordered your system may have up to two memory modules installed on the system board Installing the memory module 1 Align the notch on the memory module with the tab on the memory module slot and slide it firmly into the slot at an angle 1 2 Press the memory module down until it clicks into place 2 3 Align the tabs on the DIMM door with the slots on the system ...

Страница 27: ...ving the system board shield 1 Follow the procedure in Before working inside your computer 2 Remove the following components a Stand b Back cover 3 Remove the five M3x5 screws that secure the system board shield to the display assembly base 1 4 Lift the system board shield off the display assembly base 2 Removing and Installing components 27 ...

Страница 28: ...board shield on system board 2 Align the slots on the system board shield with the slots on the display assembly base 1 3 Replace the five screws M3x5 that secure the system board shield to the display assembly base 2 28 Removing and Installing components ...

Страница 29: ...ollow the procedure in Before working inside your computer 2 Remove the following components a Stand b Back cover c System board shield 3 Remove the screw M2x2 5 that secures the Intel Optane card to the system board 1 4 Slide and remove the Intel Optane card from the card slot on the system board 2 5 Remove the thermal pad 3 Removing and Installing components 29 ...

Страница 30: ... marked on the system board 1 2 Insert the Intel Optane card into the card slot on the system board 2 3 Replace the screw M2x2 5 that secures the Intel Optane card to the system board 3 NOTE Intel Optane modules must be installed with a thermal pad 30 Removing and Installing components ...

Страница 31: ...ve the following components a Stand b Back cover c System board shield 3 Remove the screw M2x2 5 that secures the SSD card to the system board 1 4 Slide and remove the SSD card from the card slot on the system board 2 5 Remove the thermal pad 3 NOTE M 2 PCIe SSD with capacity over 512G 512G 1TB 2TB must be installed with a thermal pad M 2 SATA SSD and M 2 PCIe SSD with 128G and 256G do not require...

Страница 32: ...ith capacity over 512G 512G 1TB 2TB must be installed with a thermal pad M 2 SATA SSD and M 2 PCIe SSD with 128G and 256G do not require a thermal pad 2 Insert the SSD card into the card slot on the system board 2 3 Replace the screw M2x2 5 that secures the SSD card to the system board 3 32 Removing and Installing components ...

Страница 33: ...g the 2230 SSD card 1 Follow the procedure in Before working inside your computer 2 Remove the following components a Stand b Back cover c System board shield 3 Remove the screw M2x2 5 that secures the SSD card to the system board 1 4 Slide and remove the SSD card from the card slot on the system board 2 5 Remove the thermal pad 3 Removing and Installing components 33 ...

Страница 34: ... thermal pad on the rectangular outline marked on the system board 1 2 Insert the SSD card into the card slot on the system board 2 3 Replace the screw M2x2 5 that secures the SSD card to the system board 3 34 Removing and Installing components ...

Страница 35: ...e WLAN card 1 Follow the procedure in Before working inside your computer 2 Remove the following components a Stand b Back cover c System board shield 3 To remove the WLAN card shield a Remove the two screws M2x2 5 that secure the WLAN card shield to the system board 1 b Remove the WLAN card shield from the system board 2 Removing and Installing components 35 ...

Страница 36: ...he WLAN card bracket and the WLAN to the system board 1 b Slide and lift the WLANs card bracket off the WLAN card 2 c Disconnect the antenna cables from the WLAN card 3 d Slide and remove the WLAN card out of the WLAN card slot 4 36 Removing and Installing components ...

Страница 37: ...the WLAN card into the WLAN card slot 1 b Connect the antenna cables to the WLAN card 2 c Replace the WLAN card bracket on the WLAN card 3 d Replace the screw M2x2 5 that secures the WLAN card bracket and the WLAN to the system board 4 Removing and Installing components 37 ...

Страница 38: ...rew slot on the WLAN card shield with the screw slot on the system board and place the WLAN card shield on the system board 1 b Replace the two screws M2x2 5 that secure the WLAN card shield to the system board 2 38 Removing and Installing components ...

Страница 39: ...ollow the procedure in Before working inside your computer 2 Remove the following components a Stand b Back cover c System board shield 3 Disconnect the system fan cable from the socket on the system board 1 4 Remove the three screws M3x5 that secure the system fan to the display assembly base 2 5 Lift the system fan away from the system 3 Removing and Installing components 39 ...

Страница 40: ... system fan with the screw slots on the display assembly base 1 2 Replace the three screws M3x5 that secure the system fan to the display assembly base 2 3 Connect the system fan cable to the socket on the system board 3 40 Removing and Installing components ...

Страница 41: ... computer Heat sink Removing the heat sink UMA 1 Follow the procedure in Before working inside your computer 2 Remove the following components a Stand b Back cover c System board shield d System fan 3 Loosen the five captive screws in a sequential order 1 2 3 4 5 as mentioned on the heat sink Removing and Installing components 41 ...

Страница 42: ...4 Lift the heat sink off the system board and display assembly base 42 Removing and Installing components ...

Страница 43: ... the heat sink with the screw slots on the system board and the display assembly base 2 Tighten the five captive screws in a sequential order 1 2 3 4 5 to secure the heat sink to the system board and display assembly base Removing and Installing components 43 ...

Страница 44: ... procedure in Before working inside your computer 2 Remove the following components a Stand b Back cover c System board shield 3 To remove the camera assembly cover a Remove the two screws M3x5 that secure the camera assembly cover to the middle frame 1 b Lift the camera assembly cover away from the middle frame 2 c Disconnect the camera cable from the system board 3 44 Removing and Installing com...

Страница 45: ...s M3x5 that secure the pop up camera assembly to the middle frame 1 b Slide the pop up camera assembly forward 2 c To remove the pop up camera assembly off the middle frame unroute the camera cable from the routing channel 3 Removing and Installing components 45 ...

Страница 46: ...rews M3x5 that secure the bezel to the pop up camera assembly 2 c Lift the pop up camera bezel off the pop up camera assembly 3 6 To remove the pop up camera module a Release the camera module from the tab 1 b Remove the camera module along with the camera cable off the pop up camera assembly 2 46 Removing and Installing components ...

Страница 47: ...sembly 1 b Snap the pop up camera assembly in place to the tab 2 3 To install the pop up camera bezel a Align the screw slots on the pop up camera bezel with the screw slots on the pop up camera assembly 1 b Replace the three screws M3x5 that secure the pop up camera bezel to the pop up camera assembly 2 c To retract the pop up camera press the top of the pop up camera assembly 3 Removing and Inst...

Страница 48: ...eplace the two screws M3x5 that secure the pop up camera assembly to the middle frame 3 5 To replace the camera assembly cover a Connect the camera cable to the system board 1 b Align and place the pop up camera assembly cover on the middle frame 2 c Replace the two screws M3x5 that secure the camera assembly cover to the middle frame 3 48 Removing and Installing components ...

Страница 49: ...1 Follow the procedure in Before working inside your computer 2 Remove the following components a Stand b Back cover c System board shield 3 Press the tab on the coin cell battery socket until the coin cell battery pops up 1 4 Lift the coin cell battery out of the coin cell battery socket 2 Removing and Installing components 49 ...

Страница 50: ...cell battery 1 Insert the coin cell battery into the battery socket on the system board with the positive side facing up 1 2 Press down the battery into place until it fits securely 2 50 Removing and Installing components ...

Страница 51: ...rom under the tab on the processor shield 1 b Lift the lever upward and lift the processor shield 2 CAUTION The processor socket pins are fragile and can be permanently damaged Be careful not to bend the pins in the processor socket when removing the processor out of the socket c Lift the processor and remove it from the processor socket 3 NOTE After removing the processor place it in an antistati...

Страница 52: ... pin 1 corner of the processor has a triangle that aligns with the triangle on the pin 1 corner on the processor socket When the processor is properly seated all four corners are aligned at the same height If one or more corners of the processor are higher than the others the processor is not seated properly b Close the processor shield by sliding it under the retention screw 2 c Lower the socket ...

Страница 53: ...mal grease provided in the kit to ensure that thermal conductivity is achieved Base cover Removing the base cover 1 Follow the procedure in Before working inside your computer 2 Remove the following components a Stand b Cable cover optional c Back cover d System board shield 3 Remove the four screws M3x5 that secure the base cover to the display assembly base Removing and Installing components 53 ...

Страница 54: ...4 Pry and lift the base cover off the middle frame 54 Removing and Installing components ...

Страница 55: ...on the base cover with the slots on the middle frame 1 2 Press the base cover down until it snaps into place on the middle frame 2 3 Replace the four screws M3x5 that secure the base cover to the display assembly base Removing and Installing components 55 ...

Страница 56: ...a Stand b Back cover c System board shield d Base cover 3 To release the PSU cable a Remove the single M3x5 screw securing the power supply socket to the I O bracket 1 b Slide the power supply socket away to remove it from the system 2 c Unroute the power supply cables from the retention clips in the chassis 3 d Disconnect the power supply cable from the socket on the system board 4 NOTE Press the...

Страница 57: ...4 To remove the PSU a Remove the single M3x5 screw that secures the PSU to the display assembly base 1 and then slide the PSU forward 2 Removing and Installing components 57 ...

Страница 58: ...b Slide the PSU and lift it away from the chassis 58 Removing and Installing components ...

Страница 59: ... to the chassis 2 2 To install the PSU cable a Connect the power supply cable to the socket on the system board 1 b Route back the power supply cables through the retention clips in the I O bracket 2 c Slide and replace the power supply socket on the chassis 3 d Replace the single M3x5 screw securing the power supply socket to the I O bracket 4 Removing and Installing components 59 ...

Страница 60: ...fan 1 Follow the procedure in Before working inside your computer 2 Remove the following components a Stand b Back cover c System board shield d Base cover 3 To disconnect the PSU fan cable a Unroute the power supply cables from the retention clips in the PSU fan b Disconnect the PSU fan cable form the socket on the system board 1 c Unroute the PSU fan cable from the retention tab 2 60 Removing an...

Страница 61: ...4 To disconnect the PSU fan a Remove two M3x5 screws that secure the PSU fan to the display assembly base 1 b Lift the PSU fan away from the chassis 2 Removing and Installing components 61 ...

Страница 62: ...wer supply unit PSU fan 1 To install the PSU fan a Align and place the PSU fan on the chassis 1 b Replace the two M3x5 screws that secure the PSU fan to the display assembly base 2 62 Removing and Installing components ...

Страница 63: ...ble a Route the PSU fan cable through the retention tab 1 b Connect the PSU fan cable to the socket on the system board 2 c Route the power supply cables to the retention clips on the PSU fan Removing and Installing components 63 ...

Страница 64: ...puter 2 Remove the following components a Stand b Back cover c System board shield d Base cover 3 Release the PSU cable to remove the Input and Output I O bracket 4 To release the PSU cable a Remove the single M3x5 screw securing the power supply socket to the Input and Output I O bracket 1 b Slide the power supply socket away to remove it from the system 2 c Unroute the power supply cables from t...

Страница 65: ...he Input and Output I O bracket a Remove the three M3x5 screws that secure the I O bracket to the display assembly base 1 b Lift the I O bracket off the display assembly base 2 Removing and Installing components 65 ...

Страница 66: ...ut and Output bracket I O bracket a Align the slots on the Input and Output bracket I O bracket with the ports on the system board 1 b Replace the three screws M3x5 that secure the I O bracket to the display assembly base 2 66 Removing and Installing components ...

Страница 67: ...wer supply cables through the retention clips in the chassis 1 b Slide and replace the power supply socket on the chassis 2 c Replace the single M3x5 screw securing the power supply socket to the I O bracket 3 Removing and Installing components 67 ...

Страница 68: ...g inside your computer System board Removing the system board 1 Follow the procedure in Before working inside your computer 2 Remove the following components a Stand b Back cover c Hard drive d Memory e System board shield f Intel Optane g SSD h WLAN card i System fan j Heat sink k Processor 68 Removing and Installing components ...

Страница 69: ... Touch cable 3 SIO_power SIO_signal UAJ INT_speaker DMIC cables 4 LVDC cable 5 Power button board cable 6 PSU fan cable 7 Back light cable 8 4 Remove the eight screws M3x5 that secure the system board to the display assembly base 1 5 Lift the system board off the display assembly base 2 Removing and Installing components 69 ...

Страница 70: ...d 1 Align the screw slots on the system board with the screw slots on the display assembly base 1 2 Replace the eight screws M3x5 that secure the system board to the display assembly base 2 70 Removing and Installing components ...

Страница 71: ...the system board Power supply unit cable 1 Camera cable 2 Touch cable 3 SIO_power SIO_signal UAJ INT_speaker DMIC cables 4 LVDC cable 5 Power button board cable 6 PSU fan cable 7 Back light cable 8 Removing and Installing components 71 ...

Страница 72: ...tel Optane i System board shield j Memory k Hard drive l Back cover m Stand 5 Follow the procedure in After working inside your computer Speakers Removing the speakers 1 Follow the procedure in Before working inside your computer 2 Remove the following components a Stand b Back cover 72 Removing and Installing components ...

Страница 73: ...e from the system board 1 b Unroute the speaker cable from the routing guide on the display assembly base 2 c Remove the four screws M3x4 7 1 that secure the speakers to the display assembly base 1 d Lift the speakers and the speaker cable off the display assembly base 2 Removing and Installing components 73 ...

Страница 74: ... speakers on the display assembly base and align the screw slots on the speakers with the screw slots on the display assembly base 1 b Replace the eight screws M3x4 7 1 that secure the speakers to the display assembly base 2 74 Removing and Installing components ...

Страница 75: ...he speaker cable through the routing guides on the display assembly base 1 d Connect the speaker cable to the socket on the system board 2 2 Install the following components Removing and Installing components 75 ...

Страница 76: ...wing components a Stand b Back cover c System board shield d Base cover e PSU f PSU fan 3 To remove the power button board a Open the latch and disconnect the power button board cable from the system board 1 b Slide the power button board cable out from under the antenna cables 2 c Peel off the power button board cable from the display assembly base 3 d Slide the power button board cable out from ...

Страница 77: ...long with its cable off the middle frame 2 Installing the power button board 1 To install the speakers a Using the alignment post place the power button board into its slot on the middle frame 1 b Replace the single screw M3x5 that secures the power button board to the middle frame 2 Removing and Installing components 77 ...

Страница 78: ...e power button board cable under the antenna cable then adhere the power button board cable to the display assembly base 2 e Slide the power button board cable into the socket on the system board and close the latch to secure the cable 3 78 Removing and Installing components ...

Страница 79: ... Follow the procedure in Before working inside your computer 2 Remove the following components a Stand b Back cover c System board shield d Base cover e I O bracket f Speakers 3 To remove the microphone and cable a Disconnect the microphone module cable from the system board 1 b Unroute the microphone module cable from the routing guides on the display assembly base 2 Removing and Installing compo...

Страница 80: ...c Remove the two screws M2x2 5 that secure the microphone modules to the middle frame 1 3 d Lift the microphone modules off the slots on the middle frame 2 4 80 Removing and Installing components ...

Страница 81: ... to the slots on the middle frame 1 3 NOTE Match the numbers on the microphone modules to the numbers on the middle frame while placing the microphone modules on the middle frame b Replace the two screws M2x2 5 that secure the microphone modules to the middle frame 4 2 Removing and Installing components 81 ...

Страница 82: ...Route the microphone module cable through the routing guides on the display assembly base 1 d Connect the microphones module cable to the socket on the system board 2 82 Removing and Installing components ...

Страница 83: ... c System board shield d Base cover e I O bracket f Speakers 3 To remove the Input and Output board I O board shield a Disconnect the I O board cable I O board power cable and headset port cable from the system board 1 NOTE Use the pull tab to disconnect the I O board cable from the system board b Remove the I O board cable I O board power cable and headset port cable from the routing guides on th...

Страница 84: ... I O board a Remove the headset port cable from the routing guide on the I O board 1 b Remove the two screws M3x5 that secure the I O board to the display assembly base 2 c Lift the I O board with its cables from the display assembly base 3 84 Removing and Installing components ...

Страница 85: ... align the Input and Output board I O board onto the display assembly base 1 b Replace the two screws M3x5 that secure the I O board to the display assembly base 2 c Route the headset port cable through the routing guide on the I O board 3 Removing and Installing components 85 ...

Страница 86: ...he two screws M3x5 that secure the I O board shield to the display assembly base 2 c Route the headset port cable I O board cable and I O board power cable through the routing guides on the display assembly base 3 d Connect the I O board cable I O board power cable and headset port cable to the system board 4 86 Removing and Installing components ...

Страница 87: ... headset port 1 Follow the procedure in Before working inside your computer 2 Remove the following components a Stand b Back cover c System board shield d Base cover e I O bracket f Speakers g I O board 3 Remove the single M3x5 screw that secures the headset port to the display assembly base 1 4 Lift the headset port with its cable from the display assembly base 2 Removing and Installing component...

Страница 88: ...to its slot on the middle frame and align the screw slot on the headset port to the screw slot on the display assembly base 1 2 Replace the single M3x5 screw that secures the headset port to the display assembly base 2 88 Removing and Installing components ...

Страница 89: ...4 Follow the procedure in After working inside your computer Antennas Removing the antennas 1 Follow the procedure in Before working inside your computer 2 Remove the following components a Stand b Back cover c System board shield d Base cover e I O bracket f Speakers g WLAN card h I O board Removing and Installing components 89 ...

Страница 90: ...ase 1 2 b Carefully peel the tape that secures the antenna cables 2 to the middle frame 1 4 c Remove the two screws M2x2 5 that secure the antenna modules 2 to the middle frame 2 5 d Release the antenna modules 2 from the tabs and lift the antenna modules off the middle frame 3 6 90 Removing and Installing components ...

Страница 91: ... the antenna modules 2 with the slots on the middle frame 1 4 b Replace the two screws M2x2 52 that secure the antenna modules 2 to the middle frame 2 5 c Adhere the tape that secures the antenna cables 2 to the middle frame 3 6 Removing and Installing components 91 ...

Страница 92: ...d Route the antenna cables through the routing guides on the display assembly base 1 2 92 Removing and Installing components ...

Страница 93: ... Stand 3 Follow the procedure in After working inside your computer Display panel Removing the display panel 1 Follow the procedure in Before working inside your computer 2 Remove the following components a Stand b Back cover c System board shield d Base cover e I O bracket f System fan g Hard drive h WLAN card Removing and Installing components 93 ...

Страница 94: ...ame and display assembly base to the display panel are silver in color and etched with LCD around the screw holes 5 Place the system in upright position holding the display panel and display assembly base carefully release the display panel from middle frame and display assembly base 1 6 Slide the display backlit cable through the slot on the display assembly base 2 7 Lift the display panel off th...

Страница 95: ...base 3 Push the display backlight cable through the slots on the display assembly base 2 4 Push the display panel towards the display assembly base closing the gap between the display panel and the middle frame 3 NOTE Ensure the display cable touchscreen cable and display backlight cable has been fully threaded through the slots on the display assembly base before closing the gap between the displ...

Страница 96: ...splay panel to the middle frame and display assembly base 1 7 Route the display backlit cable through the routing guides on the display assembly base 2 NOTE The screws that secure the middle frame and display assembly base to the display panel are silver in color and etched with LCD around the screw holes 96 Removing and Installing components ...

Страница 97: ...t i Base cover j System board shield k Back cover l Stand 9 Follow the procedure in After working inside your computer Display cable Removing the display cable 1 Follow the procedure in Before working inside your computer 2 Remove the following components a Stand b Back cover c Hard drive Removing and Installing components 97 ...

Страница 98: ...hones p I O board q Headset port r Antennas s Display panel 3 To remove the display cable a To release the cable press the tabs on both sides 1 b Disconnect the cable and lift it away from the display assembly base 2 Installing the display cable 1 To install the display cable a Press and hold the tabs on both sides 1 98 Removing and Installing components ...

Страница 99: ...on board g Speakers h System board i I O bracket j PSU fan k PSU l Base cover m Camera n System fan o WLAN card p System board shield q Hard drive r Back cover s Stand 3 Follow the procedure in After working inside your computer Middle frame Removing the middle frame 1 Follow the procedure in Before working inside your computer Removing and Installing components 99 ...

Страница 100: ... Speakers n Power button board o Microphones p I O board q Headset port r Antennas s Display panel 3 Remove the 11 screws M3x5 that secure the middle frame to the display assembly base 1 4 Slide and lift to release the tabs on the middle frame from the slots on the display assembly base 2 5 Lift the middle frame off the display assembly base 1 100 Removing and Installing components ...

Страница 101: ...me 1 Starting from the location shown slide and align the middle frame to the slots on the display assembly base and then snap the middle frame into place on the display assembly base 1 2 Removing and Installing components 101 ...

Страница 102: ... secure and the tabs on the middle frame to the slots on the display assembly base 1 3 Replace the 11 screws M3x5 that secure the middle frame to the display assembly base 2 102 Removing and Installing components ...

Страница 103: ... Microphones f Power button board g Speakers h System board i I O bracket j PSU fan k PSU l Base cover m Camera n System fan o WLAN card p System board shield q Hard drive r Back cover s Stand 5 Follow the procedure in After working inside your computer Removing and Installing components 103 ...

Страница 104: ...mputer boots press the F12 key when the Dell logo is displayed 3 In the boot menu screen use Up Down arrow key to select the Diagnostics option and then press Enter NOTE The Enhanced Pre boot System Assessment window displays listing all devices detected in the computer The diagnostics starts running the tests on all the detected devices 4 Press the arrow in the lower right corner to go to the pag...

Страница 105: ... Recovery On demand trigger recovery image is not found 3 7 BIOS Recovery On demand trigger recovery image is invalid The system may emit a series of beeps during start up if the errors or problems cannot be displayed The repetitive beep codes help the user troubleshoot problems with the system Camera status indicator Camera status light Indicates whether the camera is in use Solid white Camera is...

Страница 106: ...voke the LCD BIST turn on the system and press and hold the Display Built in Self Test button plus the Power button together Release the buttons when Red Green Blue White Blue pattern is displayed on screen 106 Troubleshooting your computer ...

Страница 107: ...e based support and service options Availability varies by country and product and some services may not be available in your area To contact Dell for sales technical support or customer service issues 1 Go to Dell com support 2 Select your support category 3 Verify your country or region in the Choose a Country Region drop down list at the bottom of the page 4 Select the appropriate service or su...

Отзывы: