background image

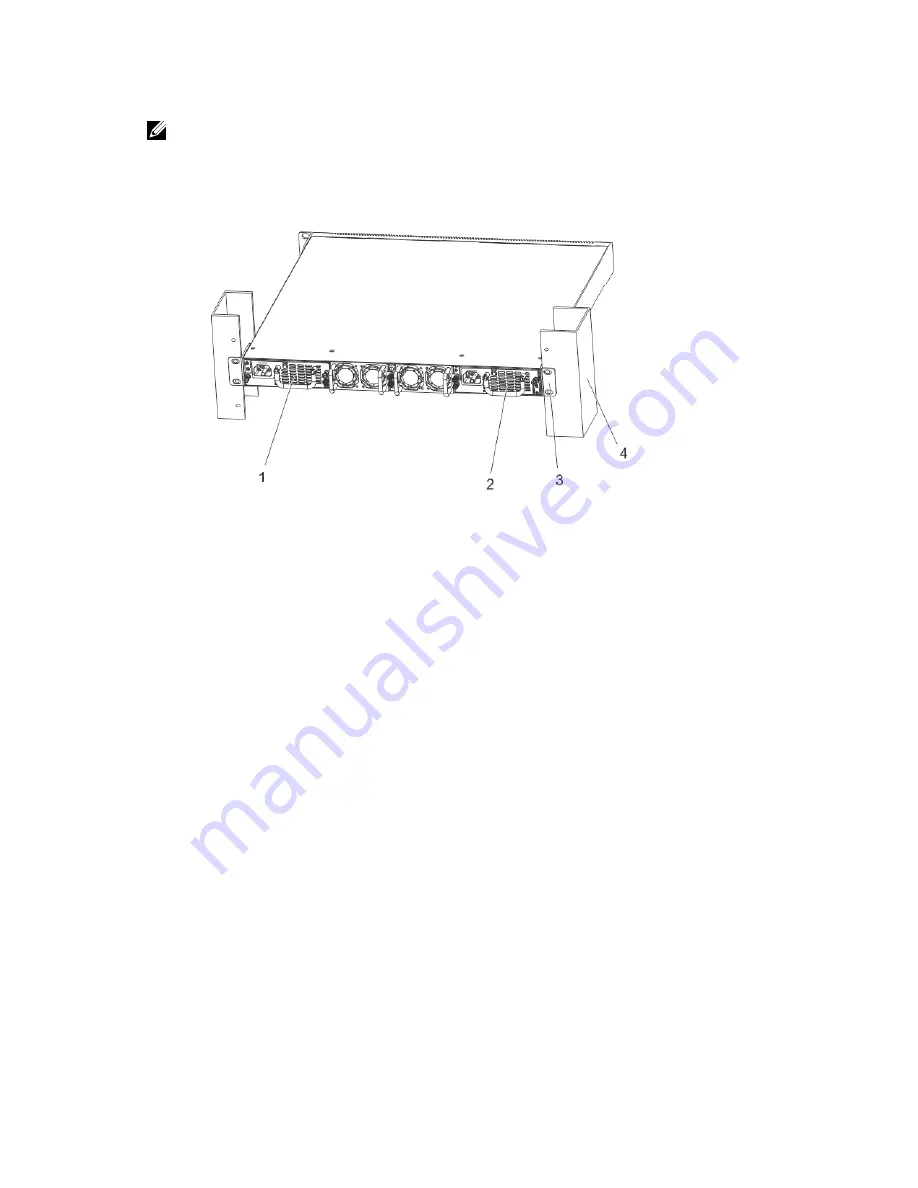
NOTE: Dell Networking recommends using one person to hold the S4810–ON chassis in place 
while another person attaches the brackets to the posts.

Attach the bracket “ears” to the rack or cabinet posts using the two screws for each bracket. Ensure 
the screws are tightened firmly.

Figure 5. Installing the System into a Two-Post Rack or Cabinet

1.

PSU1

2. PSU2

3. Rack Mounting Ears

4. Rack or Cabinet Post

Attaching the Mounting Brackets into a Four-Post Rack or Cabinet

The S4810–ON ships with mounting brackets (rack ears) and the required screws for a two-post rack or 

cabinet installation.

To install the S4810–ON in a four-post rack or cabinet, you must order additional brackets separately. 

Use the brackets included with the S4810–ON on the I/O side of system and use the brackets you 

ordered separately on the PSU side of the system.
Unlike the two-post installation, the four-post installation requires attaching brackets to the rack prior to 
installing the system.

To attach the brackets to the rack or cabinet, follow these steps.

1.

Ensure that there is adequate clearance surrounding the rack or within the cabinet to permit access 

and airflow.

2.

Take the brackets and screws out of their packaging.

Install the S4810–ON

17

Содержание Networking S4810

Страница 1: ...Installing the S4810 System April 2014 ...

Страница 2: ...problem WARNING A WARNING indicates a potential for property damage personal injury or death Copyright 2014 Dell Inc All rights reserved This product is protected by U S and international copyright and intellectual property laws Dell and the Dell logo are trademarks of Dell Inc in the United States and or other jurisdictions All other marks and names mentioned herein may be trademarks of their res...

Страница 3: ...sis in a Rack or Cabinet 15 Attaching the Mounting Brackets into a Two Post Rack or Cabinet 15 Installing the System into a Two Post Rack or Cabinet 16 Attaching the Mounting Brackets into a Four Post Rack or Cabinet 17 Installing the System into a Four Post Rack or Cabinet 18 Attaching the Ground Cable 19 Installing the SFP and QSFP Optics 20 Remove the SFP and QSFP Optics 21 Splitting QSFP Ports...

Страница 4: ...ysical Design 33 IEEE Standards 34 Agency Compliance 34 USA Federal Communications Commission FCC Statement 34 European Union EMC Directive Conformance Statement 34 Japan VCCI Compliance for Class A Equipment 35 Korean Certification of Compliance 36 Safety Standards and Compliance Agency Certifications 36 Electromagnetic Compatibility EMC 37 Product Recycling and Disposal 37 Removing the SD Card 3...

Страница 5: ...s optical transceivers which comply with the limits of Class 1 laser radiation WARNING When no cable is connected visible and invisible laser radiation may be emitted from the aperture of the optical transceiver ports Avoid exposure to laser radiation and do not stare into open apertures Information Symbols This book uses the following information symbols NOTE The Note icon signals important opera...

Страница 6: ...re information about the S4810 ON system refer to the Dell Networking S4810 Open Networking ON Getting Started Guide NOTE For the most recent documentation visit iSupport http www dell com support my support 6 About this Guide ...

Страница 7: ... pluggable plus QSFP ports For system access the S4810 ON includes an RS 232 RJ 45 console port and a management port for system access The S4810 ON input output I O side shown in the following illustration contains the 48 ports of 10GbE and four uplink ports of 40GbE QSFP autosensing ports and management ports Figure 1 S4810 ON I O Side View 1 System LEDs 2 RS 232 RJ 45 Console Port 3 Management ...

Страница 8: ... I O side S4810 ON Series Fan with airflow from the I O side to the PSU side S4810 ON Series Fan with airflow from the PSU side to the I O side S4810 ON Series AC Power supply with airflow from the I O side to the PSU side S4810 ON Series AC Power supply with airflow from the PSU side to the I O side For a list of supported optics refer to the S4810 ON data sheet at http www dell com or contact yo...

Страница 9: ... type Remote management port 32 port 40G QSFP ports Universal serial bus USB A port USB B port Solid state drive SSD System Status You can view S4810 ON status information using the light emitting diodes LEDs LED Displays The S4810 ON includes LED displays on the I O side of the chassis shown in the following illustration When the S4810 ON powers up or reloads the PSU LED is solid green For additi...

Страница 10: ... PSU status Fan tray status System Figure 3 S4810 ON LEDs 1 SYS 2 MASTER 3 FAN 4 PSU 10 The S4810 ON System ...

Страница 11: ...e Connect the system to the appropriate branch circuit protection as defined by your local electrical codes Environmental temperature between 32 to 104 F from 0 to 40 C Relative humidity that does not exceed 85 percent noncondensing In a dry clean well ventilated and temperature controlled room away from heat sources such as hot air vents or direct sunlight Away from sources of severe electromagne...

Страница 12: ...is at least 5 inches 12 7 cm apart to permit proper airflow The acceptable ambient temperature ranges are listed in Specifications The fan speed increases and decreases automatically based on the system s state and temperature The switch never intentionally turns off the fans NOTE Power Supplies and Fan Modules are field replaceable units Dell Networking does not support a mix of power supply type...

Страница 13: ...ways wear an ESD preventive wrist or heel ground strap when handling the S4810 ON and its accessories After you remove the original packaging place the S4810 ON and its components on an antistatic surface Follow these storage guidelines Storage temperature must remain constant ranging from 40 to 158 F from 40 C to 70 C Store on a dry surface or floor away from direct sunlight heat and air conditio...

Страница 14: ...14 ...

Страница 15: ...orts 5 Supply Power and Power Up the System 6 After Installing the S4810 ON WARNING ESD damage can occur if components are mishandled Always wear an ESD preventive wrist or heel ground strap when handling the S4810 ON and its components As with all electrical devices of this type take all the necessary safety precautions to prevent injury when installing this system Installing the S4810 ON Chassis...

Страница 16: ... Mounting Brackets into a Two Post Rack or Cabinet 1 View from the chassis I O side 2 Connect to the Rack or Cabinet ears 3 Screws 4 Screws 5 Connect to the Rack or Cabinet ears 6 Power Supply Installing the System into a Two Post Rack or Cabinet Ensure that there is adequate clearance surrounding the rack or within the cabinet to permit access and airflow To install a system into a two post 19 in...

Страница 17: ... ears and the required screws for a two post rack or cabinet installation To install the S4810 ON in a four post rack or cabinet you must order additional brackets separately Use the brackets included with the S4810 ON on the I O side of system and use the brackets you ordered separately on the PSU side of the system Unlike the two post installation the four post installation requires attaching br...

Страница 18: ...ount ears into the I O facing posts using rack mount screws not included with the system NOTE Mount the rack mount ears so that the system is level when fully installed 6 Using the provided pan head screws attach the rack ears on the I O facing posts to the long bracket attached to the system To secure tighten the pan head screws Installing the System into a Four Post Rack or Cabinet To install a ...

Страница 19: ... one hole lug 10 hole size 63 spacing not included in shipping The one hole lug must be a UL recognized crimp type lug NOTE The rack installation ears are not suitable for grounding CAUTION Grounding conductors must be made of copper Do not use aluminum conductors To connect the ground cable to the system follow these steps NOTE Coat the one hole lug with an anti oxidant compound prior to crimping...

Страница 20: ...uitable grounding point Installing the SFP and QSFP Optics The S4810 ON has 48 SFP optical ports and four QSFP optical ports WARNING ESD damage can occur if components are mishandled Always wear an ESD preventive wrist or heel ground strap when handling the S4810 ON and its components WARNING When working with optical fibers follow all warning labels and always wear eye protection Never look direc...

Страница 21: ...e other end of the optical cable into a similarly configured port of the adjacent system There are no unique stacking ports you can configure the small form factor pluggable SFP and quad form factor pluggable plus QSFP ports to act as stacking ports The SFP ports are labeled from 0 to 47 The QSFP ports are labeled 48 and 56 for the lower ports and 52 and 60 for the upper ports NOTE The S4810 ON sy...

Страница 22: ...he two units in a second stacking port as shown in the following illustration CAUTION To connect S4810 ON systems use only Dell Networking supported stacking cables To connect three S4810 ON systems in a ring as shown in the following illustration starting with the S4810 ON at the bottom of the stack follow these steps NOTE The port numbers in the following procedure are used as examples only 1 In...

Страница 23: ...iately come on at high speed The fan speed slows as the system boots up AC Power To add AC power connect the power cord plug to each AC power connector Make sure that the power cord is secure as shown in the following illustration CAUTION Ensure that you correctly install the PSU When correctly installed the AC power connector is on the left side of the PSU and the status LED is at the top of the ...

Страница 24: ...hemselves This influences unit numbers management addresses and other elements of the configuration file Unit identification within the stack is determined by the identification algorithm you select The default algorithm has the units self identify as Unit 0 through Unit last based on the order in which they come online So when setting up a new set of switches in a stack you can force the identifi...

Страница 25: ...10 ON is grounded properly If you ground your equipment incorrectly excessive emissions may result To ensure that the power cables meet your local electrical requirements use a qualified electrician Components The following power supply options are available for the S4810 ON AC power supply with integrated fan AC power supply with integrated reverse flow fan Power supply 1 PSU1 is on the left side...

Страница 26: ...tach the power cables NOTE The system powers up as soon as the cables are connected between the power supply and the power source Replacing an AC or DC Power Supply To replace an AC or DC power supply follow these steps NOTE The PSU slides into the slot smoothly Do not force a PSU into a slot as this action may damage the PSU or the S4810 ON chassis NOTE If a PSU fails you must completely replace ...

Страница 27: ...ons Do not mix airflow types in a chassis you can use only a single airflow direction in a chassis Normal airflow is from the I O panel to the PSU Reversed airflow is from the PSU to the I O panel Environmental factors can decrease the amount of time required between fan replacements Check the environmental factors regularly An increase in temperature and or particulate matter in the air might aff...

Страница 28: ...s in the Z9000 are field replaceable Module slot 0 is on the left side of the chassis module slot 1 is on the right side of the chassis CAUTION DO NOT mix airflow directions Both fans must use the same airflow direction reverse or normal If the airflows are mismatched an error message appears and the system shuts down 28 Fans ...

Страница 29: ...the fan screen 7 Twist the latching screws to the fan screen until it is securely attached to the system Replacing a Fan Module To replace a fan module follow these steps 1 Loosen the securing screws on the sides of the fan module CAUTION You must complete steps 2 and 3 within one minute or the system powers down 2 Use the grab handle to slide the fan module out of the bay 3 Use the grab handle on...

Страница 30: ...30 ...

Страница 31: ...sis the I O side as shown in the following illustration NOTE Before starting this procedure be sure that you have a terminal emulation program already installed on your PC Figure 11 S4810 ON Serial Console Port Connector 1 RJ 45 Console Port The following table lists the console port pinout assignments To access the console port follow these steps 1 Install an RJ 45 copper cable into the console p...

Страница 32: ...o DB 9 adapter along with the RJ 45 rollover cable The following table lists the pin assignments Table 1 Pin Assignments Between the Console and a DTE Terminal Server Console Port RJ 45 to RJ 45 Rollover Cable RJ 45 to RJ 45 Rollover Cable RJ 45 to DB 9 Adapter Terminal Server Device Signal RJ 45 Pinout RJ 45 Pinout DB 9 Pin Signal RTS 1 8 8 CTS NC 2 7 6 DSR TxD 3 6 2 RxD GND 4 5 5 GND GND 5 4 5 G...

Страница 33: ...m Rear 5 inches 12 7 cm Thermal dissipation 1194 BTH h Power consumption 250 Watts nominal 350 Watts maximum Table 3 Environmental Parameters Parameter Specifications Temperature 32 to 104 F 0 to 40 C Storage Temperature 40 to 158 F 40 to 70 C Maximum altitude No performance degradation to 10 000 feet 3 048 meters Relative humidity 10 to 85 non condensing Shock MIL STD 810 Table 4 AC Power Require...

Страница 34: ...on of this equipment in a residential area is likely to cause harmful interference in which case users will be required to take whatever measures necessary to correct the interference at their own expense Properly shielded and grounded cables and connectors must be used in order to meet FCC emission limits Dell Networking is not responsible for any radio or television interference caused by using ...

Страница 35: ...is device may cause radio interference in which case you may be required to take adequate measures European Community Contact Dell Networking EMEA Central Dahlienweg 19 66265 Heusweiler Germany http www force10networks com german Tel 49 172 6802630 Email EMEA Central Sales Japan VCCI Compliance for Class A Equipment Figure 13 Japan VCCI Compliance for Class A Equipment This is Class A product base...

Страница 36: ...cation of Compliance Figure 15 Korean Certification of Compliance Figure 16 Korean Package Label Safety Standards and Compliance Agency Certifications CUS UL 60950 1 2nd Edition CSA 60950 1 03 2nd Edition EN 60950 1 2nd Edition 36 Specifications ...

Страница 37: ... EFT EN 61000 4 5 Surge EN 61000 4 6 Low Frequency Conducted Immunity Product Recycling and Disposal You must recycle or discard this system according to applicable local and national regulations Dell Networking encourages owners of information technology IT equipment to responsibly recycle their equipment when it is no longer needed Dell Networking offers a variety of product return programs and ...

Страница 38: ...erings see the WEEE Recycling instructions on iSupport at http i dell com sites content corporate corp comm en Documents weee eol instructions pdf For more information contact the Dell Networking Technical Assistance Center TAC refer to Contacting the Technical Assistance Center Removing the SD Card To support high security environments you can remove and re install the SD card Dell Networking rec...

Страница 39: ...4 Remove the card Figure 18 Illustration of removing the SD Card Replacing the Battery The lithium battery is not field replaceable Specifications 39 ...

Страница 40: ...40 ...

Страница 41: ...r iSupport is http www dell com support You must have a userid and password to access iSupport services If you do not have a userid and password you can request these at the website To request a userid password and iSupport services follow these steps 1 On the Dell Networking Support page click the Account Request link 2 Fill out the User Account Request form and click Send You will receive your u...

Страница 42: ...hese steps 1 Determine the part number and serial number of the component 2 Request an RMA number from TAC by opening a support case Open a support case by Using the Create Service Request form on the iSupport page refer to Contacting the Technical Assistance Center Contacting Dell Networking directly by email or by phone refer to Contacting the Technical Assistance Center Provide the following in...

Отзывы: