25.
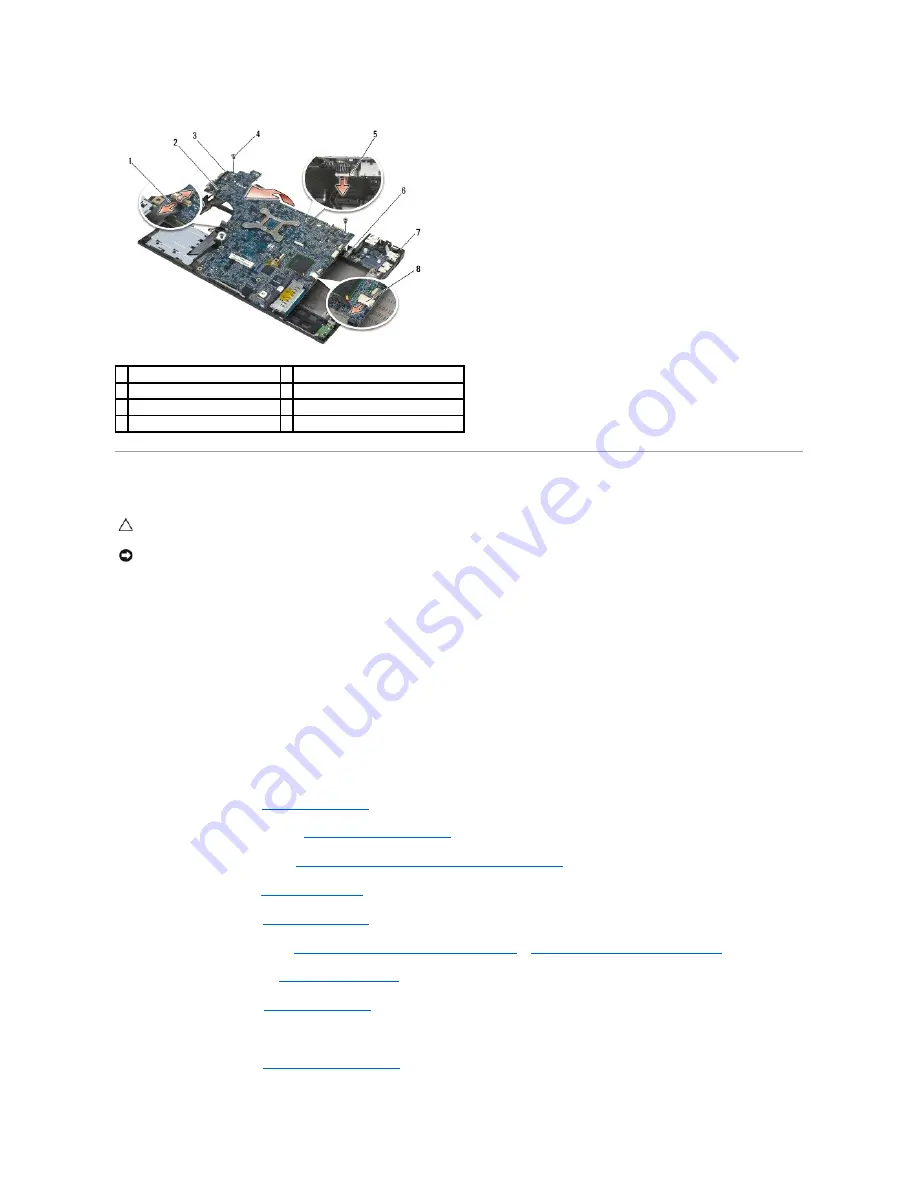
Lift the system board out of the base assembly.
Replacing the System Board Assembly
1.
Place the front-edge of the system board into the base of the computer, ensuring the system board fits under the metal LCD latch mechanism in the
front center of the base assembly.
2.
Connect the DC power cable to the bottom of the system board.
3.
Place the top-left corner of the system board in the base assembly.
4.
Push down on the top-right corner of the system board to connect it to the I/O card.
5.
Replace the three M2.5 x 5-mm screws on the system board in the holes labeled with white arrows.
6.
Route and connect the 1394 card cable to the connector on the system board. Press down on the cable to adhere it to the system board.
7.
Connect the smart card cable to the connector on the system board.
8.
Replace the card cage (see
Replacing the Card Cage
).
9.
Replace the palm rest assembly (see
Replacing the Palm Rest Assembly
).
10.
Replace the right speaker grill (see
Replacing the Right Speaker Grill/Fingerprint Reader Assembly
).
11.
Replace the keyboard (see
Replacing the Keyboard
).
12.
Replace the LED cover (see
Replacing the LED Cover
).
13.
Replace the display assembly (see
Replacing the Display Assembly (E6400 and M2400)
or
Replacing the Display Assembly (E6400 ATG)
).
14.
Replace the modular drive (see
Replacing the Modular Drive
).
15.
Replace the hard drive (see
Replacing the Hard Drive
).
16.
Connect the coin-cell battery cable to the system board.
17.
Replace the processor (see
Replacing the Processor Module
).
1 smart card cable
2 system board
3 top-left corner of base assembly
4 M2.5 x 5-mm system board screws (3)
5 DC cable
6 I/O card
7 top-right corner of base assembly 8 1394 card cable
CAUTION:
Before you begin the following procedure, follow the safety instructions that shipped with your computer.
NOTICE:
Ensure that any loose cables do not get caught beneath the system board.
Содержание Latitude E6400 ATG
Страница 14: ...Back to Contents Page ...
Страница 22: ...6 Follow the procedures in After Working on Your Computer Back to Contents Page ...
Страница 25: ...Back to Contents Page ...
Страница 47: ...Back to Contents Page ...
Страница 66: ...Back to Contents Page ...
Страница 70: ...Back to Contents Page ...


