background image

Installing heat sink assembly

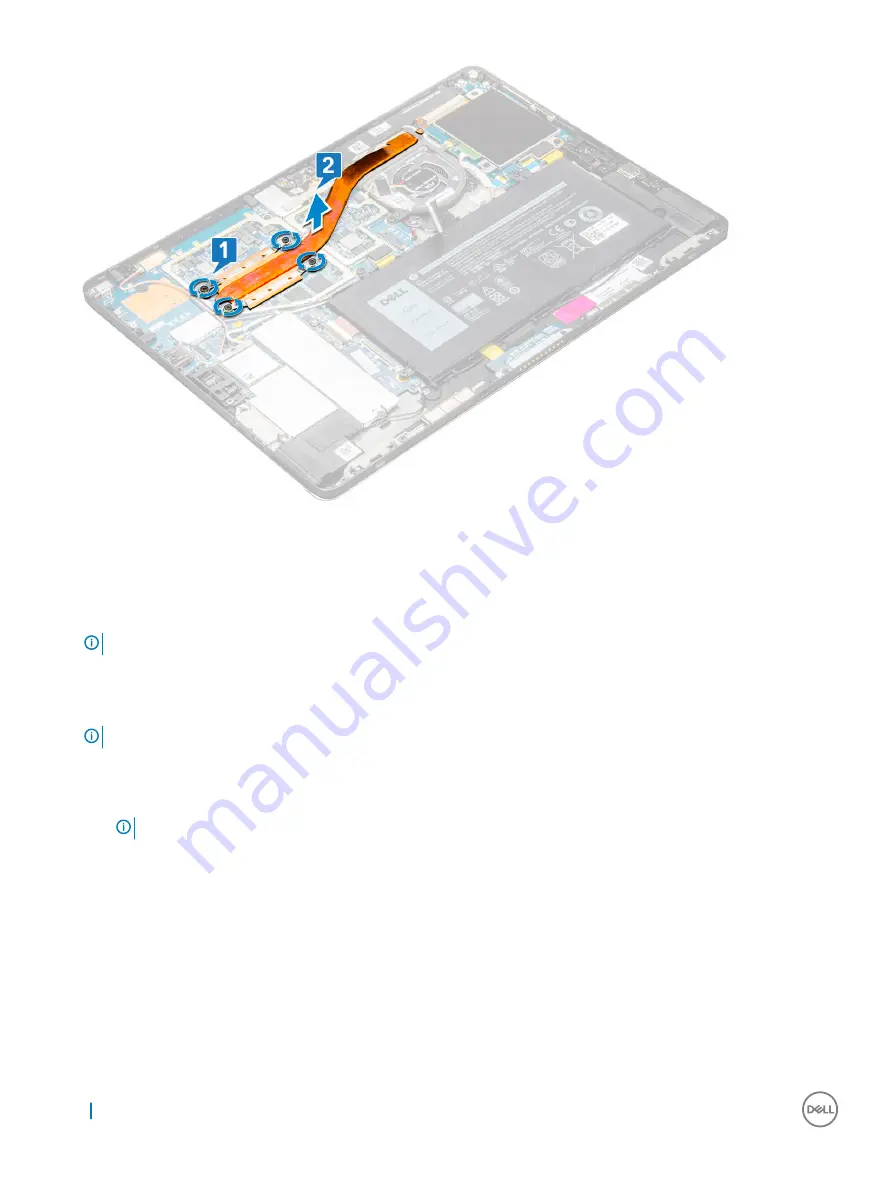
Align the heat sink assembly with screw holders on the system board.

Replace the M2.0 x 2.5 screws to secure the heat sink to the system board.

NOTE: 

Tighten the screws on the system board in the order of the callout numbers [1, 2, 3, 4] as indicated on the heat sink.

Install the shielding covers on the heat sink assembly.

Affix the conductive tapes to secure the shielding covers.

Replace the shielding covers to cover the heat sink assembly.

NOTE: 

The shield covers can break if not handled carefully.

Install the:

a

display panel

b

uSIM/microSD card

NOTE: 

uSIM card is installed only on tablets shipping with WWAN module.

Follow the procedure in 

After working inside your tablet

Front facing camera

Removing front camera

Follow the procedure in 

Before working inside your tablet

.

Remove the:

a

Micro-SIM and/or microSD card

22

Removing and installing components

Содержание Latitude 5290 2-in-1

Страница 1: ...Latitude 5290 2 in 1 Owner s Manual Regulatory Model T17G Regulatory Type T17G002 ...

Страница 2: ...m WARNING A WARNING indicates a potential for property damage personal injury or death 2016 Dell Inc or its subsidiaries All rights reserved This product is protected by U S and international copyright and intellectual property laws Dell and the Dell logo are trademarks of Dell Inc in the United States and or other jurisdictions All other marks and names mentioned herein may be trademarks of their...

Страница 3: ...s connected to bare metal and never to a painted or non metal surface The wrist strap should be secure and in full contact with your skin and ensure that you remove all jewelry such as watches bracelets or rings prior to bonding yourself and the equipment Electrostatic discharge ESD protection ESD is a major concern when you handle electronic components especially sensitive components such as expa...

Страница 4: ...ar and tear and must be checked regularly with a wrist strap tester in order to avoid accidental ESD hardware damage It is recommended to test the wrist strap and bonding wire at least once per week ESD Wrist Strap Tester The wires inside of an ESD strap are prone to damage over time When using an unmonitored kit it is a best practice to regularly test the strap prior to each service call and at a...

Страница 5: ...u have read the safety information that shipped with your tablet WARNING Before working inside your tablet read the safety information that shipped with your tablet For additional safety best practices information see the Regulatory Compliance Homepage at www dell com regulatory_compliance CAUTION Many repairs may only be done by a certified service technician You should only perform troubleshooti...

Страница 6: ...he storage SD card from the tablet After working inside your tablet CAUTION Leaving stray or loose screws inside your tablet may severely damage your tablet 1 Replace all screws and ensure that no stray screws remain inside your tablet 2 Connect any external devices peripherals and cables that you removed before working on your tablet 3 Replace any media card SIM card and any other parts that you ...

Страница 7: ...access Control Panel swipe at the right edge of the screen tap Search enter Control Panel in the search box and then click Control Panel b Slide to shut down your tablet NOTE You can also turn off your tablet without sliding down the screen Press and hold the Power button for 10 seconds to turn off your tablet You can perform this force shutdown if your tablet is not responding behaving unexpected...

Страница 8: ... Screw list Table 1 Latitude 5285 2 in 1 Screw size list Component M2 0x 1 1 1 7 M2 0X4 0 M1 6x3 0 M2 0X2 5 M1 6x3 0 M2 0X2 0 M2 0X3 5 Back cover 3 Battery 4 Heat sink 4 Hinges 4 Display panel 6 System fan 2 WWAN card 1 WLAN card 1 Smart card cage 3 SSD card 1 Docking bracket 2 Kickstand 4 Camera module 3 Antenna module 1 System board 4 Removing and Installing components This section provides deta...

Страница 9: ...5 to avoid damage to the hinges NOTE Ensure to turn off or disconnect power to drain flea power before installing the micro SD and or micro SIM 3 Slide the kickstand to an angle 135 to microSD and micro SIM cards slot 4 Slide the microSD micro SIM card cover towards 3 clock 1 and pull the cover 2 5 Insert the SD card micro SIM cards and a lign the cover with the groove on the tablet and slide it i...

Страница 10: ...w the procedure in Before working inside your tablet 2 Remove the a uSIM microSD card NOTE uSIM card slot is available only on tablets shipping with WWAN module 3 Open the kickstand by holding the tablet vertically and pressing it down Place the tablet with the display facing down 10 Removing and installing components ...

Страница 11: ...ker recess area 4 Place the tablet on a flat surface and lift the stand to reveal the base of the tablet 5 To release the display assembly a Remove the M1 6 x 3 0 6 screws that secure the base cover to the tablet 1 Removing and installing components 11 ...

Страница 12: ... kickstand 2 and flip the tablet to view the display 6 Use a plastic scribe 1 to pry the edges 2 of the display panel starting from the bottom side first near the docking port 12 Removing and installing components ...

Страница 13: ... moving clockwise to avoid damage to the plastic clips 7 Flip the display panel on a plane surface with the LCD panel upwards 8 To disconnect the cables a Push and disconnect the battery cable on the system board 1 Removing and installing components 13 ...

Страница 14: ...splay panel on the tablet and press the edges until they snap in 5 Flip the tablet and open the kickstand 6 Replace the M1 6 x 3 0 screws to secure the tablet to the display panel 7 Install the a uSIM micro SD card 8 Follow the procedure in After working inside your tablet PCIe Solid State Drive SSD Removing the SSD module 1 Follow the procedure in Before working inside your tablet 2 Remove the a ...

Страница 15: ...e SSD module CAUTION Align the five clips heads into the system board clips holes to install the shield properly Ensure to insert the clips with caution as the clips are small and delicate Mishandling damages the clips head and needs replacing the shield 3 Replace the M2 0 x 2 5 screw to secure SSD shield NOTE Align the shield carefully to avoid damage to the clips heads 4 Install the a Display pa...

Страница 16: ...d a Remove the M2 0 x 3 5 screw securing the WWAN bracket 1 and lift the bracket 2 b Disconnect the antenna cables from the WWAN card 3 c Lift and slide the WLAN card from the connector on the system board 4 NOTE Ensure to lift the WWAN card by an angle NOT more than 20 Installing the WLAN card 1 Insert the WLAN card into the connector on the system board 2 Connect the antenna cables to the WLAN c...

Страница 17: ...our tablet 2 Remove the a Micro SIM micro SD card NOTE Micro SIM card slot is available only on tablets shipping with WWAN module b display panel 3 To remove the speaker a Lift the latch and release the speaker cable from the connector 1 NOTE Ensure to remove the SSD to create more space to pry off the speakers b Un route the speaker cable from the routing clips with a plastic scribe 2 NOTE Ensure...

Страница 18: ...ure in After working inside your tablet Battery Removing the battery 1 Follow the procedure in Before working inside your tablet 2 Remove the a uSIM micro SD card NOTE uSIM card slot is available only on tablets shipping with WWAN module b display panel 3 To remove the battery a Release the adhesive tape that secures the battery connector to the system board b Disconnect the battery cable from the...

Страница 19: ...installed only on tablets shipping with WWAN module 5 Follow the procedure in After working inside your tablet System Fan Removing the system fan 1 Follow the procedure in Before working inside your tablet 2 Remove the a uSIM microSD card NOTE Micro SIM card slot is available only on tablets shipped with WWAN module b Display panel 3 To remove the system fan a Disconnect the system fan cable from ...

Страница 20: ...board 3 Connect the system fan cable to the system board 4 Install the a display panel NOTE uSIM card is installed only on tablets shipping with WWAN module b uSIM microSD card 5 Follow the procedure in After working inside your tablet Heat Sink Removing heat sink assembly 1 Follow the procedure in Before working inside your tablet 2 Remove the a Micro SIM and or microSD card 20 Removing and insta...

Страница 21: ...ductive tapes The tape secures the IR camera cable from any damage Ensure to fix the tapes while installing or replacing the component NOTE Ensure to peel off the conductive tape if the system heatsink is shipped with a tape b Lift the shielding covers that secure the heat sink assembly 4 To remove the heat sink assembly a Loosen the M2 0 x 2 5 captive screws 4 that secure the heat sink assembly t...

Страница 22: ...bly 4 Affix the conductive tapes to secure the shielding covers 5 Replace the shielding covers to cover the heat sink assembly NOTE The shield covers can break if not handled carefully 6 Install the a display panel b uSIM microSD card NOTE uSIM card is installed only on tablets shipping with WWAN module 7 Follow the procedure in After working inside your tablet Front facing camera Removing front c...

Страница 23: ...The front camera cable is glued to the rear camera ensure to gently peel off to remove the screw that secures the rear camera to the system board d Remove the M1 6 x 3 0 screws 2 securing the front camera module 4 e Lift the front camera module from the tablet 5 Installing the front camera 1 Insert the camera module into the slot on the tablet 2 Replace the M1 6 x 3 0 screws to secure the front ca...

Страница 24: ...ot is available only on tablets shipping with WWAN module b Display panel c front facing camera 3 To remove the rear camera a Disconnect the rear camera cable from the system board 1 b Remove the M1 6 x 3 0 screw 1 securing the rear camera module 2 c Lift the camera module from the tablet 3 Installing the rear camera 1 Insert the rear camera module into the slot on the tablet 2 Replace the M1 6 x ...

Страница 25: ...Always remove the smart card from the smart card reader 1 Follow the procedure in Before working inside your tablet 2 Remove the a uSIM microSD card NOTE uSIM card slot is available only on tablets shipping with WWAN module b display panel 3 To disconnect the cables a Lift the latch and dDisconnect the smart card cable from the smart card cage 1 b Remove the M2 0 x 2 5 screws 3 from the smart card...

Страница 26: ...r tablet Docking board Removing the docking board 1 Follow the procedure in Before working inside your tablet 2 Remove the a uSIM microSD card NOTE uSIM card slot is available only on tablets shipping with WWAN module b display panel c battery 3 To release the docking board a Lift the latch and dDisconnect the docking board cable from the system board 1 b Peel the docking board cable from adhesive...

Страница 27: ...Lift the docking board after releasing the cable from the adhesive Removing and installing components 27 ...

Страница 28: ...WAN module 6 Follow the procedure in After working inside your tablet System Board Removing system board 1 Follow the procedure in Before working inside your tablet 2 Remove the a uSIM microSD card NOTE Micro SIM card slot is available only on tablets shipping with WWAN module b display panel c battery d SSD card e WLAN card f system fan g front camera h rear camera i heat sink 3 Disconnect the fo...

Страница 29: ...outing clips 1 2 3 5 To remove the system board a Remove the bracket M2 0 x 2 5 screws 2 and lift the bracket form the tablet 1 2 b Release the coin cell battery from the adhesive on the tablet chassis 3 Removing and installing components 29 ...

Страница 30: ...c Remove the M2 0 x 2 5 screws 4 that secure the system board to the tablet 1 d Lift the system board from the tablet 2 30 Removing and installing components ...

Страница 31: ...a d system fan e WLAN card f SSD card g battery h display panel i uSIM microSD NOTE uSIM card is installed only on tablets shipping with WWAN module 6 Follow the procedure in After working inside your tablet Real time clock RTC Removing the RTC battery RTC battery connector is located beneath the system board 1 Follow the procedure in Before working inside your tablet 2 Remove the a uSIM and or mi...

Страница 32: ...cable to the connector beneath the system board 3 Install the a battery b display panel c uSIM microSD card NOTE uSIM card is installed only on tablets shipping with WWAN module 4 Follow the procedure in After working inside your tablet USH board Removing the USH board 1 Follow the procedure in Before working inside your tablet 2 Remove the a uSIM microSD card NOTE uSIM card slot is available only...

Страница 33: ... 5 Installing the USH board 1 Replace the USB board in the slot on the tablet 2 Connect the M2 0 x 2 5 screw to secure the USH board 3 Connect the USH board cable to the connector on the USH board 4 Connect the NFC and the fingerprint reader cables to the connectors on the system board 5 Replace the shield on the USH board 6 Install the a smart card cage b battery c display panel d uSIM microSD ca...

Страница 34: ...era f system board 3 To un route the antenna cables of the antenna module a Peel the tape that secures the cables to the back cover of the tablet 1 b Un route the cables from routing channels on the back cover c Peel the conductive tape that secures the cables 3 4 To remove the antenna module a Remove the M1 6 x 3 screw that secures the antenna module to the back cover of the tablet 1 b Lift the a...

Страница 35: ...outing channels 4 Affix the tape and the conductive tapes to secure the antenna cables 5 Install the a heat sink b rear facing camera c front facing camera d system fan e WLAN card f SSD card g battery h display panel i uSIM microSD card NOTE uSIM card is installed only on tablets shipping with WWAN module 6 Follow the procedure in After working inside your tablet Removing and installing component...

Страница 36: ...ible cable or improperly connecting the cable to the power strip or electrical outlet may cause fire or equipment damage Processors Latitude 5285 is shipped with Intel Core i3 7100U Dual Core 3M cache 2 4 GHz 15 W Intel Core i5 7200U Dual Core 3M Cache up to 3 1 GHz 15 W Intel Core i5 7300U vPro Dual Core 3M Cache up to 3 5 GHz 15 W Intel Core i7 7600U vPro Dual Core 4M cache up to 3 9 GHz 15 W NO...

Страница 37: ... 6 Intel Rapid Storage Technology NOTE Windows 7 and 8 are not supported by systems with 7th generation processors Identifying processors in Windows 10 1 Type Device Manager in Ask me anything field The Device Manager window is displayed 2 Click Processor The processor information is displayed Figure 1 Processor Verifying processor usage in task manager 1 Right click on the taskbar Select Task Man...

Страница 38: ...ck the on tablet 2 Select Start Task Manager The Windows Task Manager window is displayed 3 Click the Performance tab in the Windows Task Manager window The processor performance details are displayed 4 Click Open Resource Monitor 38 Technology and components ...

Страница 39: ...anager on Windows 10 NOTE The Chipset information displayed is a generic image and may be different from what is displayed 1 Type Device Manager in the Ask me anything field Device Manager window appears 2 Expand System Devices and search for the chipset Technology and components 39 ...

Страница 40: ...ng ePSA 1 Turn on or restart your tablet 2 Perform one of the following actions after the Dell logo is displayed With keyboard Press F12 Tablet only Press Volume Up button before pressing the Power button to turn on the tablet Once the power sequence is initiated you can release the Volume Up button and ePSA will launch The PreBoot System Assessment PSA is launched on your tablet NOTE If you wait ...

Страница 41: ...with front facing camera with 5 MP and rear facing camera with 8 MP Identifying the camera in Device Manager on Windows 10 1 In the Search box type device manager and tap to start it 2 Under Device Manager expand Imaging devices Starting the camera To start the camera open an application that uses the camera For instance if you tap the Dell webcam central software or the Skype software that is shi...

Страница 42: ... the camera application 1 Tap or click the Windows button and select All apps 2 Select Camera from the apps list 3 If the Camera App is not available in the apps list search for it 42 Technology and components ...

Страница 43: ...one of the following actions to enter the BIOS setup program With keyboard Tap F2 until the Entering BIOS setup message appears To enter the Boot selection menu tap F12 In tablet mode Press the Volume Up button to display the F12 boot selection or press Volume Down button to enter BIOS setup directly Hard drive is listed under the System Information under the General group Technology and component...

Страница 44: ...Drivers This section lists the drivers associated with the components shipped with your tablet System drivers Figure 3 System drivers 44 Technology and components ...

Страница 45: ...Disk driver Figure 4 Disk driver Technology and components 45 ...

Страница 46: ...Sound video and game controller drivers Figure 5 Sound video and game controllers 46 Technology and components ...

Страница 47: ...Storage controller drivers Figure 6 Storage controllers Technology and components 47 ...

Страница 48: ...Network drivers Figure 7 Network drivers Graphics driver Figure 8 Graphics driver 48 Technology and components ...

Страница 49: ...re Magnetic attach feature with built in magnet for increased fastening strength Removed Pen clip and added Tethering functionality Customizable 2 barrel buttons and Top button Quick launch and note taking over lock screen requires Bluetooth pairing LED light to show Bluetooth pairing status 12 months battery life with AAAA battery Based on 3 hours daily usage for 5 days a week Technology and comp...

Страница 50: ...g 10 to 90 non condensing Storage 10 to 95 non condensing Altitude maximum Specifications Operating 0 m to 3048 m 0 to 10 000 ft Non operating 0 m to 10 668 m 0 ft to 35 000 ft Airborne contaminant level G2 or lower as defined by ISA S71 04 1985 Physical specifications Feature Specification Weight Tablet only with 31 5 Whr battery and 126 GB m2 SATA base 1 89 lbs 857 g Weight Tablet Keyboard 2 65 ...

Страница 51: ... 0 21 inch Weight 135 0 g 0 29 lb 126 GB m2 SATA Voltage 11 4 VDC 42 WHr Length 177 6 mm 6 99 inches Width 82 6 mm 3 25 inches Height 5 5 mm 0 21 inch Weight 170 g 0 37 lb Voltage 7 6 VDC Life span 300 discharge per charge cycles Temperature range Operating Charge 0 C to 50 C 32 F to 122 F Discharge 0 C to 70 C 32 F to 158 F Non operating 20 C to 85 C 4 F to 185 F AC adapter specifications Feature...

Страница 52: ...nge Operating 0 C to 40 C 32 F to 104 F Temperature range Non Operating 40 C to 70 C 40 F to 158 F Display specifications Feature Specification Type 12 3 3 2 WVA Touch with Corning Gorilla Glass 4 Anti reflective and Anti smudge Luminance 340 nits Height 265 56 mm 10 55 inches Width 185 06 mm 7 28 inches Diagonal 312 42 mm 12 3 inches Maximum resolution 1920x1280 Refresh rate 60 Hz Maximum viewing...

Страница 53: ... Qualcomm Snapdragon X7 LTE A DW5811e for AT T Verizon Sprint US Qualcomm Snapdragon X7 LTE A DW5811e EMEA APJ ROW Qualcomm Snapdragon X7 LTE A DW5816e for Japan ANZ China India WiGig Optional Intel Tri Band Wireless AC 18265 WiGig Wi Fi BT4 2 Wireless Card Port and connector specifications Feature Specification Audio Realtek ALC3253 Controller Microphone in and stereo headphones speakers universa...

Страница 54: ...HD Graphics 620 8th Generation Intel Core External display support Optional Dell Adapter USB Type C to HDMI Ethernet USB 3 1 Gen1 NOTE Supports VGA DisplayPort HDMI through the docking station Memory specifications Feature Specification Memory connector Onboard memory Memory capacity 4GB 8GB SDRAM 16GB SDRAM Memory type LPDDR3 1866MHz LPDDR3 2133 MHz Audio specifications Feature Specification Type...

Страница 55: ...Feature Specification Speakers Two Internal speaker amplifier 2 W RMS per channel Volume controls Volume up and Volume down buttons System specifications 55 ...

Страница 56: ...p button 4 Press the Volume Down button to enter BIOS setup program System setup options NOTE Depending on the notebook and its installed devices the items listed in this section may or may not appear General screen options This section lists the primary hardware features of your tablet Option Description System Information This section lists the primary hardware features of your tablet System Inf...

Страница 57: ...FI boot path security Always except internal SSD Always Never Date Time Allows you to change the date and time General screen options This section lists the primary hardware features of your computer Option Description System Information System Information Displays BIOS Version Service Tag Asset Tag Ownership Tag Ownership Date Manufacture Date and the Express Service Code Memory Information Displ...

Страница 58: ...ance if the Admin password is not set BIOS settings Date Time Allows you to change the date and time System Configuration screen options Option Description SMART Reporting This field controls whether hard drive errors for integrated drives are reported during system startup This technology is part of the SMART Self Monitoring Analysis and Reporting Technology specification This option is disabled ...

Страница 59: ... to support the various illumination levels This field has an effect when the backlight is enabled The options are 5 sec 10 sec enabled by default 15 sec 30 sec 1 min 5 min 15 min Never Keyboard Backlight with AC The Keyboard Backlight with AC option does not affect the main keyboard illumination feature Keyboard Illumination will continue to support the various illumination levels This field has ...

Страница 60: ...ther hard drive errors for integrated drives are reported during system startup This technology is part of the SMART Self Monitoring Analysis and Reporting Technology specification This option is disabled by default Enable SMART Reporting USB Configuration This is an optional feature This field configures the integrated USB controller If Boot Support is enabled the system is allowed to boot any ty...

Страница 61: ... MicrophoneThis option is enabled by default Enable Internal Speaker This option is enabled by default Keyboard Illumination Allows you to choose the operating mode of the keyboard illumination feature The keyboard brightness level can be set from 0 to 100 The options are Disabled Dim Bright This option is enabled by default NOTE The Fn F10 hotkey can be used to change the setting Keyboard Backlig...

Страница 62: ...o set the display brightness depending up on the power source On Battery and On AC The display brightness is independent for battery and AC adapter It can be set using the slider Video screen options Option Description LCD Brightness Allows you to set the display brightness depending up on the power source On Battery and On AC NOTE The video setting will be visible only when a video card is instal...

Страница 63: ...t setting Allow Non Admin Password Changes is selected Non Admin Setup Changes Allows you to determine whether changes to the setup options are allowed when an Administrator Password is set If disabled the setup options are locked by the admin password Option allow wireless switch changes is not selected by default UEFI capsule firmware updates This option controls whether the system allows BIOS u...

Страница 64: ...ays set strong passwords Default Setting Enable Strong Password is not selected NOTE If user interface is enabled Admin and System passwords must contain at least one uppercase character one lowercase character and be at least 8 characters long Password Configuration Allows you to determine the minimum and maximum length of Administrator and System passwords Password Bypass Allows you to disable o...

Страница 65: ...ting take effect immediately Computrace R Allows you to activate or disable the optional Computrace Service from Absolute software The options are Deactivate Disable Activate NOTE The Activate and Disable options will permanently activate or disable the feature and no further changes will be allowed Default setting Activate OROM Keyboard Access Allows you to set an option to enter the Option ROM C...

Страница 66: ... security key databases only if the system is in Custom Mode The Enable Custom Mode option is disabled by default Custom Mode Key Management Allows you to manage the security key databases only if the system is in Custom Mode The options are PK This option is selected by default KEK db dbx NOTE If you disable the Enable Custom Mode all the changes made will be erased and the keys will restore to d...

Страница 67: ... Description Multi Core Support This field specifies whether the process has one or all cores enabled The performance of some applications improves with the additional cores This option is enabled by default Allows you to enable or disable multi core support for the processor The installed processor supports two cores If you enable Multi Core Support two cores are enabled If you disable Multi Core...

Страница 68: ...lt 1 2 3 Intel SpeedStep Allows you to enable or disable the Intel SpeedStep mode of the processor Enable Intel SpeedStep Default setting The option is enabled C States Control Allows you to enable or disable the additional processor sleep states C states Default setting The option is enabled Intel TurboBoost Allows you to enable or disable the Intel TurboBoost mode of the processor Enable Intel T...

Страница 69: ...is option enables you to minimize the AC power consumption during the peak power times of day After you enable this option your system runs only in battery even if the AC is attached Enable peak shift Set battery threshold 15 to 100 15 enabled by default Advanced Battery Charge Configuration This option enables you to maximize the battery health By enabling this option your system uses the standar...

Страница 70: ...wer Enable USB Wake Support Wake on Dell USB C Dock The option is selected by default Wireless Radio Control Allows you to sense the connection of the system to a wired network and subsequently disable the selected wireless radios WLAN and or WWAN Upon disconnection from the wired network the selected wireless radios is re enabled By default none of the option is enabled The options are Control WL...

Страница 71: ...r can drawn from the Type C connectors The options are 7 5 Watts 15 WattsThis option is enabled by default POST Behavior screen options Option Description Adapter Warnings Allows you to enable or disable the system setup BIOS warning messages when you use certain power adapters Default setting Enable Adapter Warnings Keypad Embedded Allows you to choose one of two methods to enable the keypad that...

Страница 72: ...ed by default POST Behavior Option Description Adapter Warnings Allows you to enable or disable the system setup BIOS warning messages when you use certain power adapters Enable Adapter Warnings This option is selected by default Keypad Embedded Allows you to choose one of two methods to enable the keypad that is embedded in the internal keyboard Fn Key Only This option is enabled by default By Nu...

Страница 73: ...rrors This option is enabled by default Continue on Warnings Continue on Warnings and Errors MAC Address Pass Through Allows you to replace the external NIC MAC address in a supported dock or dongle with the selected MAC address from the system The options are System Unique MAC Address This option is enabled by default Integrated NIC1 MAC Address Disabled Virtualization support screen options Opti...

Страница 74: ...options Option Description Wireless Device Enable Allows you to enable or disable the internal wireless devices WWAN GPS WLAN WiGig Bluetooth All the options are enabled by default NOTE IMEI number for WWAN can be found on the outer box or the WWAN card Maintenance screen options Option Description Service Tag Displays the Service Tag of your Asset Tag Allows you to create a system asset tag if an...

Страница 75: ...y default BIOS Recovery Allows you to recover from certain computed BIOS conditions from a recovery file on the user primary hard drive or an external USB key When Enabled is selected BIOS stores the recovery file on the user primary hard drive The option are BIOS Recovery from Hard Drive This option is enabled by default BIOS Auto Recovery Always Perform Integrity Check System logs screen options...

Страница 76: ...red download method in the Please select your download method below window click Download File The File Download window appears 11 Click Save to save the file on your notebook 12 Click Run to install the updated BIOS settings on your notebook Follow the instructions on the screen NOTE It is recommended not to update the BIOS version for more than 3 revisions For example If you want to update the B...

Страница 77: ...g to delete or change the existing System and or Setup password You cannot delete or change an existing System or Setup password if the Password Status is Locked To enter the System Setup press F2 immediately after a power on or reboot 1 In the System BIOS or System Setup screen select System Security and press Enter The System Security screen is displayed 2 In the System Security screen verify th...

Страница 78: ...e Downloading drivers 1 Turn on the notebook 2 Go to Dell com support 3 Click Product Support enter the Service Tag of your notebook and then click Submit NOTE If you do not have the Service Tag use the auto detect feature or manually browse for your notebook model 4 Click Drivers and Downloads 5 Select the operating system installed on your notebook 6 Scroll down the page and select the driver to...

Страница 79: ...f the Touchpad and Portable Device drivers are already installed in the computer Network drivers Install the WLAN and Bluetooth drivers from the Dell support site Verify if the Network drivers are already installed in the computer Software 79 ...

Страница 80: ...Audio drivers Verify if the Realtek Audio drivers are already installed in the computer Disk drives Verify if the Disk drives drivers are already installed in the computer 80 Software ...

Страница 81: ...agement Engine Interface Verify if the Intel Management Engine Interface drivers are already installed in the computer USB drivers Verify if the USB drivers are already installed in the laptop Software 81 ...

Страница 82: ...82 Software ...

Страница 83: ...a full OS environment Tablet panel test Video card Battery test Charger test Primary battery Multiprocessor cache test Running the ePSA Diagnostic Utility NOTE The following steps can be used to run the ePSA diagnostic utility in DOS mode without using an external keyboard 1 Power on the system 2 Before the Dell Logo is displayed immediately press the Volume Up button to get the Boot Menu 3 Scroll...

Страница 84: ...ry installed 2 6 system board chipset system board chipset error 2 7 display display failure 3 1 RTC power failure coin cell battery failure 3 2 PCI Video PCI Video card chip failure 3 3 BIOS recovery 1 recovery image not found 3 4 BIOS recovery 2 recovery image found but invalid Real Time Clock reset The Real Time Clock RTC reset function allows you or the service technician to recover the recent...

Страница 85: ...omer requirements or based on regions To identify the AC adapter shipped with your notebook you can verify it from the service tag 1 Go to Dell com support 2 Type the service tag of your notebook 3 Click System configuration System configuration details are displayed 4 Click Original configuration to view the AC adapter shipped with your notebook Troubleshooting 85 ...

Страница 86: ... service options Availability varies by country and product and some services may not be available in your area To contact Dell for sales technical support or customer service issues 1 Go to Dell com support 2 Select your support category 3 Verify your country or region in the Choose a Country Region drop down list at the bottom of the page 4 Select the appropriate service or support link based on...

Отзывы: