●
Intermittent
– Intermittent failures represent approximately 80 percent of ESD-related failures. The high rate of
intermittent failures means that most of the time when damage occurs, it is not immediately recognizable. The DIMM
receives a static shock, but the tracing is merely weakened and does not immediately produce outward symptoms related to
the damage. The weakened trace may take weeks or months to melt, and in the meantime may cause degradation of memory
integrity, intermittent memory errors, etc.
The more difficult type of damage to recognize and troubleshoot is the intermittent (also called latent or "walking wounded")
failure.
Perform the following steps to prevent ESD damage:
●
Use a wired ESD wrist strap that is properly grounded. The use of wireless anti-static straps is no longer allowed; they do not
provide adequate protection. Touching the chassis before handling parts does not ensure adequate ESD protection on parts
with increased sensitivity to ESD damage.
●
Handle all static-sensitive components in a static-safe area. If possible, use anti-static floor pads and workbench pads.
●
When unpacking a static-sensitive component from its shipping carton, do not remove the component from the anti-static
packing material until you are ready to install the component. Before unwrapping the anti-static packaging, ensure that you
discharge static electricity from your body.
●
Before transporting a static-sensitive component, place it in an anti-static container or packaging.
ESD field service kit
The unmonitored Field Service kit is the most commonly used service kit. Each Field Service kit includes three main components:
anti-static mat, wrist strap, and bonding wire.
Components of an ESD field service kit
The components of an ESD field service kit are:
●
Anti-Static Mat
– The anti-static mat is dissipative and parts can be placed on it during service procedures. When using an
anti-static mat, your wrist strap should be snug and the bonding wire should be connected to the mat and to any bare metal
on the system being worked on. Once deployed properly, service parts can be removed from the ESD bag and placed directly
on the mat. ESD-sensitive items are safe in your hand, on the ESD mat, in the system, or inside a bag.
●
Wrist Strap and Bonding Wire
– The wrist strap and bonding wire can be either directly connected between your wrist
and bare metal on the hardware if the ESD mat is not required, or connected to the anti-static mat to protect hardware that
is temporarily placed on the mat. The physical connection of the wrist strap and bonding wire between your skin, the ESD
mat, and the hardware is known as bonding. Use only Field Service kits with a wrist strap, mat, and bonding wire. Never
use wireless wrist straps. Always be aware that the internal wires of a wrist strap are prone to damage from normal wear
and tear, and must be checked regularly with a wrist strap tester in order to avoid accidental ESD hardware damage. It is
recommended to test the wrist strap and bonding wire at least once per week.
●
ESD Wrist Strap Tester
– The wires inside of an ESD strap are prone to damage over time. When using an unmonitored
kit, it is a best practice to regularly test the strap prior to each service call, and at a minimum, test once per week. A
wrist strap tester is the best method for doing this test. If you do not have your own wrist strap tester, check with your
regional office to find out if they have one. To perform the test, plug the wrist-strap's bonding-wire into the tester while it is
strapped to your wrist and push the button to test. A green LED is lit if the test is successful; a red LED is lit and an alarm
sounds if the test fails.
●
Insulator Elements
– It is critical to keep ESD sensitive devices, such as plastic heat sink casings, away from internal parts
that are insulators and often highly charged.
●
Working Environment
– Before deploying the ESD Field Service kit, assess the situation at the customer location. For
example, deploying the kit for a server environment is different than for a desktop or portable environment. Servers are
typically installed in a rack within a data center; desktops or portables are typically placed on office desks or cubicles. Always
look for a large open flat work area that is free of clutter and large enough to deploy the ESD kit with additional space to
accommodate the type of system that is being repaired. The workspace should also be free of insulators that can cause an
ESD event. On the work area, insulators such as Styrofoam and other plastics should always be moved at least 12 inches or
30 centimeters away from sensitive parts before physically handling any hardware components.
●
ESD Packaging
– All ESD-sensitive devices must be shipped and received in static-safe packaging. Metal, static-shielded
bags are preferred. However, you should always return the damaged part using the same ESD bag and packaging that the
new part arrived in. The ESD bag should be folded over and taped shut and all the same foam packing material should be
used in the original box that the new part arrived in. ESD-sensitive devices should be removed from packaging only at an
ESD-protected work surface, and parts should never be placed on top of the ESD bag because only the inside of the bag is
shielded. Always place parts in your hand, on the ESD mat, in the system, or inside an anti-static bag.
●
Transporting Sensitive Components
– When transporting ESD sensitive components such as replacement parts or parts
to be returned to Dell, it is critical to place these parts in anti-static bags for safe transport.
Safety instructions
11
Содержание Inspiron 7590 2in1
Страница 1: ...Inspiron 7590 2in1 Service Manual Regulatory Model P84F Regulatory Type P84F001 July 2021 Rev A03 ...
Страница 17: ...Removing the base cover 17 ...
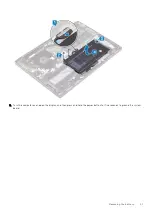
Страница 22: ...22 Removing the battery ...
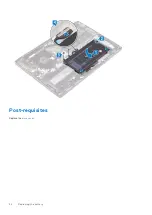
Страница 24: ...Post requisites Replace the base cover 24 Replacing the battery ...
Страница 26: ...26 Removing the memory modules ...
Страница 28: ...Post requisites Replace the base cover 28 Replacing the memory modules ...
Страница 30: ...30 Removing the wireless card ...
Страница 32: ...Post requisites Replace the base cover 32 Replacing the wireless card ...
Страница 36: ...36 Removing the I O board ...
Страница 38: ...Post requisites Replace the base cover 38 Replacing the I O board ...
Страница 45: ...Post requisites Replace the base cover Replacing the solid state drive 45 ...
Страница 51: ...Removing the hard drive 51 ...
Страница 56: ...56 Removing the touchpad ...
Страница 58: ...58 Replacing the touchpad ...
Страница 66: ...Post requisites 1 Replace the fan 2 Replace the base cover 66 Replacing the display assembly ...
Страница 70: ...70 Removing the system board ...
Страница 81: ...Removing the power button with fingerprint reader 81 ...
Страница 85: ...Removing the palm rest and antenna assembly 85 ...


