


Replacing the I/O Board
WARNING: Before working inside your computer, read the safety
information that shipped with your computer and follow the steps in
Before Working Inside Your Computer
. After working inside your
computer, follow the instructions in
After Working Inside Your
Computer
. For more safety best practices, see the Regulatory
Compliance home page at dell.com/regulatory_compliance.
Procedure
1
Slide the I/O-board cable into the I/O-board cable connector and press
down on the latch to secure the cable.
2
Turn over the I/O board and use the alignment post on the computer
base to place the I/O board in position.
Post-requisites
1
Replace the
palm rest
.
2
Replace the
hard drive
.
3
Replace the
wireless card
.
4
Replace the
memory module(s)
.
5
Replace the
base cover
.
6
Replace the
keyboard
.
7
Replace the
battery
.
51
Содержание Inspiron 14
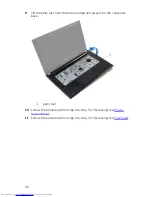
Страница 31: ...1 keyboard cable 2 keyboard 31 ...
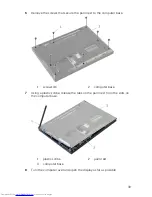
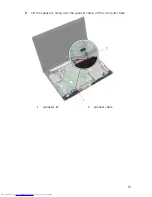
Страница 34: ...6 Peel off the Mylar sheet from the hard drive 1 hard drive bracket 2 pull tab 3 screws 2 4 mylar sheet 34 ...
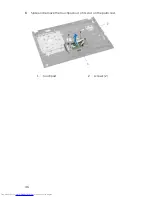
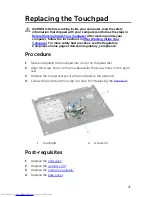
Страница 46: ...3 Slide and remove the touchpad out of its slot on the palm rest 1 touchpad 2 screws 2 46 ...
Страница 48: ...5 Replace the keyboard 6 Replace the battery 48 ...
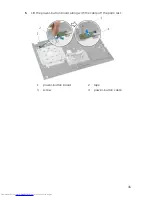
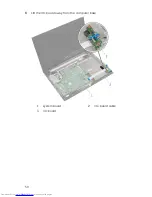
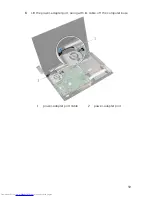
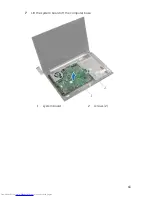
Страница 50: ...3 Lift the I O board away from the computer base 1 system board 2 I O board cable 3 I O board 50 ...
Страница 53: ...3 Lift the speakers along with the speaker cable off the computer base 1 speakers 2 2 speaker cable 53 ...
Страница 56: ...1 system board 2 battery socket 3 coin cell battery 4 plastic scribe 56 ...
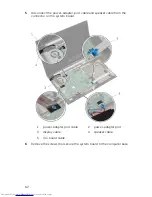
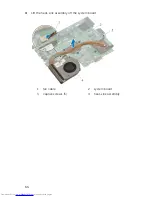
Страница 63: ...7 Lift the system board off the computer base 1 system board 2 screws 2 63 ...


