background image

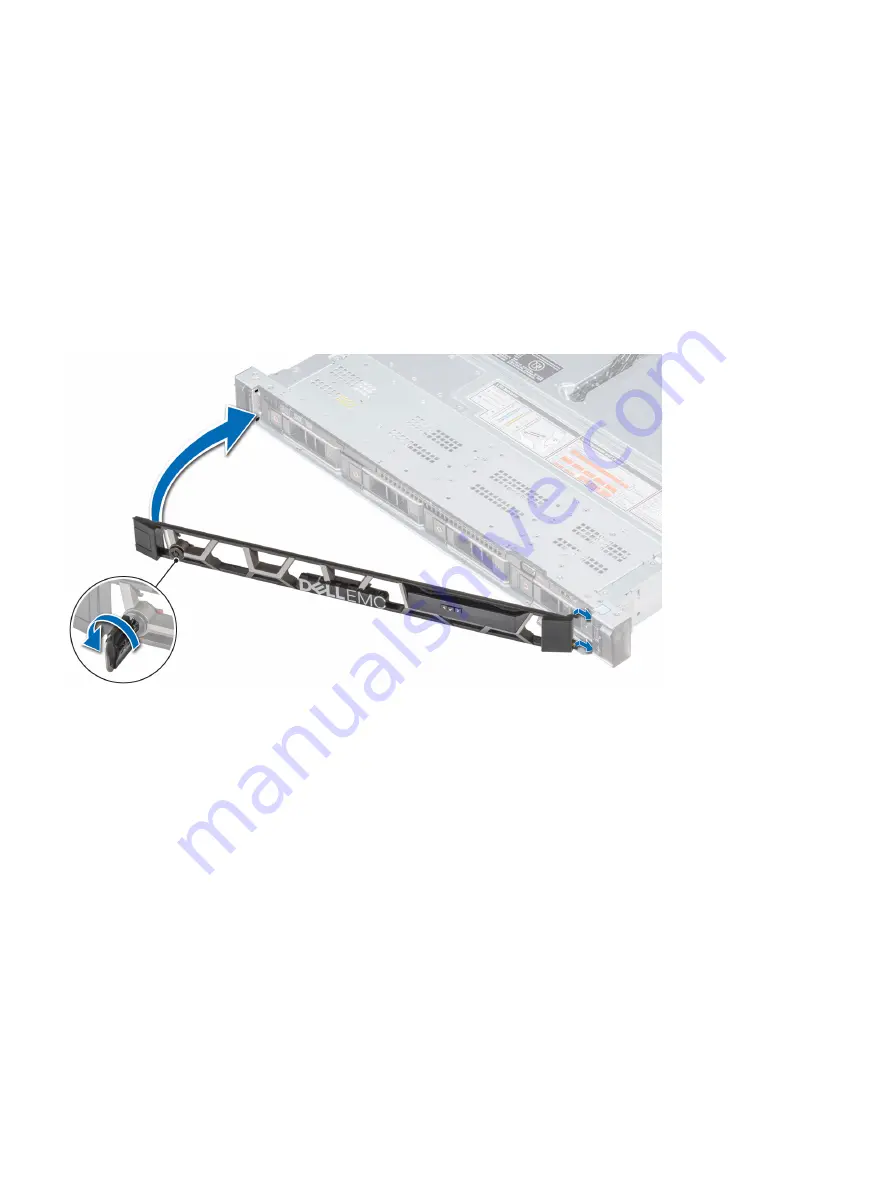
Install the front bezel

The procedure to install the front bezel with the LCD panel and the front bezel
without the LCD panel is the same.

Procedure

1. Align and insert the right end of the bezel onto the system.

2. Press the release button and fit the left end of the bezel onto the system.

3. Lock the bezel by using the key.

Figure 32 Installing the front bezel on 1U system

2U1N Configuration Equipment Installation

Install the front bezel


71

Содержание EMC ScaleIO Ready Node 14G

Страница 1: ...EMC ScaleIO Ready Node 14G Hardware Installation Guide 302 004 321 REV 01 ...

Страница 2: ...HE INFORMATION IN THIS PUBLICATION AND SPECIFICALLY DISCLAIMS IMPLIED WARRANTIES OF MERCHANTABILITY OR FITNESS FOR A PARTICULAR PURPOSE USE COPYING AND DISTRIBUTION OF ANY DELL SOFTWARE DESCRIBED IN THIS PUBLICATION REQUIRES AN APPLICABLE SOFTWARE LICENSE Dell EMC and other trademarks are trademarks of Dell Inc or its subsidiaries Other trademarks may be the property of their respective owners Pub...

Страница 3: ...e system in the cabinet 35 Install the front bezel 37 Connect and route cords and cables 38 Install AC Power Cables 41 Guidelines for installing and connecting AC power cables 42 Sample single phase wiring for 1U1N configuration 43 Install Management Network I O Cables 49 Guidelines for installing and connecting management network cables 50 Management network A nodes 1 16 cabling 51 Management net...

Страница 4: ...9 Install the front bezel 71 Connect and route cords and cables 72 Wiring Diagrams for a 2U1N Configuration 75 Guidelines for wiring a 2U1N configuration 76 Sample single phase wiring for 2U1N configuration 77 Management network wiring for 2U1N configuration 80 Data network A wiring for 2U1N configuration 82 Data network B wiring for 2U1N configuration 84 Update the Install Database 85 Update the ...

Страница 5: ... of servers and switches 42 Single phase power distribution 44 Console and management ports on switches 50 Management A nodes 1 16 cabling example 51 Data networks A and B cabling example 56 Cabinet stack up for 2U1N configurations 65 A10 sliding rail assembly 1U systems 66 B13 sliding rail assembly 2U systems 66 Installing the rear end of the rail 67 Installing the front end of the rail 68 Instal...

Страница 6: ...FIGURES 6 Hardware Installation Guide ...

Страница 7: ...8 Maximum configuration in 3 phase wye power distribution cabinets 29 Single phase power distribution cabling from top to bottom 44 Management A nodes 1 16 cabling 51 Management A nodes 17 22 cabling 53 Management B nodes 23 32 cabling 53 Data A nodes 1 22 cabling 56 Data B nodes 1 22 cabling 57 Stack up for a minimum configuration 64 Stack up for a maximum configuration 64 Single phase power dist...

Страница 8: ...TABLES 8 Hardware Installation Guide ...

Страница 9: ...product l ScaleIO software downloadable as ScaleIO Software version Documentation set l ScaleIO Ready Node with AMS downloadable as ScaleIO Ready Node with AMS Documentation set l ScaleIO Ready Node no AMS downloadable as ScaleIO Ready Node no AMS Documentation set l VxRack Node 100 Series downloadable as VxRack Node 100 Series Documentation set You can download the release notes the document sets...

Страница 10: ...e Support at https support emc com Technical support Go to EMC Online Support and click Service Center You will see several options for contacting EMC Technical Support Note that to open a service request you must have a valid support agreement Contact your EMC sales representative for details about obtaining a valid support agreement or with questions about your account Your comments Your suggest...

Страница 11: ... obtaining assistance and for preparing for the installation of the ScaleIO Ready Node PowerEdge 14G server l Before you begin 12 l Conventions used in this document 13 l Where to get help 13 l Site requirements 14 l Hardware acclimation times 14 Before You Begin 11 ...

Страница 12: ... your system WARNING To avoid injury do not attempt to lift the system by yourself Note The illustrations in this document do not represent a specific system Note The procedures to install the 1U and 2U rails are identical Note The rail kit is compatible with square unthreaded round and threaded round hole racks Before You Begin 12 Hardware Installation Guide ...

Страница 13: ...documentation release notes software updates or information about EMC products can be obtained on the EMC Online Support site https support emc com registration required Note To open a service request through the EMC Online Support site you must have a valid support agreement Contact your EMC sales representative for details about obtaining a valid support agreement or to answer any questions abou...

Страница 14: ...power until the system is acclimated to the local environment Customer installed cables Dispersed system bays include longer switch and Ethernet cable bundles that extend the separation distance between system bay 1 and one or more dispersed system bays Cable bundles for dispersed system bays may be routed across the subfloor or in the overhead ceiling space If you are not allowed access under the...

Страница 15: ...y 30 RH 86 F 30 C 4 hours Hot 72 F 22 C Humid 30 45 RH 86 F 30 C 4 hours Humid 45 60 RH 86 F 30 C 8 hours Humid 60 RH 86 F 30 C 16 hours Unknown 86 F 30 C 16 hours NOTICE l If there are signs of condensation after the recommended acclimation time has passed allow an additional eight 8 hours to stabilize l Systems and components must not experience changes in temperature and humidity that are likel...

Страница 16: ...Before You Begin 16 Hardware Installation Guide ...

Страница 17: ...ter 2 1U1N Configuration Equipment Installation Chapter 3 Install AC Power Cables Chapter 4 Install Management Network I O Cables Chapter 5 Install Data Network I O Cables Chapter 6 Update the Install Database 1U1N Procedures 17 ...

Страница 18: ...1U1N Procedures 18 Hardware Installation Guide ...

Страница 19: ...ation in cabinets with single phase power distribution 20 l Installation in cabinets with 3 phase delta power distribution 23 l Installation in cabinets with 3 phase wye power distribution 27 l Identifying the kit components 31 l Install the rails 33 l Secure the rail assemblies to the cabinet 34 l Install the system in the cabinet 35 l Install the front bezel 37 l Connect and route cords and cabl...

Страница 20: ...ration and operating system installation procedures l Install the management switches l Install the data switches Installation in cabinets with single phase power distribution Note Install all the equipment in the cabinet before installing and connecting the power and I O cables l Install the equipment as described in Installation of the equipment in the cabinet on page 20 l If you are installing ...

Страница 21: ...imum configuration in single phase power distribution cabinets Component Function Description Quantity Cabinet U Space Data Server R640 Server 32 2 17 and 25 40 1U1N Configuration Equipment Installation Installation in cabinets with single phase power distribution 21 ...

Страница 22: ...ued Component Function Description Quantity Cabinet U Space Management Server Management Server 1 18 Management Switch Customer provided 1 GbE switch 2 19 20 Data Switch Customer provided 10 GbE switch 2 21 24 1U1N Configuration Equipment Installation 22 Hardware Installation Guide ...

Страница 23: ...binet stack up for a maximum configuration Installation in cabinets with 3 phase delta power distribution 1U1N Configuration Equipment Installation Installation in cabinets with 3 phase delta power distribution 23 ...

Страница 24: ...he cabinet l If you are installing the maximum configuration refer to the figure and table below for maximum configurations for the equipment stack up in the cabinet Table 5 Minimum configuration in 3 phase delta power distribution cabinets Component Function Description Quantity Cabinet U Space Data Server R640 Server 3 2 4 Management Server Management Server 1 20 Management Switch Customer provi...

Страница 25: ...on Table 6 Stack up for a maximum configuration Component Function Description Quantity Cabinet U Space Data Server R640 Server 32 2 17 and 25 34 1U1N Configuration Equipment Installation Installation in cabinets with 3 phase delta power distribution 25 ...

Страница 26: ...unction Description Quantity Cabinet U Space Management Server Management Server 1 18 Management Switch Customer provided 1 GbE switch 2 19 20 Data Switch Customer provided 10 GbE switch 2 21 24 1U1N Configuration Equipment Installation 26 Hardware Installation Guide ...

Страница 27: ...Cabinet stack up for a maximum configuration Installation in cabinets with 3 phase wye power distribution 1U1N Configuration Equipment Installation Installation in cabinets with 3 phase wye power distribution 27 ...

Страница 28: ...the cabinet l If you are installing the maximum configuration refer to the figure and table below for maximum configurations for the equipment stack up in the cabinet Table 7 Minimum configuration in 3 phase wye power distribution cabinets Component Function Description Quantity Cabinet U Space Data Server R640 Server 3 2 4 Management Server Management Server 1 20 Management Switch Customer provid...

Страница 29: ...ximum configuration in 3 phase wye power distribution cabinets Component Function Description Quantity Cabinet U Space Data Server R640 Server 32 2 17 and 25 36 1U1N Configuration Equipment Installation Installation in cabinets with 3 phase wye power distribution 29 ...

Страница 30: ...ed Component Function Description Quantity Cabinet U Space Management Server Management Server 1 18 Management Switch Customer provided 1 GbE switch 2 19 20 Data Switch Customer provided 10 GbE switch 2 21 24 1U1N Configuration Equipment Installation 30 Hardware Installation Guide ...

Страница 31: ...ssemblies allow the server to be secured in the cabinet and extended from the cabinet so that the system cover can be removed to access the internal FRUs The A10 sliding rail assembly 1U is used for installation of the PowerEdge 1U1N Configuration Equipment Installation Identifying the kit components 31 ...

Страница 32: ...allation of the PowerEdge R740xd Figure 7 A10 sliding rail assembly 1U systems 1 A10 sliding rail 2 2 velcro strap 2 3 screw 4 4 washer 4 Figure 8 B13 sliding rail assembly 2U systems 1U1N Configuration Equipment Installation 32 Hardware Installation Guide ...

Страница 33: ... the left rail assembly first 2 Fully extend the rear sliding bracket of the rail so that the rail is as long as possible 3 Position the rail end piece labeled Left Front facing inward and orient the rear end piece to align with the holes on the rear cabinet flanges 4 Push the rail straight toward the rear of the rack until the latch locks in place Figure 9 Installing the rear end of the rail 5 Fo...

Страница 34: ...washer to the screw before installing the screw Note For unthreaded round hole cabinets install only the screw without the conical washer Procedure 1 Align the screws with the designated U spaces on the front and rear rack flanges Note Ensure that the screw holes on the tab of the system retention bracket are seated on the designated U spaces 2 Insert and tighten the two screws using the Phillips ...

Страница 35: ...ystem in a cabinet without a mechanical lift and or help from another person Procedure 1 At front of the cabinet pull the inner slide rails out of the cabinet until they lock into place Figure 12 Pull the inner rails out of the cabinet 2 Locate the rear rail standoff on each side of the system Position the system above the rails and lower the rear rail standoffs into the rear J slots on the slide ...

Страница 36: ...e system inward until the lock levers click into place 5 Pull the blue slide release lock tabs forward on both rails and slide the system into the cabinet The slam latches will engage to secure the system in the cabinet Figure 14 Slide the system into the cabinet 1U1N Configuration Equipment Installation 36 Hardware Installation Guide ...

Страница 37: ... panel is the same Procedure 1 Align and insert the right end of the bezel onto the system 2 Press the release button and fit the left end of the bezel onto the system 3 Lock the bezel by using the key Figure 15 Installing the front bezel on 1U system 1U1N Configuration Equipment Installation Install the front bezel 37 ...

Страница 38: ...e the two velcro straps to route and secure cords and cables at the rear of the system a Locate the CMA bracket slots on the rear end of both the rails b Bundle the cables gently pulling them clear of the system connectors to the left and right sides Note Ensure that there is enough space for the cables to move when you slide the system out of the rack c Thread the straps through the CMA bracket s...

Страница 39: ...Figure 17 CMA bracket slots 1U1N Configuration Equipment Installation Connect and route cords and cables 39 ...

Страница 40: ...1U1N Configuration Equipment Installation 40 Hardware Installation Guide ...

Страница 41: ...r distribution units PDUs and the equipment This information is provided as an example only and may differ from your system setup depending on the number of nodes and the type of PDUs used in your system l Guidelines for installing and connecting AC power cables 42 l Sample single phase wiring for 1U1N configuration 43 Install AC Power Cables 41 ...

Страница 42: ...ence for connectors on the rear panel of the servers and switches Figure 18 AC Connectors on rear panel of servers and switches Management Server 1U1N Data Switch Management Switch Port 1 Port 1 Port 1 Port 1 Port 2 Port 2 Port 2 Port 2 Install AC Power Cables 42 Hardware Installation Guide ...

Страница 43: ...figuration Typical example for connecting power cables in racks with single phase power distribution units is shown below The following diagram and table provide a typical example for connecting power cables in racks with single phase power distribution units In this example PDUs with 14 power inlets are used Install AC Power Cables Sample single phase wiring for 1U1N configuration 43 ...

Страница 44: ...1 PDU 1 PDU 3 PDU 4 PDU 2 Zone A Zone B Zone A Zone B Table 9 Single phase power distribution cabling from top to bottom Source Destination Node 32 PSU1 PDU 1 Port 2 Node 32 PSU2 PDU 2 Port 2 Node 31 PSU1 PDU 1 Port 2 Node 31 PSU2 PDU 2 Port 2 Node 30 PSU1 PDU 1 Port 3 Node 30 PSU2 PDU 2 Port 3 Node 29 PSU1 PDU 1 Port 3 Install AC Power Cables 44 Hardware Installation Guide ...

Страница 45: ...U 2 Port 8 Node 23 PSU1 PDU 1 Port 8 Node 23 PSU2 PDU 2 Port 8 Node 22 PSU1 PDU 1 Port 9 Node 22 PSU2 PDU 2 Port 9 Node 21 PSU1 PDU 1 Port 9 Node 21 PSU2 PDU 2 Port 9 Data Switch C PDU 1 Port 10 Data Switch C PDU 2 Port 10 Node 20 PSU1 PDU 1 Port 11 Node 20 PSU2 PDU 2 Port 11 Node 19 PSU1 PDU 1 Port 11 Node 19 PSU2 PDU 2 Port 11 Node 18 PSU1 PDU 1 Port 12 Node 18 PSU2 PDU 2 Port 12 Node 17 PSU1 PD...

Страница 46: ...Node 14 PSU2 PDU 4 Port 5 Node 13 PSU1 PDU 3 Port 6 Node 13 PSU2 PDU 4 Port 6 Node 12 PSU1 PDU 3 Port 6 Node 12 PSU2 PDU 4 Port 6 Node 11 PSU1 PDU 3 Port 7 Node 11 PSU2 PDU 4 Port 7 Node 10 PSU1 PDU 3 Port 7 Node 10 PSU2 PDU 4 Port 7 Node 9 PSU1 PDU 3 Port 9 Node 9 PSU2 PDU 4 Port 9 Node 8 PSU1 PDU 3 Port 9 Node 8 PSU2 PDU 4 Port 9 Node 7 PSU1 PDU 3 Port 10 Node 7 PSU2 PDU 4 Port 10 Node 6 PSU1 PD...

Страница 47: ...om top to bottom continued Source Destination Node 3 PSU2 PDU 4 Port 13 Node 2 PSU1 PDU 3 Port 14 Node 2 PSU2 PDU 4 Port 14 Node 1 PSU1 PDU 3 Port 14 Node 1 PSU2 PDU 4 Port 14 Install AC Power Cables Sample single phase wiring for 1U1N configuration 47 ...

Страница 48: ...Install AC Power Cables 48 Hardware Installation Guide ...

Страница 49: ...lling and connecting cables for the management network l Guidelines for installing and connecting management network cables 50 l Management network A nodes 1 16 cabling 51 l Management network A nodes 17 22 cabling 53 l Management network B nodes 23 32 cabling 53 Install Management Network I O Cables 49 ...

Страница 50: ...ntly so that excess slack does not interfere with routing of adjacent cables Refer to the management network cable diagrams applicable to your installation l Management network A nodes 1 16 Management network A nodes 1 16 cabling on page 51 l Management network B nodes 17 22 Management network A nodes 17 22 cabling on page 53 l Management network B nodes 23 32 Management network B nodes 23 32 cabl...

Страница 51: ...B BMC iDRAC 2 4 MGMT1 NIC1 38 45 46 47 MGMT 48 Table 10 Management A nodes 1 16 cabling Source Destination Node 1 BMC iDRAC Management SwitchA Port 2 Node 1 MGMT1 Management SwitchA Port 4 Node 2 BMC iDRAC Management SwitchA Port 6 Node 2 MGMT1 Management SwitchA Port 8 Node 3 BMC iDRAC Management SwitchA Port 10 Node 3 MGMT1 Management SwitchA Port 12 Node 4 BMC iDRAC Management SwitchA Port 14 I...

Страница 52: ...Port 5 Node 11 MGMT1 Management SwitchA Port 7 Node 12 BMC iDRAC Management SwitchA Port 9 Node 12 MGMT1 Management SwitchA Port 11 Node 13 BMC iDRAC Management SwitchA Port 13 Node 13 MGMT1 Management SwitchA Port 15 Node 14 BMC iDRAC Management SwitchA Port 17 Node 14 MGMT1 Management SwitchA Port 19 Node 15 BMC iDRAC Management SwitchA Port 21 Node 15 MGMT1 Management SwitchA Port 23 Node 16 BM...

Страница 53: ...22 BMC iDRAC Management SwitchA Port 42 Node 22 MGMT1 Management SwitchA Port 44 Management network B nodes 23 32 cabling Use the following table to connect cables for the management network B nodes 23 32 Table 12 Management B nodes 23 32 cabling Source Destination Node 23 BMC iDRAC Management SwitchB Port 2 Node 23 MGMT1 Management SwitchB Port 4 Node 24 BMC iDRAC Management SwitchB Port 6 Node 2...

Страница 54: ...hB Port 11 Node 31 BMC iDRAC Management SwitchB Port 13 Node 31 MGMT1 Management SwitchB Port 15 Node 32 BMC iDRAC Management SwitchB Port 17 Node 32 MGMT1 Management SwitchB Port 19 Data SwitchC MGMT Port Management SwitchB Port 47 Data SwitchD MGMT Port Management SwitchB Port 48 Management Server NIC1 Management SwitchB Port 48 Link to Core Switch or Management SwitchA Management SwitchB Port 5...

Страница 55: ...ables This section provides the diagrams and tables for installing and connecting cables for the data network l Data network A nodes 1 22 cabling example 56 l Data network B nodes 1 22 cabling example 57 Install Data Network I O Cables 55 ...

Страница 56: ... empty ports However ensure that on each node each NIC is connected to a different data switch either Data Switch A or Data Switch B in order to prevent a single point of failure in case a switch fails Figure 22 Data networks A and B cabling example Node 1 Data Switch A Node 16 Mgmt Server 40 G link to core switch 40 G link to core switch 40 G link to core switch 40 G link to core switch 2 4 0 1 0...

Страница 57: ...ard Port 0 Data Switch A Port 21 Node 16 Onboard Port 0 Data Switch A Port 25 Node 17 Onboard Port 0 Data Switch A Port 29 Node 18 Onboard Port 0 Data Switch A Port 33 Node 19 Onboard Port 0 Data Switch A Port 37 Node 20 Onboard Port 0 Data Switch A Port 41 Node 21 Onboard Port 0 Data Switch A Port 38 Node 22 Onboard Port 0 Data Switch A Port 42 Data network B nodes 1 22 cabling example Use the fo...

Страница 58: ... Switch B Port 7 Node 12 PCIe Port 2 Data Switch B Port 11 Node 13 PCIe Port 2 Data Switch B Port 15 Node 14 PCIe Port 2 Data Switch B Port 19 Node 15 PCIe Port 2 Data Switch B Port 23 Node 16 PCIe Port 2 Data Switch B Port 27 Node 17 PCIe Port 2 Data Switch B Port 31 Node 18 PCIe Port 2 Data Switch B Port 35 Node 19 PCIe Port 2 Data Switch B Port 39 Node 20 PCIe Port 2 Data Switch B Port 43 Node ...

Страница 59: ...date the Install Database This section provides information to update the install database after all installation and configuration work is completed l Update the install database 60 Update the Install Database 59 ...

Страница 60: ...te the install database Procedure 1 Open a web browser and navigate to the EMC Business Services website at http emc force com BusinessServices 2 In the Post Sales area click Install Base Group 3 Complete and submit the form Update the Install Database 60 Hardware Installation Guide ...

Страница 61: ...PART 2 2U1N Procedures Chapter 7 2U1N Configuration Equipment Installation Chapter 8 Wiring Diagrams for a 2U1N Configuration Chapter 9 Update the Install Database 2U1N Procedures 61 ...

Страница 62: ...2U1N Procedures 62 Hardware Installation Guide ...

Страница 63: ...1N configuration l Installation of the equipment in the cabinet 64 l 2U1N configuration installation guidelines 64 l Identifying the kit components 65 l Install the rails 67 l Secure the rail assemblies to the cabinet 68 l Install the system in the cabinet 69 l Install the front bezel 71 l Connect and route cords and cables 72 2U1N Configuration Equipment Installation 63 ...

Страница 64: ...tallation procedures l Install the management switches l Install the data switches 2U1N configuration installation guidelines Minimum and maximum stack up configurations are provided in this topic Assuming installation is into an empty rack always begin component installation at the bottom of the cabinet and work upward Install components at the lowest available space for that component type If yo...

Страница 65: ...itch 2 23 24 The following illustration represents the maximum 2U1N configuration Figure 23 Cabinet stack up for 2U1N configurations Identifying the kit components The sliding rail assemblies allow the server to be secured in the cabinet and extended from the cabinet so that the system cover can be removed to access the internal 2U1N Configuration Equipment Installation Identifying the kit compone...

Страница 66: ...iding rail assembly 2U is used for installation of the PowerEdge R740xd Figure 24 A10 sliding rail assembly 1U systems 1 A10 sliding rail 2 2 velcro strap 2 3 screw 4 4 washer 4 Figure 25 B13 sliding rail assembly 2U systems 2U1N Configuration Equipment Installation 66 Hardware Installation Guide ...

Страница 67: ... the left rail assembly first 2 Fully extend the rear sliding bracket of the rail so that the rail is as long as possible 3 Position the rail end piece labeled Left Front facing inward and orient the rear end piece to align with the holes on the rear cabinet flanges 4 Push the rail straight toward the rear of the rack until the latch locks in place Figure 26 Installing the rear end of the rail 5 F...

Страница 68: ...washer to the screw before installing the screw Note For unthreaded round hole cabinets install only the screw without the conical washer Procedure 1 Align the screws with the designated U spaces on the front and rear rack flanges Note Ensure that the screw holes on the tab of the system retention bracket are seated on the designated U spaces 2 Insert and tighten the two screws using the Phillips ...

Страница 69: ...ystem in a cabinet without a mechanical lift and or help from another person Procedure 1 At front of the cabinet pull the inner slide rails out of the cabinet until they lock into place Figure 29 Pull the inner rails out of the cabinet 2 Locate the rear rail standoff on each side of the system Position the system above the rails and lower the rear rail standoffs into the rear J slots on the slide ...

Страница 70: ...e system inward until the lock levers click into place 5 Pull the blue slide release lock tabs forward on both rails and slide the system into the cabinet The slam latches will engage to secure the system in the cabinet Figure 31 Slide the system into the cabinet 2U1N Configuration Equipment Installation 70 Hardware Installation Guide ...

Страница 71: ... panel is the same Procedure 1 Align and insert the right end of the bezel onto the system 2 Press the release button and fit the left end of the bezel onto the system 3 Lock the bezel by using the key Figure 32 Installing the front bezel on 1U system 2U1N Configuration Equipment Installation Install the front bezel 71 ...

Страница 72: ...e the two velcro straps to route and secure cords and cables at the rear of the system a Locate the CMA bracket slots on the rear end of both the rails b Bundle the cables gently pulling them clear of the system connectors to the left and right sides Note Ensure that there is enough space for the cables to move when you slide the system out of the rack c Thread the straps through the CMA bracket s...

Страница 73: ...Figure 34 CMA bracket slots 2U1N Configuration Equipment Installation Connect and route cords and cables 73 ...

Страница 74: ...2U1N Configuration Equipment Installation 74 Hardware Installation Guide ...

Страница 75: ... the 2U1N configuration l Guidelines for wiring a 2U1N configuration 76 l Sample single phase wiring for 2U1N configuration 77 l Management network wiring for 2U1N configuration 80 l Data network A wiring for 2U1N configuration 82 l Data network B wiring for 2U1N configuration 84 Wiring Diagrams for a 2U1N Configuration 75 ...

Страница 76: ...ches iDRAC Management Server 2U1N Data Switch Management Switch Port 1 Port 1 Port 1 Port 1 Port 2 Port 2 Port 2 Port 2 Use the wiring diagrams to connect power management and data cables As cables are installed and connected dress and tie cables frequently so that excess slack does not interfere with routing of adjacent cables Wiring Diagrams for a 2U1N Configuration 76 Hardware Installation Guid...

Страница 77: ...configuration This topic provides a sample diagram and a connection table for installing and connecting power cables to power distribution units PDUs and the equipment This information is provided as an example only and may differ from your system setup depending on the number of nodes and the type of PDUs used in your system In this example PDUs with 14 power inlets are used Use the following fig...

Страница 78: ...3 PDU 4 PDU 2 Zone A Zone B Zone A Zone B Node 12 Table 17 Single phase power distribution cabling Source Destination Node 14 PSU1 PDU 1 Port 2 Node 14 PSU2 PDU 2 Port 2 Node 13 PSU1 PDU 1 Port 3 Node 13 PSU2 PDU 2 Port 3 Node 12 PSU1 PDU 1 Port 4 Node 12 PSU2 PDU 2 Port 4 Wiring Diagrams for a 2U1N Configuration 78 Hardware Installation Guide ...

Страница 79: ...agement Server PDU 2 Port 14 Data Switch A PDU 3 Port 1 Data Switch A PDU 4 Port 1 Node 8 PSU1 PDU 3 Port 2 Node 8 PSU2 PDU 4 Port 2 Node 7 PSU1 PDU 3 Port 3 Node 7 PSU2 PDU 4 Port 3 Management Switch B PDU 3 Port 4 Management Switch B PDU 4 Port 4 Management Switch A PDU 3 Port 5 Management Switch A PDU 4 Port 5 Node 6 PSU1 PDU 3 Port 6 Node 6 PSU2 PDU 4 Port 6 Node 5 PSU1 PDU 3 Port 7 Node 5 PSU...

Страница 80: ... Note The page does not provide enough space to illustrate cabling of the maximum number of nodes in the management network However the table does provide all the source to destination cabling for the maximum sized network Figure 37 Management network iDRA C iDRA C Node 16 Node 1 Mgmt Switch A To core switch or Mgmt Switch B Mgmt Server Data Switch A Data Switch B MGMT 38 45 46 47 48 NIC1 2 4 NIC1...

Страница 81: ...tch Port 28 Node 8 BMC iDRAC Management Switch Port 30 Node 8 NIC 1 Management Switch Port 32 Node 9 BMC iDRAC Management Switch Port 34 Node 9 NIC 1 Management Switch Port 36 Node 10 BMC iDRAC Management Switch Port 1 Node 10 NIC 1 Management Switch Port 3 Node 11 BMC iDRAC Management Switch Port 5 Node 11 NIC 1 Management Switch Port 7 Node 12 BMC iDRAC Management Switch Port 9 Node 12 NIC 1 Man...

Страница 82: ... Rack Management Switch Management Switch Port 52 Data network A wiring for 2U1N configuration Use the following figure and table to connect the data network A cables Note In this example data switch ports have been intentionally left empty These empty ports can be used for other user allocated purposes If no other use is required for the empty ports nodes may be connected to the data switches wit...

Страница 83: ...rt 6 Node 3 Onboard Port 0 Data Network Switch A Port 10 Node 4 Onboard Port 0 Data Network Switch A Port 14 Node 5 Onboard Port 0 Data Network Switch A Port 18 Node 6 Onboard Port 0 Data Network Switch A Port 22 Node 7 Onboard Port 0 Data Network Switch A Port 26 Node 8 Onboard Port 0 Data Network Switch A Port 30 Node 9 Onboard Port 0 Data Network Switch A Port 34 Management Server Port 0 Data N...

Страница 84: ...itch B Port 8 Node 3 PCIe Port 2 Data Network Switch B Port 12 Node 4 PCIe Port 2 Data Network Switch B Port 16 Node 5 PCIe Port 2 Data Network Switch B Port 20 Node 6 PCIe Port 2 Data Network Switch B Port 24 Node 7 PCIe Port 2 Data Network Switch B Port 28 Node 8 PCIe Port 2 Data Network Switch B Port 32 Node 9 PCIe Port 2 Data Network Switch B Port 36 Management Server Port 1 Data Network Switc...

Страница 85: ...date the Install Database This section provides information to update the install database after all installation and configuration work is completed l Update the install database 86 Update the Install Database 85 ...

Страница 86: ...te the install database Procedure 1 Open a web browser and navigate to the EMC Business Services website at http emc force com BusinessServices 2 In the Post Sales area click Install Base Group 3 Complete and submit the form Update the Install Database 86 Hardware Installation Guide ...

Отзывы: