background image

EMC3550

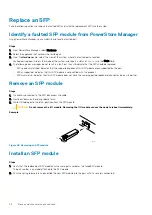
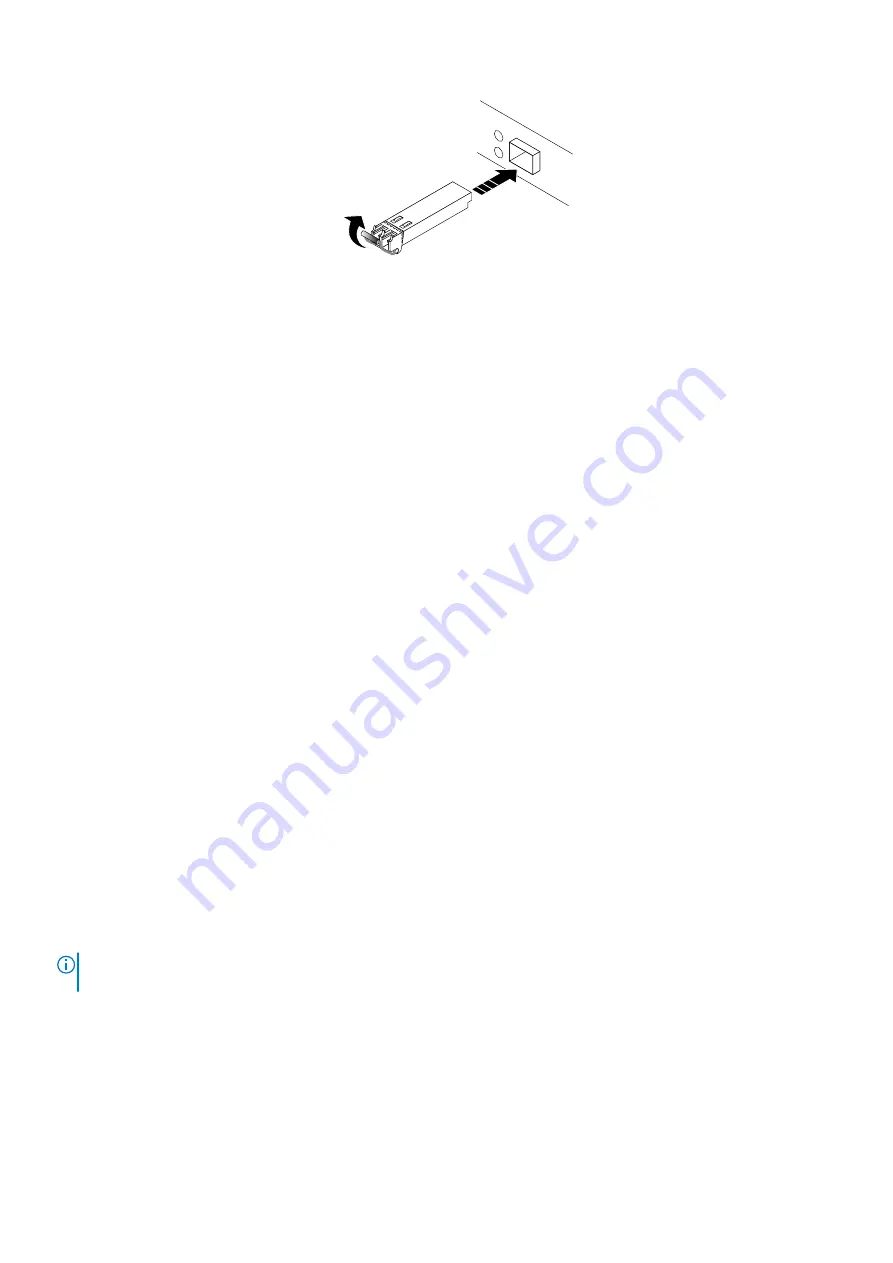
Figure 49. Installing an SFP module

3. Push the spring release down to lock the SFP module into place.
4. Reconnect the cable to the replacement SFP module.

Example

Verify the operation of a replacement part

Steps

1. From PowerStore Manager, select Hardware.
2. Select the appliance where you replaced the faulted part.
3. From the 

Hardware

 card, select the view of the system where the part was replaced.

The status of the replacement part should read 

Healthy

. If the status is still 

Faulted

, wait a few minutes and refresh PowerStore

Manager. If the status does not change, ensure that the part is correctly seated, or contact your service provider.

Replace an I/O module

Take the following actions to remove the faulted I/O module and install the replacement I/O module into the system.

Identify a faulted part from PowerStore Manager

Before you replace a part, ensure that you have identified its location within the system. Using PowerStore Manager, you can identify and
locate a faulted part.

Steps

1. From PowerStore Manager, select Hardware.
2. Select the appliance that contains the faulted part.
3. From the 

Hardware

 card, select the view of the system where the faulted part is located.

Faulted parts appear in red in the image of the system, and report a status of 

Faulted

 in the State field.

Base enclosure I/O module LEDs

Use the fault LEDs to identify the faulted part.

NOTE:

 The ports look different depending on whether they are for copper or optical connections. The image below

shows ports for copper cables.

Base enclosure service procedures

47

Содержание EMC PowerStore T

Страница 1: ...Dell EMC PowerStore Installation and Service Guide ...

Страница 2: ...amage to hardware or loss of data and tells you how to avoid the problem WARNING A WARNING indicates a potential for property damage personal injury or death 2020 Dell Inc or its subsidiaries All rights reserved Dell EMC and other trademarks are trademarks of Dell Inc or its subsidiaries Other trademarks may be trademarks of their respective owners May 2020 Rev A00 ...

Страница 3: ...the front bezel 17 Cable the base enclosure to the expansion enclosure 18 Connect expansion enclosure power cables 18 Verify the operation of the new part 19 Add a 25 drive expansion enclosure 19 Summary of tasks for adding an expansion enclosure 19 Verify shipping package contents 20 Choose where to install the expansion enclosure 20 Removing a filler panel 20 Install the rails in the cabinet 21 ...

Страница 4: ...dded module LEDs 40 Power down the node 41 Remove an embedded module 41 Remove a 4 port card 42 Install a 4 port card 43 Install an embedded module 44 Power up the node 45 Verify the operation of a new part 45 Replace an SFP 46 Identify a faulted SFP module from PowerStore Manager 46 Remove an SFP module 46 Install an SFP module 46 Verify the operation of a replacement part 47 Replace an I O modul...

Страница 5: ... node 66 Install the node 67 Power up the node 68 Verify the operation of a replacement part 68 Replace an M 2 boot module adaptor 68 Identify a faulted part from PowerStore Manager 68 Power down the node 69 Remove the node 69 Remove the top cover from the node 70 Remove the faulted M 2 boot module adaptor 71 Install the M 2 boot module adaptor 72 Install the top cover on the node 73 Install the n...

Страница 6: ...ration of a replacement part 95 A Safety precautions for handling replaceable units 96 Handling replaceable units 96 Avoiding electrostatic discharge ESD damage 96 Emergency procedures without an electrostatic discharge kit 96 Hardware acclimation times 97 Removing installing or storing replaceable units 97 Unpacking a part 98 B Discovering PowerStore Appliances 99 Discover your system 99 Discover...

Страница 7: ...e 108 Power on a PowerStore X model appliance 108 Powering off procedures for PowerStore cluster 109 Power off a PowerStore T model cluster 109 Power off a PowerStore X model cluster 110 Powering on procedures for PowerStore cluster 110 Power on a PowerStore T model cluster 111 Power on a PowerStore X model cluster 111 D Data collection 113 Support materials collection 113 Collect support material...

Страница 8: ... licensing information can be obtained as follows Product information For product and feature documentation or release notes go to the PowerStore Documentation page at www dell com powerstoredocs Troubleshooting For information about products software updates licensing and service go to www dell com support and locate the appropriate product support page Technical support For technical support and...

Страница 9: ...ceability Most cabinets mark 1U increments with horizontal lines or small holes in the channels 2 If this is the second base enclosure to be installed in the rack install it directly into the 2U space above the first base enclosure NOTE For additional rack space considerations refer to the PowerStore Planning Guide 3 Considering these recommendations choose a 2U space in the cabinet for the base e...

Страница 10: ...this task CAUTION The enclosure is heavy and should be installed into or removed from a rack by two people To avoid personal injury and or damage to the equipment do not attempt to lift and install the enclosure into a rack without a mechanical lift and or help from another person L enclosure étant lourde sa mise en place dans l armoire nécessite deux personnes Afin de ne pas vous blesser et ou en...

Страница 11: ...and lock the system into the rack Ensure that the enclosure is flush with the front of the rack fully seated in the cabinet and does not slide out Figure 2 Installing the system in the enclosure Cable the base enclosure appliance to switches For switch cabling information refer to the PowerStore Network Planning Guide Connect power cables Prerequisites If you are also installing an expansion enclo...

Страница 12: ...dure if you do not have access to the base enclosure Verify the operation of the new part Steps 1 From PowerStore Manager select Hardware 2 Select the appliance where you installed the new part 3 From the Hardware card select the view of the system where the part was installed The status of the part should read Healthy If the status is Faulted wait a few minutes and refresh PowerStore Manager If t...

Страница 13: ... expansion enclosure 7 Install the front bezel on the new expansion enclosure 8 Attach the expansion back end cables to the new expansion enclosure 9 Attach the power cables to the new expansion enclosure 10 Verify the operation of the new expansion enclosure Verify shipping package contents Confirm that you received all the equipment that is required to install the new 25 drive expansion enclosur...

Страница 14: ...the filler panel 2 Use a flatblade screwdriver or similar tool to pry off the latch brackets Figure 5 Prying off a latch bracket CL4064 Figure 5 Prying off a latch bracket Install the rails in the cabinet This task describes the procedure to install one rail After installing one rail repeat the procedure for the other rail The procedure is the same for both the left and right rail You can install ...

Страница 15: ...rlichen Verletzungen und oder der Beschädigung des Gerätes bitte das Gehäuse nicht ohne die Hilfe einer zweiten Person anheben und einbauen Il contenitore è pesante e dev essere installato nel rack da due persone Per evitare danni personali e o all apparecchiatura non tentare di sollevare ed installare in un rack il contenitore senza un sollevatore meccanico e o l aiuto di un altra persona Debido ...

Страница 16: ...e you are ready to install the bezel Installing a drive About this task NOTE If you are installing multiple drives in a system that is powered up wait at least 10 seconds before sliding the next drive into position Steps 1 Align the drive with the guides in the slot 2 With the latch fully opened gently push the drive into the slot The latch begins to rotate downward when it meets the enclosure 3 P...

Страница 17: ...ective plastic strip will cause the system to overheat About this task Refer to Figure 9 Installing the bezel while performing the procedure that follows Steps 1 If present remove the protective plastic strip from the front of the bezel 2 Align the bezel with the enclosure 3 Gently push the bezel into place on the cabinet until it latches 4 If the bezel has a key lock lock the bezel with the provi...

Страница 18: ...nclosure to the LCCs on the last expansion enclosure in the stack a Connect node A SAS port A to LCC B port B on the last expansion enclosure b Connect node B SAS port A to LCC A port B on the last expansion enclosure 3 If you are installing more than one expansion enclosure cable expansion enclosure to expansion enclosure a Connect LCC A port B on the first expansion enclosure to LCC A port A on ...

Страница 19: ...re To add an expansion enclosure to a running system complete the tasks below in the order in which they appear This document provides instructions for completing each task NOTE When adding an expansion enclosure to a running system you must power on the expansion enclosure before attaching the back end cables 1 Verify the contents of the shipping package 2 Choose the space in the cabinet for the ...

Страница 20: ...ermine the placement of the new expansion enclosure within the rack Steps 1 It is recommended that you install the expansion enclosure in the next available 2U space directly above the base enclosure or the last expansion enclosure in the system Most cabinets mark 1U increments with horizontal lines or small holes in the channels 2 Considering these recommendations choose a 2U space in the cabinet...

Страница 21: ...ps 1 Position the rail end piece so the label FRONT is located at the front of the rack and facing towards the inside of the rack while orienting the rear of the rail to align level with the holes on the rear of the rack 2 From the rear of the rack pull the rail straight back until the latch is locked 3 To install the front end piece of the rail press the blue latch release button until the latch ...

Страница 22: ...Il contenitore è pesante e dev essere installato nel rack da due persone Per evitare danni personali e o all apparecchiatura non tentare di sollevare ed installare in un rack il contenitore senza un sollevatore meccanico e o l aiuto di un altra persona Debido a su considerable peso la instalación del compartimento en el bastidor deben realizarla siempre dos personas Para evitar daños personales o ...

Страница 23: ...ush the latch down until it locks into place Figure 15 Installing a drive The activity light flashes to indicate that the spin up sequence has begun Installing the front bezel Prerequisites CAUTION If the protective plastic strip is present on the front of the bezel it must be removed before placing the system into operation Failure to remove the protective plastic strip will cause the system to o...

Страница 24: ...se guidelines to cable the base enclosure in a running system to a new expansion enclosure Prerequisites Apply cable labels to the cables connecting the expansion enclosures In this procedure last expansion enclosure refers to the last expansion enclosure that is currently installed The new expansion enclosure refers to the expansion enclosure that you are adding in this procedure Steps 1 Disconne...

Страница 25: ...e last expansion enclosure to LCC A port A of the new expansion enclosure 4 Use a new SAS cable to connect LCC B port B of the last expansion enclosure to LCC B port A of the new expansion enclosure B A Expansion enclosure 0 B A Node B A Expansion enclosure 1 Figure 18 Cabling the base enclosure to two expansion enclosures Install a new base enclosure and optional expansion enclosure 25 ...

Страница 26: ... part Steps 1 From PowerStore Manager select Hardware 2 Select the appliance where you installed the new part 3 From the Hardware card select the view of the system where the part was installed The status of the part should read Healthy If the status is Faulted wait a few minutes and refresh PowerStore Manager If the status does not change ensure the part is correctly seated or call support 26 Ins...

Страница 27: ... the base enclosure Identify a faulted drive from PowerStore Manager Before you replace a drive ensure that you have identified its location within the system Using PowerStore Manager you can identify and locate a faulted drive Steps 1 From PowerStore Manager select Hardware 2 Select the enclosure that contains the faulted drive 3 From the Hardware card select the faulted drive Faulted parts appea...

Страница 28: ...ing multiple drives in a system that is powered up wait at least 10 seconds before sliding the next drive into position Steps 1 Align the drive with the guides in the slot 2 With the latch fully opened gently push the drive into the slot The latch begins to rotate downward when it meets the enclosure 3 Push the orange button until the drive is fully seated in the slot 4 Push the latch down until i...

Страница 29: ...e drive The status of the replacement drive should read Healthy If the status is still Faulted wait a few minutes and refresh PowerStore Manager If the status does not change ensure that the drive is correctly seated or contact your service provider 4 Click Stop Blink LED Add a new drive to the base enclosure Take the following actions to add a new drive to the base enclosure Removing the front be...

Страница 30: ...e filler module Install a 2 5 drive About this task NOTE If you are installing multiple drives in a system that is powered up wait at least 10 seconds before sliding the next drive into position Steps 1 Align the drive with the guides in the slot 2 With the latch fully opened gently push the drive into the slot The latch begins to rotate downward when it meets the enclosure 3 Push the orange butto...

Страница 31: ...nce where you added the part 3 From the Hardware card select the view of the system where you added the part The status of the part should read Healthy If the status is Faulted wait a few minutes and refresh PowerStore Manager If the status does not change ensure the part is correctly seated or call support Replace a power supply Take the following actions to remove the faulted power supply and in...

Страница 32: ...tate Description AC power input Green AC power is on Off AC power is off Verify source power DC power output Green DC power is on Off DC power is off Verify source power Fault Solid amber Power supply or backup fault Check cable connection Off No fault Remove a power supply About this task There are two power supplies The power supplies are installed in the top and bottom node and the top power su...

Страница 33: ...ply About this task The power supplies are installed in the top and bottom nodes meaning that the top power supply is installed upside down This procedure works for installing either power supply Steps 1 Align the power supply with the slot in the node The power cable retention bail will be on the right for the bottom power supply and on the left for the top power supply 2 Push the power supply in...

Страница 34: ...it a few minutes and refresh PowerStore Manager If the status does not change ensure that the part is correctly seated or contact your service provider Replace an embedded module Take the following actions to remove the faulted embedded module and install the replacement embedded module into the system Identify a faulted part from PowerStore Manager Before you replace a part ensure that you have i...

Страница 35: ... and activity link Blue SAS port link is up Off No link established Port link Green Link up with high speed Amber Link up with degraded speed Off Link down Node fault Amber Fault has occurred in the node or one of its components Off No fault has occurred Normal operation Node power Green Node is on main power Off Node is off Unsafe to remove White Do not remove the node Improper removal could caus...

Страница 36: ...on the embedded module to release the lever Figure 31 Releasing the lever on the embedded module 3 Pull the release lever away from the system The embedded module releases from the system as you pull the lever Figure 32 Removing the embedded module from the system 4 Remove the embedded module from the slot 36 Base enclosure service procedures ...

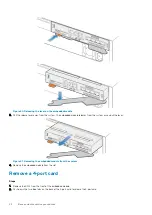
Страница 37: ... blue tabs on the back of the 4 port card to release the 4 port card Figure 33 Opening the retaining tabs 4 Lift the 4 port card off the pegs and pull the 4 port card away from the embedded module Figure 34 Removing the 4 port card Install a 4 port card Steps 1 Align the 4 port card in the embedded module so that the ports on the front line up with the slots on the front of the embedded module 2 A...

Страница 38: ...Locking the 4 port card into position 5 Replace the air dam and tighten the four captive screws 6 Install the SFPs into the embedded module Install an embedded module Steps 1 Align the embedded module with the empty slot and carefully push it into the slot As the embedded module is installed the release lever rotates inward 38 Base enclosure service procedures ...

Страница 39: ...wer control procedures Verify the operation of a replacement part Steps 1 From PowerStore Manager select Hardware 2 Select the appliance where you replaced the faulted part 3 From the Hardware card select the view of the system where the part was replaced The status of the replacement part should read Healthy If the status is still Faulted wait a few minutes and refresh PowerStore Manager If the s...

Страница 40: ...d in the State field Embedded module LEDs Use the fault LEDs to identify the faulted part Figure 39 Embedded module LEDs Table 3 Embedded module LEDs LED Location State Description Embedded module power Amber Embedded module has faulted Off No fault has occurred normal operation Ethernet port link Green Link established Off No link established Ethernet port activity Amber blinking Port activity Of...

Страница 41: ... removal could cause data loss Off Safe to remove the embedded module when the embedded module has been properly prepared Power down the node Power down the node as described in Power control procedures Remove an embedded module Steps 1 Label and disconnect all cables that are attached to the embedded module CAUTION Do not pull the node from the base enclosure Pulling the node from the base enclos...

Страница 42: ...e system as you pull the lever Figure 41 Removing the embedded module from the system 4 Remove the embedded module from the slot Remove a 4 port card Steps 1 Remove the SFPs from the front of the embedded module 2 Push down the two blue tabs on the back of the 4 port card to release the 4 port card 42 Base enclosure service procedures ...

Страница 43: ...e front of the embedded module Figure 43 Removing the 4 port card Install a 4 port card Steps 1 Align the 4 port card in the embedded module so that the ports on the front line up with the slots on the front of the embedded module 2 Align the white pegs beneath the holes on the 4 port card CAUTION Do not force the 4 port card into place If the 4 port card does not smoothly seat realign the pegs an...

Страница 44: ...into position 5 If necessary tighten the four captive screws that secure the air dam to the front of the embedded module 6 Install the SFPs into the embedded module Install an embedded module Steps 1 Align the embedded module with the empty slot and carefully push it into the slot As the embedded module is installed the release lever rotates inward 44 Base enclosure service procedures ...

Страница 45: ...e as described in Power control procedures Verify the operation of a new part Steps 1 From PowerStore Manager select Hardware 2 Select the appliance where you installed the new part 3 From the Hardware card select the view of the system where the part was installed The status of the new part should read Healthy If the status is still Faulted wait a few minutes and refresh PowerStore Manager If the...

Страница 46: ... SFP module are unsupported by the port SFP unsupported Indicates that this SFP module is not qualified with this product SFP asymmetric Indicates that this SFP module does not have the same supported speeds and connector type as its partner Remove an SFP module Steps 1 If a cable is connected to the SFP disconnect the cable 2 Gently pull down on the spring release latch 3 While still holding onto...

Страница 47: ...e the following actions to remove the faulted I O module and install the replacement I O module into the system Identify a faulted part from PowerStore Manager Before you replace a part ensure that you have identified its location within the system Using PowerStore Manager you can identify and locate a faulted part Steps 1 From PowerStore Manager select Hardware 2 Select the appliance that contain...

Страница 48: ...own the node Power down the node as described in Power control procedures Remove a faulted I O module Steps 1 Pull the trigger mechanism on the I O module handle to release it CAUTION Do not pull the node from the base enclosure Pulling the node from the base enclosure disrupts the system cache Figure 51 Releasing the I O module 2 Gently pull the I O module from the slot 48 Base enclosure service ...

Страница 49: ...he handle If the button remains in the module is fully seated If the button springs back gently push the module further into the chassis then push it again If the button still does not rest flush with its handle remove the module and repeat steps 1 and 2 Figure 54 Locking in the I O module 3 Connect the cables into the assigned I O module ports Power up the node Power up the node as described in P...

Страница 50: ...d parts appear in red in the image of the system and report a status of Faulted in the State field Power down the node Power down the node as described in Power control procedures Remove the node This procedure describes how to remove a node from the chassis There are two nodes The top node is considered to be upside down and mirrors the bottom node The procedure for removing the top node and the ...

Страница 51: ... locking mechanism and the release tab slides out NOTE The node comes completely out of the chassis Be prepared to support the node to avoid dropping it Figure 56 Disengaging the locking mechanism 4 Use the release handle to pull the node outward enough to grasp the sides with both hands Then with both hands supporting the node pull the node fully out of the enclosure Figure 57 Removing the node 5...

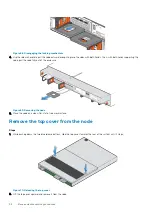
Страница 52: ...over towards the rear of the system until it stops Figure 58 Releasing the top cover 2 Lift the top cover upward and remove it from the node Figure 59 Removing the top cover Remove the faulted fan module Steps 1 Disconnect the fan module power cable from the motherboard 52 Base enclosure service procedures ...

Страница 53: ...way from the motherboard Figure 61 Removing the fan from the motherboard Install a new fan module Steps 1 Place the fan module into the mounting position in the node 2 Squeeze the blue tabs and press downward to lock the fan module into position 3 Connect the fan module power cable to the connector on the motherboard Base enclosure service procedures 53 ...

Страница 54: ...op cover on the node Steps 1 Position the top cover over the node and align it with the slots in the sides at the rear of the node Figure 63 Aligning the top cover 2 Pull the top cover forward to secure it in place 54 Base enclosure service procedures ...

Страница 55: ...he chassis 2 Slide the node into the chassis until it stops about halfway in Figure 65 Sliding the node halfway into the chassis 3 Pull the black release tab out completely and slide the rest of the node back into the chassis The black release tab slides back into the system as it is inserted Base enclosure service procedures 55 ...

Страница 56: ...nsure that the part is correctly seated or contact your service provider Replace a dual inline memory module DIMM Take the following actions to remove the faulted DIMM and install the replacement DIMM into the system The DIMMs are located within the node You can access the DIMMs by removing the node from the chassis and opening the top cover Identify a faulted part from PowerStore Manager Before y...

Страница 57: ...es include cooling fans they should be removed for as short a time as possible Do not remove nodes from a live system unless replacement parts are available Steps 1 Rotate the power cable retention bail to the left right for top power supply Disconnect the power cable from the power supply NOTE If the I O module and network cables are not already labeled label them clearly for reconnecting later F...

Страница 58: ...lly out of the enclosure Figure 69 Removing the node 5 Place the node on a clean flat static free work surface Remove the top cover from the node Steps 1 While pushing down the two blue release buttons slide the top cover towards the rear of the system until it stops Figure 70 Releasing the top cover 2 Lift the top cover upward and remove it from the node 58 Base enclosure service procedures ...

Страница 59: ...g tabs downward to free the DIMM from its slot 3 Remove the faulted DIMM Figure 72 Removing the DIMM Install the dual inline memory module Steps 1 Touching only the outside edges of the DIMM align the DIMM with the connector 2 Firmly push the carrier straight down into the connector When the DIMM is fully seated you will hear a snap and feel the connector latches click into place Base enclosure se...

Страница 60: ...e Install the top cover on the node Steps 1 Position the top cover over the node and align it with the slots in the sides at the rear of the node Figure 74 Aligning the top cover 2 Pull the top cover forward to secure it in place Figure 75 Securing the top cover 60 Base enclosure service procedures ...

Страница 61: ...lack release tab slides back into the system as it is inserted Figure 77 Installing the node 4 Pull the orange release trigger and push in gently to re engage the locking mechanism If the black release tab comes out when pulled the locking mechanism is not engaged Power up the node Power up the node as described in Power control procedures Verify the operation of a replacement part Steps 1 From Po...

Страница 62: ...aulted part is located Faulted parts appear in red in the image of the system and report a status of Faulted in the State field Power down the node Power down the node as described in Power control procedures Remove the node This procedure describes how to remove a node from the chassis There are two nodes The top node is considered to be upside down and mirrors the bottom node The procedure for r...

Страница 63: ... locking mechanism and the release tab slides out NOTE The node comes completely out of the chassis Be prepared to support the node to avoid dropping it Figure 79 Disengaging the locking mechanism 4 Use the release handle to pull the node outward enough to grasp the sides with both hands Then with both hands supporting the node pull the node fully out of the enclosure Figure 80 Removing the node 5...

Страница 64: ...the node Figure 82 Removing the top cover Remove the faulted internal M 2 boot module Steps 1 Locate the M 2 boot module adaptor in the node You can identify the M 2 boot module adaptor by the blue retaining tabs 2 Press the blue retaining tabs downward to free the M 2 boot module adaptor from its slot 3 Touching only the outside edges of the M 2 boot module adaptor remove the M 2 boot module adap...

Страница 65: ...ll straight up on the pull tab to free it from the M 2 boot module adaptor 7 Remove the internal M 2 boot module from the M 2 boot module adaptor Figure 84 Removing the internal M 2 boot module from the M 2 boot module adaptor Install the internal M 2 boot module Steps 1 Place the internal M 2 boot module into the M 2 boot module adaptor NOTE The side of the internal M 2 boot module with the barco...

Страница 66: ...own into the connector When the M 2 boot module adaptor is fully seated you will hear a snap and feel the connector latches click into place Figure 86 Installing the M 2 boot module adaptor Install the top cover on the node Steps 1 Position the top cover over the node and align it with the slots in the sides at the rear of the node Figure 87 Aligning the top cover 2 Pull the top cover forward to s...

Страница 67: ...he chassis 2 Slide the node into the chassis until it stops about halfway in Figure 89 Sliding the node halfway into the chassis 3 Pull the black release tab out completely and slide the rest of the node back into the chassis The black release tab slides back into the system as it is inserted Base enclosure service procedures 67 ...

Страница 68: ...eated or contact your service provider Replace an M 2 boot module adaptor Take the following actions to remove the faulted M 2 boot module adaptor and install the replacement M 2 boot module adaptor into the system The M 2 boot module adaptor is located within the node You can access the M 2 boot module adaptor by removing the node from the chassis and opening the top cover Identify a faulted part...

Страница 69: ...es include cooling fans they should be removed for as short a time as possible Do not remove nodes from a live system unless replacement parts are available Steps 1 Rotate the power cable retention bail to the left right for top power supply Disconnect the power cable from the power supply NOTE If the I O module and network cables are not already labeled label them clearly for reconnecting later F...

Страница 70: ...lly out of the enclosure Figure 93 Removing the node 5 Place the node on a clean flat static free work surface Remove the top cover from the node Steps 1 While pushing down the two blue release buttons slide the top cover towards the rear of the system until it stops Figure 94 Releasing the top cover 2 Lift the top cover upward and remove it from the node 70 Base enclosure service procedures ...

Страница 71: ...om its slot 3 Touching only the outside edges of the M 2 boot module adaptor remove the M 2 boot module adaptor Figure 96 Removing the M 2 boot module adaptor 4 Remove the internal M 2 boot modules a Gently pull the handle on the release tab to separate it from the tab holding it in place b Gently pull straight up on the pull tab to free it from the M 2 boot module adaptor c Remove the internal M ...

Страница 72: ...ent internal M 2 boot module with the slot on the M 2 boot module adaptor and gently push it into place 3 Connect the pull tab to the blue adapter Figure 98 Installing the internal M 2 boot modules into the M 2 boot module adaptor 4 Touching only the outside edges of the M 2 boot module adaptor align the M 2 boot module adaptor with the connector 5 Firmly push the M 2 boot module adaptor straight ...

Страница 73: ... the node Steps 1 Position the top cover over the node and align it with the slots in the sides at the rear of the node Figure 100 Aligning the top cover 2 Pull the top cover forward to secure it in place Figure 101 Securing the top cover Base enclosure service procedures 73 ...

Страница 74: ...lack release tab slides back into the system as it is inserted Figure 103 Installing the node 4 Pull the orange release trigger and push in gently to re engage the locking mechanism If the black release tab comes out when pulled the locking mechanism is not engaged Power up the node Power up the node as described in Power control procedures Verify the operation of a replacement part Steps 1 From P...

Страница 75: ...the State field Power down the node Power down the node as described in Power control procedures Remove the node This procedure describes how to remove a node from the chassis There are two nodes The top node is considered to be upside down and mirrors the bottom node The procedure for removing the top node and the bottom node is the same About this task WARNING Do not remove the node within five ...

Страница 76: ... locking mechanism and the release tab slides out NOTE The node comes completely out of the chassis Be prepared to support the node to avoid dropping it Figure 105 Disengaging the locking mechanism 4 Use the release handle to pull the node outward enough to grasp the sides with both hands Then with both hands supporting the node pull the node fully out of the enclosure Figure 106 Removing the node...

Страница 77: ...ment node Transfer the following components from the faulted node to the corresponding locations in the replacement node To help ensure the correct placement in the enclosure transfer only one component at a time Transfer the power supply Transfer the I O modules and fillers Transfer the embedded module without removing the 4 port card Transfer the internal M 2 boot modules without removing them f...

Страница 78: ...ackup module by pulling the tab on the left side 3 Disconnect the internal battery backup module cable from the motherboard Figure 109 Releasing the BBU 4 Lift the internal battery backup module away from the motherboard Figure 110 Removing the BBU from the motherboard Install the internal battery backup module Install the internal battery backup module into the replacement node Steps 1 Place the ...

Страница 79: ...dding around the top of the internal battery backup module 4 Connect the internal battery backup module cable to the motherboard Figure 112 Connecting the internal battery backup module cable to the motherboard Install the top cover on the node Steps 1 Position the top cover over the node and align it with the slots in the sides at the rear of the node Base enclosure service procedures 79 ...

Страница 80: ...to secure it in place Figure 114 Securing the top cover Install the node Steps 1 Align the pins on the top of the node with the grooves on the top of the chassis 2 Slide the node into the chassis until it stops about halfway in 80 Base enclosure service procedures ...

Страница 81: ...sm is not engaged Power up the node Power up the node as described in Power control procedures Verify the operation of a replacement part Steps 1 From PowerStore Manager select Hardware 2 Select the appliance where you replaced the faulted part 3 From the Hardware card select the view of the system where the part was replaced The status of the replacement part should read Healthy If the status is ...

Страница 82: ... a 25 drive expansion enclosure Take the following actions to add a new drive to a 25 drive expansion enclosure Removing the front bezel About this task NOTE Remove the front bezel of the expansion enclosure to gain access to the drives The bezel is required for EMI compliance when the enclosure is powered up Remove it only to replace or add a drive Steps 1 If the bezel has a lock insert the key t...

Страница 83: ...sk NOTE If you are installing multiple drives in a system that is powered up wait at least 10 seconds before sliding the next drive into position Steps 1 Align the drive with the guides in the slot 2 With the latch fully opened gently push the drive into the slot The latch begins to rotate downward when it meets the enclosure 3 Push the orange button until the drive is fully seated in the slot 4 P...

Страница 84: ... should read Healthy If the status is still Faulted wait a few minutes and refresh PowerStore Manager If the status does not change ensure that the part is correctly seated or contact your service provider Replace a faulted drive in a 25 drive expansion enclosure Take the following actions to remove a faulted drive from a 25 drive expansion enclosure and install a replacement drive Identify a faul...

Страница 85: ... only to replace or add a drive Steps 1 If the bezel has a lock insert the key that shipped with your enclosure into the lock and turn the key to unlock the bezel 2 Press the two latch buttons on the bezel surface to release the bezel from the cabinet 3 Pull the bezel off the cabinet and put it on a clean static free surface CL5261 Figure 121 Removing the front bezel Remove a faulted drive Steps 1...

Страница 86: ... guides in the slot 2 With the latch fully opened gently push the drive into the slot The latch begins to rotate downward when it meets the enclosure 3 Push the orange button until the drive is fully seated in the slot 4 Push the latch down until it locks into place Figure 123 Installing a drive The activity light flashes to indicate that the spin up sequence has begun Installing the front bezel S...

Страница 87: ...t your service provider 4 Click Stop Blink LED Replace a link control card in a 25 drive expansion enclosure Take the following actions to remove a faulted link control card LCC from a 25 drive expansion enclosure and install a replacement LCC Identify a faulted part from PowerStore Manager Before you replace a part ensure that you have identified its location within the system Using PowerStore Ma...

Страница 88: ...up do not remove both LCCs while AC power is on Steps 1 Attach an ESD wristband to your wrist and the enclosure 2 Remove each cable connected to the LCC by gently pulling the connector latches to release the cable from the connector Note where the cables connect to the LCC because you will reconnect them later CL5983 Figure 126 Disconnecting an LCC cable 3 Remove the LCC 88 Expansion enclosure ser...

Страница 89: ... the orange handle buttons to release the LCC pull the latches outward and remove the LCC from its slot CL5984 2 1 Figure 127 Removing an LCC 4 Place the LCC on a clean static free surface Installing a replacement LCC Steps 1 Attach an ESD wristband to your wrist and the enclosure 2 Pull out the latches on the LCC and make sure they stay in the open position Expansion enclosure service procedures ...

Страница 90: ...e enclosure being sure the LCC is completely seated in the enclosure CL5985 2 1 Figure 128 Installing an LCC 4 Press the latches to secure the LCC 5 Reconnect each cable to the port from which it was removed Results The LCC power LED turns on 90 Expansion enclosure service procedures ...

Страница 91: ...ions to remove the faulted power cooling module from the 25 drive expansion enclosure and install a replacement power cooling module Identify a faulted part from PowerStore Manager Before you replace a part ensure that you have identified its location within the system Using PowerStore Manager you can identify and locate a faulted part Steps 1 From PowerStore Manager select Hardware 2 Select the a...

Страница 92: ...ds before removing power from the second module Steps 1 Attach an ESD wristband to your wrist and the enclosure 2 On an AC power cooling module release the cable retention bail and unplug the power cord Figure 131 Unplugging the power cord from an AC power supply cooling module 3 On a DC power cooling module pinch the spring releases on each side of the power cord plug and pull the plug out of the...

Страница 93: ... Removing an AC power cooling module Installing a replacement power cooling module Steps 1 Install the power cooling module in the enclosure within two minutes a Gently insert the power cooling module into the enclosure being sure that the module is completely seated b Press the latch in to secure the power cooling module Expansion enclosure service procedures 93 ...

Страница 94: ...le 2 For an AC power cooling module a Plug the power cord into the power cooling module b Secure the cord with the retention bail at the connector The bail prevents the power cord from pulling out of the connector 94 Expansion enclosure service procedures ...

Страница 95: ...e 2 Select the appliance where you replaced the faulted part 3 From the Hardware card select the view of the system where the part was replaced The status of the replacement part should read Healthy If the status is still Faulted wait a few minutes and refresh PowerStore Manager If the status does not change ensure that the part is correctly seated or contact your service provider Expansion enclos...

Страница 96: ...f using an ESD wristband with a strap Attach the clip of the ESD wristband to the ESD bracket or bare metal on a cabinet rack or enclosure Wrap the ESD wristband around your wrist with the metal button against your skin If a tester is available test the wristband If an emergency arises and the ESD kit is not available follow the procedures in Emergency Procedures without an ESD kit Emergency proce...

Страница 97: ...nal injury or damage to the equipment NOTE For a module that must be installed into a slot in an enclosure examine the rear connectors on the module for any damage before attempting its installation CAUTION A sudden jar drop or even a moderate vibration can permanently damage some sensitive replaceable units Do not remove a faulted replaceable unit until you have the replacement available When han...

Страница 98: ...hroughout the system Unpacking a part Use these best practices to unpack a part Steps 1 Wear ESD gloves or attach an ESD wristband to your wrist and the enclosure in which you are installing the part 2 Unpack the part and place it on a static free surface 3 If the part is a replacement for a faulted part save the packing material to return the faulted part 98 Safety precautions for handling replac...

Страница 99: ...our networks are correctly configured The NVT can be downloaded from Dell EMC Central Solutions at https psapps emc com central solutions Ensure that your workstation s Ethernet adapter is configured as follows Connected directly to the PowerStore service port on node A Configured with a static IP address on the service LAN network 128 221 1 0 24 with no gateway address defined 128 221 1 249 255 2...

Страница 100: ...o the same switch that the base enclosure is cabled to or is on the same VLAN as the native untagged network of the PowerStore management network connection Create a second network adapter that uses the same native untagged network as the PowerStore management network connection Verify whether there is an IP address starting with 169 254 x x 16 subnet setup available that you can use as the IP add...

Страница 101: ...t you also record the Dell service tag numbers of all enclosures in your cluster Nodes in the appliance power on in the same mode that they were in when the appliance was powered off If a node powers on in service mode 1 Log in to the appliance from an SSH client 2 Run the svc_rescue_state clear command to clear the boot mode 3 Then run the svc_node reboot command to reboot the node and return it ...

Страница 102: ...off procedures for PowerStore node This section includes the following procedures Power off a PowerStore T model node Power off a PowerStore T model node using a service script Power off a PowerStore X model node Power off a PowerStore T model node Prerequisites Obtain the following information Management IP address of the cluster to log in to PowerStore Manager PowerStore Manager user account cre...

Страница 103: ...78910 A indicates that you are logged into node A 3 Based on the node you are logged into run one of the following commands svc_node shutdown local to power off the node you are logged into svc_node shutdown peer to power off the peer node Next steps To verify that the node has powered off check the status of the LEDs in the rear of chassis Other than the LEDs for the power supply unit management ...

Страница 104: ...associated with the appliance Service account credentials About this task NOTE If the node was removed from the chassis reseat the node reconnect the power cables and wait for the node to power on Use the following procedure to power on a PowerStore T model node in scenarios such as You are remote and cannot reseat the node Node was not removed from the chassis Embedded module I O module and 4 por...

Страница 105: ...nance Mode The controller VM powers on automatically NOTE For primary internal M 2 boot module replacements skip this step The node automatically powers on once you reconnect the power cables or run the svc_node service script 5 Monitor the vCenter server console to ensure that the ESXi host and controller VM have returned to normal operation Rebooting procedures for a PowerStore node This section...

Страница 106: ...rStore Service Scripts Guide Reboot a PowerStore X model node Prerequisites Obtain the following information Address of the VMware vCenter server associated with the appliance Associated vCenter server account credentials About this task Use the following procedure to reboot a PowerStore X model node Steps 1 Log in to the associated vCenter server 2 Place the ESXi host for the node in Maintenance ...

Страница 107: ...re T model cluster Table 6 Appliance power off recommendations Appliances in the Cluster Appliances to Power Off Recommendation 1 1 Power off the entire cluster 2 1 Power off the entire cluster 2 2 Power off the entire cluster 3 1 Use the svc_appliance service script 3 2 Power off the entire cluster 3 3 Power off the entire cluster 4 1 Use the svc_appliance service script 4 2 Power off the entire ...

Страница 108: ...ESXi hosts using the vCenter commands 6 Monitor the vCenter server console to ensure that the ESXi hosts have shut down 7 Wait for 5 minutes and then disconnect the power cables from the base enclosure and expansion enclosures as required Powering on procedures for PowerStore appliances This section includes the following procedures Power on a PowerStore T model appliance Power on a PowerStore X m...

Страница 109: ... login prompt to appear 6 Exit the ESXi host for the node B from Maintenance Mode Wait for the task to complete Controller VM for node B automatically gets restarted 7 Power on user VMs on the ESXi hosts for both nodes 8 Verify that the PowerStore X model cluster is operating normally in both vCenter server and PowerStore Manager Powering off procedures for PowerStore cluster This section includes...

Страница 110: ...account credentials About this task NOTE In this release you can only have one appliance in a PowerStore X model cluster Use the following procedure to power off power down a PowerStore X model cluster Powering off a cluster results in the mapped hosts losing access to the data on the appliance The relevant prompts display the workloads that are affected NOTE When the cluster is powered off you ha...

Страница 111: ...nd the service account credentials About this task Use the following procedure to power on a PowerStore X model cluster Steps 1 If applicable reconnect the power cables to each expansion enclosure in the following order Expansion enclosure 0 Expansion enclosure 1 Expansion enclosure 2 The power status LEDs on each expansion enclosure turns on when the power cable is connected 2 Reconnect the power...

Страница 112: ...7 Power on user VMs on the ESXi hosts for both nodes 8 Verify that the PowerStore X model cluster is operating normally in both vCenter server and PowerStore Manager 112 Power control procedures ...

Страница 113: ...script to collect support materials for other profiles See the PowerStore Service Scripts Guide for more information about the svc_dc service script and the available profiles NOTE The system can run only one collection job at a time You can perform the following actions on a collection of support materials View information about existing collections Upload a collection to support if remote suppor...

Страница 114: ...the job is finished you can download the data collection to a client send the collection to support or delete the collection Select the data collection then select Download Send to Support or Delete 114 Data collection ...

Страница 115: ...lize the system Reinitialize the system Reinitializing the system resets the entire system to the original default factory settings You can reinitialize the system using service scripts To use service scripts to reinitialize the system refer to the PowerStore Series Service Scripts Guide E Reinitialize the system 115 ...

Отзывы: