background image

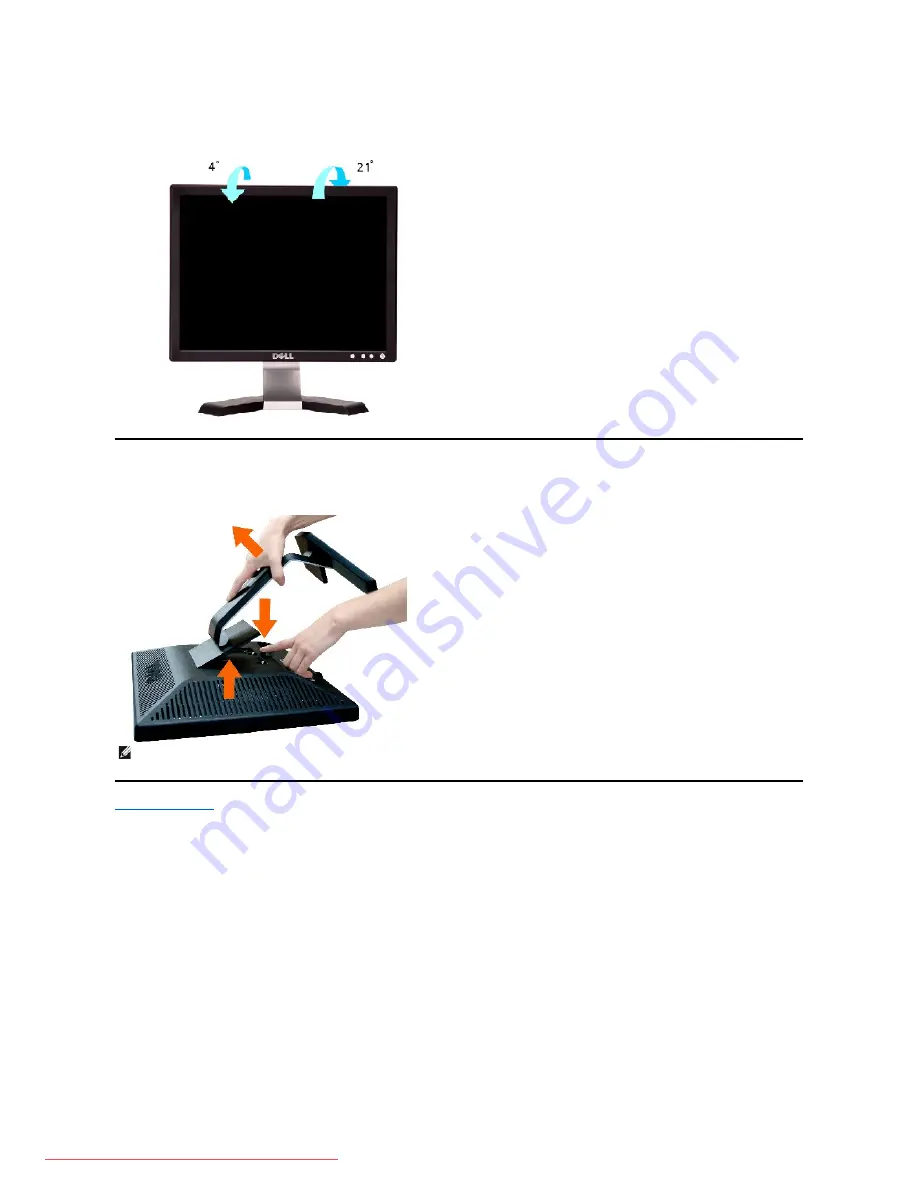
Tilt 

With the built-in pedestal, you can tilt the monitor for the most comfortable viewing angle. 


Removing the Stand 

After placing the monitor panel on a soft cloth or cushion, press and hold the LCD removal button, and then remove the stand.  


Back to Contents Page


NOTE: To prevent scratches on the LCD screen while removing the stand, ensure that the monitor is placed on a clean surface.  

Downloaded from ManualMonitor.com Manuals

Содержание E177FP - 17" LCD Monitor

Страница 1: ...ined that this product meets the ENERGY STAR guidelines for energy efficiency Other trademarks and trade names may be used in this document to refer to either the entities claiming the marks and names or their products Dell Inc disclaims any proprietary interest in trademarks and trade names other than its own October 2006 Rev A00 About Your Monitor Front View Back View Side View Bottom View Monit...

Страница 2: ...ide Front View Back View Side View Bottom View Monitor Specifications Caring for your Monitor Front View Back View 1 Menu selection button 2 Brightness Contrast Down button 3 Auto Adjust Up button 4 Power button On Off button with indicator Downloaded from ManualMonitor com Manuals ...

Страница 3: ...bel Refer to this label if you need to contact Dell for technical support 4 Regulatory rating label List the regulatory approvals 5 Stand removal button Press to release the stand 6 VESA mounting holes 100mm behind attached stand Use to mount monitor 7 Cable holder Help organize cables by passing them through the holder Downloaded from ManualMonitor com Manuals ...

Страница 4: ...Right side Left side Bottom View 1 AC power cord connector 2 VGA connector Downloaded from ManualMonitor com Manuals ...

Страница 5: ...sts the preset modes for which Dell guarantees image size and centering Display Mode Horizontal Frequency kHz Vertical Frequency Hz Pixel Clock MHz Sync Polarity Horizontal Vertical VGA 720 x 400 31 5 70 1 28 3 VGA 640 x 480 31 5 60 0 25 2 VESA 640 x 480 37 5 75 0 31 5 VESA 800 x 600 37 9 60 3 40 0 VESA 800 x 600 46 9 75 0 49 5 VESA 1024 x 768 48 4 60 0 65 0 VESA 1024 x 768 60 0 75 0 78 8 VESA 115...

Страница 6: ...onitor Stand and Head 4 85kg 10 67 lb Monitor Flat panel only VESA Mode 4 0 kg 8 8 lb Weight with packaging 6 0 kg 13 2 lb Environmental Temperature Operating 5 to 35 C 41 to 95 F Nonoperating 20 to 60 C 4 to 140 F Humidity Operating 10 to 80 noncondensing Nonoperating 5 to 90 noncondensing Altitude Operating 3 657 6 m 12 000 ft max Nonoperating 12 192 m 40 000 ft max Power Management Definition V...

Страница 7: ...ened warm cloth to clean the plastics Avoid using detergent of any kind as some detergents leave a milky film on the plastics l If you notice a white powder when you unpack your monitor wipe it off with a cloth This white powder occurs during the shipping of the monitor l Handle your monitor with care as darker colored plastics may scratch and show white scuff marks more than lighter colored monit...

Страница 8: ...voltage selection switch on the power supply for the computer is set to match the alternating current AC power available at your location 115 volts V 60 hertz Hz in most of North and South America and some Far Eastern countries such as Japan South Korea also 220 volts V 60 hertz Hz and Taiwan 230 volts V 50 hertz Hz in most of Europe the Middle East and the Far East Always be sure that your monito...

Страница 9: ...e a telephone number listed that is specific for XPS portable computers you may contact Dell through the support number listed and your call will be routed appropriately When you need to contact Dell use the electronic addresses telephone numbers and codes provided in the following table If you need assistance in determining which codes to use contact a local or an international operator NOTE The ...

Страница 10: ...847 4096 Customer Service small med large business government toll free 1 800 387 5757 Customer Service printers projectors televisions handhelds digital jukebox and wireless toll free 1 800 847 4096 Hardware Warranty Phone Support XPS toll free 1 866 398 8977 Hardware Warranty Phone Support Home HomeOffice toll free 1 800 847 4096 Hardware Warranty Phone Support small med large business governmen...

Страница 11: ...board Fax Home Small Business 3287 5001 Dominica Website www dell com dm E mail la techsupport dell com General Support toll free 1 866 278 6821 Dominican Republic Website www dell com do E mail la techsupport dell com General Support 1 800 156 1588 Ecuador Website www dell com ec E mail la techsupport dell com General Support calling from Quito toll free 999 119 877 655 3355 General Support calli...

Страница 12: ... 3416 0910 Large Corporate Accounts 00852 3416 0907 Global Customer Programs 00852 3416 0908 Medium Business Division 00852 3416 0912 Home and Small Business Division 00852 2969 3105 India Website support ap dell com E mail india_support_desktop dell com india_support_notebook dell com india_support_Server dell com Technical Support XPS computers 0802 506 8033 or toll free 1800 425 2066 Technical ...

Страница 13: ... Korea Seoul International Access Code 001 Country Code 82 City Code 2 E mail krsupport dell com Support toll free 080 200 3800 Technical Support XPS toll free 080 999 0283 Support Dimension PDA Electronics and Accessories toll free 080 200 3801 Sales toll free 080 200 3600 Fax 2194 6202 Switchboard 2194 6000 Latin America Customer Technical Support Austin Texas U S A 512 728 4093 Customer Service...

Страница 14: ...00 507 1264 Peru E mail la techsupport dell com General Support 0800 50 669 Poland Warsaw International Access Code 011 Country Code 48 City Code 22 Website support euro dell com E mail pl_support_tech dell com Customer Service Phone 57 95 700 Customer Care 57 95 999 Sales 57 95 999 Customer Service Fax 57 95 806 Reception Desk Fax 57 95 998 Switchboard 57 95 999 Portugal International Access Code...

Страница 15: ...Support Fax 08 590 05 594 Sales 08 590 05 185 Switzerland Geneva International Access Code 00 Country Code 41 City Code 22 Website support euro dell com E mail Tech_support_central_Europe dell com Technical Support for XPS 0848 33 88 57 Technical Support Home and Small Business for all other Dell products 0844 811 411 Technical Support Corporate 0844 822 844 Customer Care Home and Small Business 0...

Страница 16: ...ranty Support Dell TV Printers and Projectors for Relationship customers toll free 1 877 459 7298 Americas Consumer XPS support toll free 1 800 232 8544 Consumer Home and Home Office Support for all other Dell products toll free 1 800 624 9896 Customer Service toll free 1 800 624 9897 Employee Purchase Program EPP Customers toll free 1 800 695 8133 Financial Services website www dellfinancialservi...

Страница 17: ...Back to Contents Page Downloaded from ManualMonitor com Manuals ...

Страница 18: ... Be sure that your local power is within the supported range If you are unsure ask your electricity supplier 5 Turn on your display and computer If your monitor displays an image installation is complete If it does not display an image see Troubleshooting Using the Front Panel Buttons Use the control buttons on the front of the monitor to adjust the characteristics of the image being displayed As ...

Страница 19: ...he monitor is on and fully functional An amber LED indicates DPMS power save mode The Power button turns the monitor on and off Function Adjustment Method Auto adjustment Use this button to activate automatic setup and adjustment The following dialog will appear on screen as the monitor self adjusts to the current input Auto Adjustment button allows the monitor to self adjust to the incoming video...

Страница 20: ...it out of the Main Menu Positioning Horizontal Vertical Positioning moves the viewing area around on the monitor screen When making changes to either the Horizontal or Vertical settings no changes will occur to the size of the viewing area the image will simply be shifted in response to your selection change Minimum is 0 Maximum is 100 Image settings Auto Adjust Even though your computer system ca...

Страница 21: ...he warmth of the image colors red green blue The two available presets Blue and Red favor blue and red accordingly Select each one to see how each range suits your eye or utilize the User Preset option to customize the color settings to your exact choice OSD Settings Each time the OSD opens it displays in the same location on the screen OSD Settings horizontal vertical provides control over this l...

Страница 22: ...OTE The language chosen affects only the language of the OSD It has no effect on any software running on the computer Factory Reset Factory Reset returns the settings to the factory preset values for the selected group of functions Exit is used to exit out of Factory Reset menu For All settings all user adjustable settings are reset at one time except Language settings DDC CI Display Data Channel ...

Страница 23: ...ication and two audio headset jacks Exit leaves this submenu without resetting any values All Settings returns your monitor settings to those that were set at the time of manufacture This includes Color Position Clock frequency Phase Brightness Contrast and OSD hold time DDC CI Display Data Channel Command Interface allows you to adjust the monitor parameters brightness color balance etc via softw...

Страница 24: ...he Soundbar to the left until it snaps into place 3 Connect the Soundbar with the power brick 4 Plug the power cables of the power brick into a nearby outlet 5 Insert the lime green mini stereo plug from the rear of the Soundbar into the computer s audio output jack NOTE Soundbar Power Connector 12V DC output is for optional Dell Soundbar only NOTICE Do not use with any device other than Dell Soun...

Страница 25: ...issues see OSD Warning Messages Common Problems The following table contains general information about common monitor problems you might encounter CAUTION Before you begin any of the procedures in this section follow the Safety Instruction The floating Dell Self Test Feature Check dialog box should appear on screen against a black background if the monitor cannot sense a video signal and is workin...

Страница 26: ... Check for bent or broken pins l Boot up in the safe mode LCD Scratched Screen has scratches or smudges l Turn monitor off and clean the screen l For cleaning instruction see Caring for your Monitor Safety Related Issues Visible signs of smoke or sparks l Do not perform any troubleshooting steps l Monitor needs to be replaced Intermittent Problems Monitor malfunctions on off l Ensure monitor is in...

Страница 27: ...Computer is not in power saving by moving mouse or pressing any key on the keyboard l Check whether the signal cable is plugged in and seated properly Re plug the signal cable if necessary l Re boot the computer or video player OSD Lock All buttons are locked except the menu button No user adjustments are allowed l Press the menu button for over 15 seconds to unlock the OSD menu Downloaded from Ma...

Страница 28: ...he monitor onto the two teeth of the upper stand 3 Lower the monitor so that the monitor mounting area snaps on locks to the stand Organizing Your Cables After attaching all necessary cables to your monitor and computer See Connecting Your Monitor for cable attachment use the cable holder to neatly organize all cables as shown above Using the Tilt NOTE Stand is detached when the monitor is shipped...

Страница 29: ...and After placing the monitor panel on a soft cloth or cushion press and hold the LCD removal button and then remove the stand Back to Contents Page NOTE To prevent scratches on the LCD screen while removing the stand ensure that the monitor is placed on a clean surface Downloaded from ManualMonitor com Manuals ...

Отзывы: