4-24
Dell Dimension XPS R
xxx
Systems Service Manual
6\VWHP%RDUG
)LJXUH 6\VWHP %RDUG 5HPRYDO
To remove the system board, follow these steps.
NOTES: Read this entire procedure before you begin.
If possible, print the system setup screens (by pressing the <Print Screen>
key) before you turn off the computer, because you will have to restore the
configuration information after the system board is replaced.
'LVFRQQHFW DQ\ FDEOHV DWWDFKHG WR WKH ,2 SDQHO RQ WKH EDFN RI
WKH FRPSXWHU VHH )LJXUH
5HPRYH DQ\ LQVWDOOHG H[SDQVLRQ FDUGV
Note the location of each connector and the orientation of any cables
attached to the expansion cards before disconnecting these cables.
'LVFRQQHFW DOO LQWHUQDO FDEOHV IURP WKH V\VWHP ERDUG
The cables attached to the PRI IDE, SEC IDE, and FLOPPY connectors (see
Figure 4-17) each have two latches securing them to the system board.
Press the latch on each end of the cable connector, and pull to release the
cable from the system board.
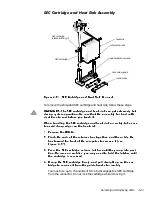
The SEC cartridge and heat sink assembly (see Figure 4-21), the guide
bracket assembly, the expansion cards, and the DIMM modules must be
removed from the old system board and transferred to the replacement
system board. Dell recommends removing these components from the
system board while it is still securely mounted in the computer.
secondary
hard-disk
drive bracket
system board
3.5-inch
diskette drive
I/O
gasket
Содержание Dimension XPS R Series
Страница 1: ...ZZZ GHOO FRP HOO LPHQVLRQ 36 5 6 VWHPV 6 59 0 18 ...
Страница 7: ...ix ...
Страница 16: ...1 8 Dell Dimension XPS Rxxx Systems Service Manual LJXUH 3RZHU DEOHV P1 P7 P2 P3 P6 P5 P4 ...
Страница 30: ...1 22 Dell Dimension XPS Rxxx Systems Service Manual ...
Страница 38: ...2 8 Dell Dimension XPS Rxxx Systems Service Manual ...
Страница 44: ...3 6 Dell Dimension XPS Rxxx Systems Service Manual ...


