background image

Media Card Reader (Optional)

For information about using a Media Card Reader, see your 

Owner's Manual

.

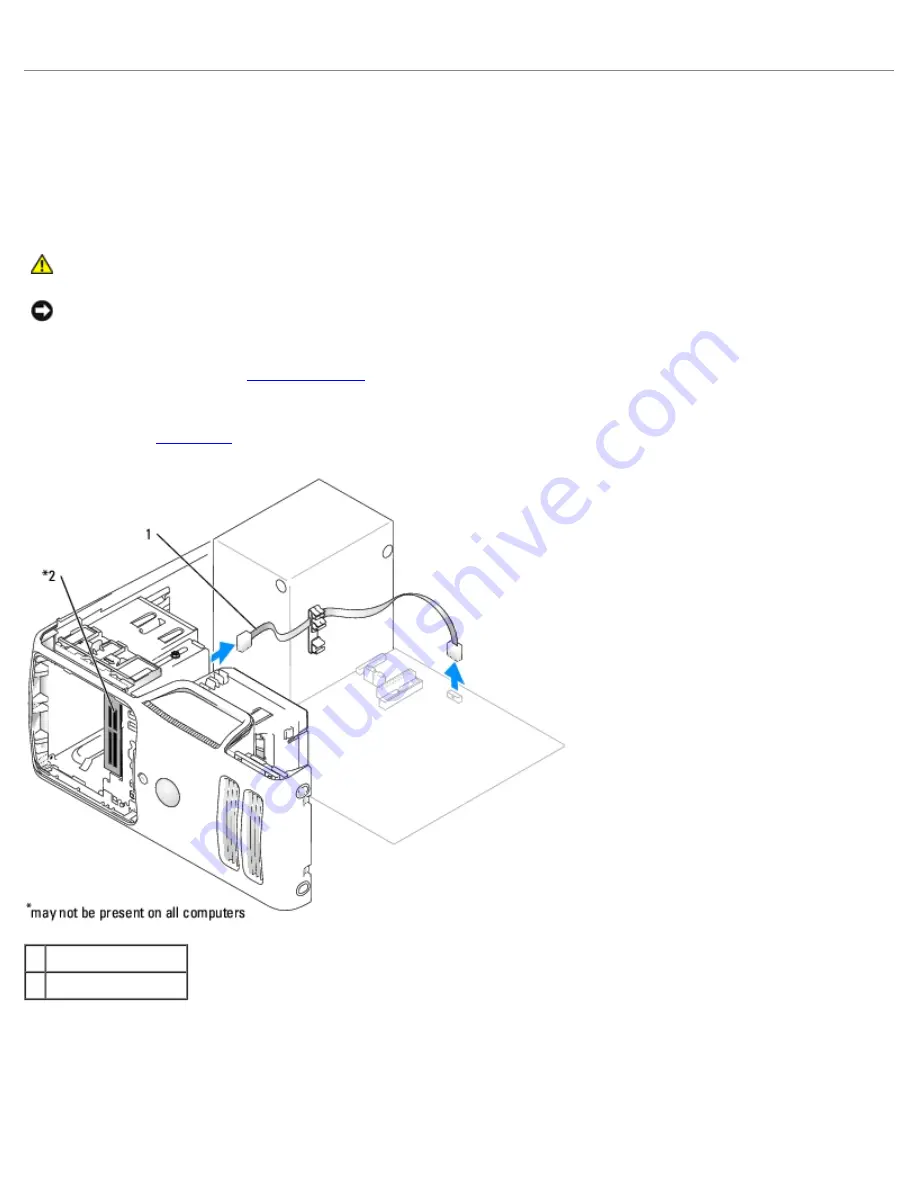
Removing a Media Card Reader

CAUTION: 

Before you begin any of the procedures in this section, follow the safety instructions in the

Product Information Guide

.

NOTICE: 

To prevent static damage to components inside your computer, discharge static electricity from your body

before you touch any of your computer's electronic components. You can do so by touching an unpainted metal surface

on the computer chassis.

1.  Follow the procedures in "

Before You Begin

." 

2.  Remove the computer cover. 

3.  Remove the 

drive panel

1 cable
2 Media Card Reader

4.  Disconnect the FlexBay USB cable on the back of the Media Card Reader from the Media Card Reader connector on the

system board and route the cable through the cable routing clip. 

Содержание Dimension 5150

Страница 1: ...n this document to Microsoft Windows operating systems are not applicable Information in this document is subject to change without notice 2005 2006 Dell Inc All rights reserved Reproduction in any manner whatsoever without the written permission of Dell Inc is strictly forbidden Trademarks used in this text Dell the DELL logo and Dimension are trademarks of Dell Inc Intel Intel SpeedStep and Pent...

Страница 2: ...ng tools Small flat blade screwdriver Long Phillips screwdriver Flash BIOS update program floppy disk or CD Turning Off Your Computer NOTICE To avoid losing data save and close any open files and exit any open programs before you turn off your computer 1 Shut down the operating system a Save and close any open files exit any open programs click the Start button and then click Turn Off Computer b I...

Страница 3: ...bending any connector pins Also before you connect a cable ensure that both connectors are correctly oriented and aligned NOTICE To avoid damaging the computer perform the following steps before you begin working inside the computer 1 Turn off your computer NOTICE To disconnect a network cable first unplug the cable from your computer and then unplug it from the network port or device 2 Disconnect...

Страница 4: ...ice Tag Use the Service Tag to identify your computer when you access the Dell Support website or call technical support 3 CD or DVD eject button Press to eject a disk from the CD or DVD drive 4 CD or DVD activity light The drive light is on when the computer reads data from the CD or DVD drive 5 FlexBay Can contain an optional floppy drive or optional Media Card Reader For more information about ...

Страница 5: ...tion NOTICE To avoid losing data do not use the power button to turn off the computer Instead perform an operating system shutdown 11 USB 2 0 connectors 2 Use the front USB connectors for devices that you connect occasionally such as joysticks or cameras It is recommended that you use the back USB connectors for devices that typically remain connected such as printers keyboards and mice or for boo...

Страница 6: ...onnection exists between a 100 Mbps network and the computer Off The computer is not detecting a physical connection to the network 2 network adapter connector To attach your computer to a network or broadband device connect one end of a network cable to either a network jack or your network or broadband device Connect the other end of the network cable to the network adapter connector on the back...

Страница 7: ...und connector Use the pink and silver connector to attach a personal computer microphone for voice or musical input into a sound or telephony program On computers with a sound card the microphone connector is on the card The side surround output provides enhanced surround audio for computers with 7 1 speakers 8 center subwoofer connector Use the yellow connector to attach a speaker to a Low Freque...

Страница 8: ...System Board Components ...

Страница 9: ...Power Supply DC Connector Pin Assignments ...

Страница 10: ...DC Main Power Connector P1 Pin Number Signal Name 18 AWG Wire 1 3 3 VDC Orange 2 3 3 VDC Orange 3 COM Black 4 5VDC Red 5 COM Black 6 5 VDC Red 7 COM Black 8 POK Gray 9 5 VFP Purple ...

Страница 11: ...G The 3 3 VDC terminals are high current type 9 A current rating Molex HCS type The 3 3VDC SE is a brown sense wire for 3 3VDC and is optional DC Processor Power Connector P2 Pin Number Signal Name 18 AWG Wire 1 COM Black 2 COM Black 3 12 VADC Yellow 4 12 VADC Yellow DC Peripheral Connectors P3 and P5 Pin Number Signal Name 18 AWG Wire 1 3 3 VDC Orange 2 COM Black 3 5 VADC Red 4 COM Black 5 12 VBD...

Страница 12: ...1 5 VDC Red 2 COM Black 3 COM Black 4 12 VADC Yellow DC Peripheral Connectors P8 and P9 Pin Number Signal Name 18 AWG Wire 1 12 VBDC White 2 COM Black 3 COM Black 4 5 VDC Red Back to Contents Page ...

Страница 13: ...eight way set associative write back SRAM Memory Type 400 MHz and 533 MHz DDR2 unbuffered SDRAM Memory connectors four Memory capacities 256 MB 512 MB or 1 GB non ECC Maximum memory 4 GB NOTE See Addressing Memory With 4 GB Configurations to verify the amount of memory available to the operating system BIOS address F0000h Computer Information Chipset Intel 945G Express RAID Support RAID 1 Mirrorin...

Страница 14: ...Express lane PCI Express connector one x16 connector size 164 pins connector data width maximum 16 PCI Express lanes Drives Externally accessible one 3 5 inch FlexBay may contain an optional floppy drive or an optional Media Card Reader two 5 25 inch drive bays Available devices Serial ATA drives 2 floppy drive USB memory devices CD drive CD RW drive DVD drive DVD RW drive DVD and CD RW combo driv...

Страница 15: ...ight Blinking green in sleep state solid green for power on state amber light Blinking amber indicates a problem with the power supply inside the computer If the system cannot boot and there is a solid amber light this indicates a problem with the system board see Power Problems in your computer Owner s Manual Hard drive access light green Link integrity light on integrated network adapter green l...

Страница 16: ...vironmental Temperature Operating 10 to 35 C 50 to 95 F Storage 40 to 65 C 40 to 149 F Relative humidity 20 to 80 noncondensing Maximum vibration Operating 0 25 G at 3 to 200 Hz at 0 5 octave min Storage 0 5 G at 3 to 200 Hz at 1 octave min Maximum shock Operating bottom half sine pulse with a change in velocity of 20 inches sec 50 8 cm sec Storage 27 G faired square wave with a velocity change of...

Страница 17: ... the electrical outlet before removing the cover 1 Follow the procedures in Before You Begin NOTICE Ensure that sufficient space exists to support the removed cover at least 30 cm 1 ft of desktop space NOTICE Ensure that you are working on a level protected surface to avoid scratching either the computer or the surface on which it is resting 2 Lay your computer on its side with the computer cover ...

Страница 18: ...For additional information on the type of memory supported by your computer see your Owner s Manual DDR2 Memory Overview DDR2 memory modules should be installed in pairs of matched memory size speed and technology If the DDR2 memory modules are not installed in matched pairs the computer will continue to operate but with a slight reduction in performance See the label on the module to determine th...

Страница 19: ...not pair an original memory module with a new memory module Otherwise your computer may not start properly You should install your original memory modules in pairs either in DIMM connectors 1 and 2 or DIMM connectors 3 and 4 Addressing Memory With 4 GB Configurations Your computer supports a maximum of 4 GB of memory when you use four 1 GB DIMMs Current operating systems such as Microsoft Windows ...

Страница 20: ...ions in the Product Information Guide NOTICE To prevent static damage to components inside your computer discharge static electricity from your body before you touch any of your computer s electronic components You can do so by touching an unpainted metal surface on the computer chassis 1 Follow the procedures in Before You Begin 2 Remove the computer cover 3 Press out the securing clip at each en...

Страница 21: ...network cable first plug the cable into the network port or device and then plug it into the computer 7 Connect your computer and devices to electrical outlets and turn them on 8 When a message appears stating that memory size has changed press F1 to continue 9 Log on to your computer 10 Right click the My Computer icon on your Microsoft Windows desktop and click Properties 11 Click the General ta...

Страница 22: ...slots One PCI Express x16 card slot One PCI Express x1 card slot PCI Cards Your computer supports two PCI cards If you are installing or replacing a card follow the procedures in the next section If you are removing but not replacing a PCI card see Removing a PCI Card If you are replacing a card remove the current driver for the card from the operating system If you are installing or replacing a P...

Страница 23: ...th the card for information on configuring the card making internal connections or otherwise customizing it for your computer CAUTION Some network adapters automatically start the computer when they are connected to a network To guard against electrical shock be sure to unplug your computer from its electrical outlet before installing any cards 7 Place the card in the connector and press down firm...

Страница 24: ...reconnect the computer and devices to electrical outlets and then turn them on 12 If you installed a sound card a Enter system setup select Audio Controller and then change the setting to Off b Connect external audio devices to the sound card s connectors Do not connect external audio devices to the microphone speaker headphone or line in connectors on the back panel 13 If you installed an add in ...

Страница 25: ... 7 Remove the card s driver from the operating system 8 If you removed a sound card a Enter system setup select Audio Controller and then change the setting to On b Connect external audio devices to the audio connectors on the back panel of the computer 9 If you removed an add in network connector a Enter system setup select Integrated NIC and then change the setting to On b Connect the network ca...

Страница 26: ...ism aside in a secure location 5 If you are installing a new card remove the filler bracket to create a card slot opening Then continue with step 6 6 If you are replacing a card that is already installed in the computer remove the card If necessary disconnect any cables connected to the card If your computer includes a card retention mechanism remove the top of the retention mechanism by pressing ...

Страница 27: ... securing tab to unseat the card If the card is not removed correctly the system board may be damaged 9 Place the card in the connector and press down firmly Ensure that the card is fully seated in the slot 1 bracket within slot 4 alignment guide 2 bracket caught outside of slot 5 fully seated card 3 alignment bar 6 not fully seated card 10 If you replaced a card that was already installed in the ...

Страница 28: ...n connectors on the back panel 15 If you installed an add in network adapter and want to disable the integrated network adapter a Enter system setup select Integrated NIC and then change the setting to Off b Connect the network cable to the add in network adapter s connectors Do not connect the network cable to the integrated connector on the back panel 16 Install any drivers required for the card...

Страница 29: ...s and then turn them on 9 Remove the card s driver from the operating system 10 If you removed a sound card a Enter system setup select Audio Controller and then change the setting to On b Connect external audio devices to the audio connectors on the back panel of the computer 11 If you removed an add in network connector a Enter system setup select Integrated NIC and then change the setting to On...

Страница 30: ...panel snaps open NOTE The sliding plate secures and releases the drive panel and helps to secure the drives 4 Pivot the drive panel outward and lift it away from the computer 5 Set the drive panel aside in a secure location Removing the Drive Panel Insert 1 Follow the procedures in Before You Begin 2 Remove the computer cover 3 Remove the drive panel ...

Страница 31: ...drive panel 3 Pivot the drive panel insert out and away from the drive panel 4 Set the drive panel insert aside in a secure location Replacing the Drive Panel Insert 1 drive panel insert tab 3 center drive panel tab 2 drive panel insert 4 drive panel 1 Slide the tab on the left side of the drive panel insert under the center drive panel tab 2 Rotate the drive panel insert into place and snap the d...

Страница 32: ...panel 4 Align the drive panel tabs with the side door hinges 5 Rotate the drive panel toward the computer until it snaps into place on the front panel Front Panel CAUTION Before you begin any of the procedures in this section follow the safety instructions in the Product Information Guide CAUTION To guard against electrical shock always unplug your computer from the electrical outlet before removi...

Страница 33: ...nel release tabs upwards and press down on the four bottom release tabs to loosen the front panel 6 Starting from the bottom of the front panel pivot the panel toward the top of the computer and remove the panel 1 top front panel release tabs 4 2 front panel screws 2 3 front panel 4 bottom front panel release tabs 4 Drives Your computer supports a combination of these devices Up to two serial ATA ...

Страница 34: ...ing Drive Interface Cables When you install a drive you connect two cables a DC power cable and a data cable to the back of the drive and to the system board When removing an IDE drive data cable grasp the colored pull tab and pull until the connector detaches Most interface connectors are keyed for correct insertion that is a notch or a missing pin on one connector matches a tab or a filled in ho...

Страница 35: ... shock always unplug your computer from the electrical outlet before removing the cover NOTICE To prevent static damage to components inside your computer discharge static electricity from your body before you touch any of your computer s electronic components You can do so by touching an unpainted metal surface on the computer NOTICE To avoid damage to the drive do not set it on a hard surface In...

Страница 36: ...move the computer cover NOTICE Use the pull tab to remove the data cable from your hard drive or from the system board 3 Disconnect the power and data cables from the drive 1 serial ATA data cable 2 power cable 4 Press the blue tabs on either side of the hard drive bracket toward each other and slide the drive up and out of the computer 1 hard drive 2 tabs 2 ...

Страница 37: ...ation for the drive to verify that it is configured for your computer NOTE If your replacement hard drive does not have the hard drive bracket attached remove the bracket from the old drive by unsnapping it from the drive Snap the bracket onto the new drive 1 drive 2 hard drive bracket 6 Gently slide the drive into place until you feel a click or feel the drive securely installed 7 Connect the pow...

Страница 38: ...nt static damage to components inside your computer discharge static electricity from your body before you touch any of your computer s electronic components You can do so by touching an unpainted metal surface on the computer NOTICE To avoid damage to the drive do not set it on a hard surface Instead set the drive on a surface such as a foam pad that will sufficiently cushion it 1 Check the docum...

Страница 39: ...puter discharge static electricity from your body before you touch any of your computer s electronic components You can do so by touching an unpainted metal surface on the computer NOTE If you are adding a floppy drive see Installing a Floppy Drive Removing a Floppy Drive 1 Follow the procedures in Before You Begin 2 Remove the computer cover 3 Remove the drive panel 1 power cable 2 data cable 4 D...

Страница 40: ...asing the sliding plate lever slide the floppy drive out through the front of the computer 1 sliding plate lever 2 sliding plate 3 floppy drive Installing a Floppy Drive NOTE If the new floppy drive does not include shoulder screws use the screws within the drive panel insert 1 drive ...

Страница 41: ...he shroud 1 power cable 2 data cable 7 Check all cable connections and fold cables out of the way to avoid blocking the fan and cooling vents 8 Replace the drive panel 9 Replace the computer cover NOTICE To connect a network cable first plug the cable into the network port or device and then plug it into the computer 10 Connect your computer and devices to their electrical outlets and turn them on...

Страница 42: ...ide your computer discharge static electricity from your body before you touch any of your computer s electronic components You can do so by touching an unpainted metal surface on the computer chassis 1 Follow the procedures in Before You Begin 2 Remove the computer cover 3 Remove the drive panel 1 cable 2 Media Card Reader 4 Disconnect the FlexBay USB cable on the back of the Media Card Reader fr...

Страница 43: ...computer cover Installing a Media Card Reader CAUTION Before you begin any of the procedures in this section follow the safety instructions in the Product Information Guide NOTICE To prevent static damage to components inside your computer discharge static electricity from your body before you touch any of your computer s electronic components You can do so by touching an unpainted metal surface o...

Страница 44: ... all of the screws are included 5 Slide the Media Card Reader into place until you feel a click or feel the drive securely installed NOTE Ensure that the Media Card Reader is installed before the FlexBay cable is connected 6 Connect the FlexBay USB cable to the back of the Media Card Reader and to the Media Card Reader connector on the system board ...

Страница 45: ...tlet before removing the cover NOTICE To prevent static damage to components inside your computer discharge static electricity from your body before you touch any of your computer s electronic components You can do so by touching an unpainted metal surface on the computer chassis Removing a CD DVD Drive 1 Follow the procedures in Before You Begin 2 Remove the computer cover 3 Remove the drive pane...

Страница 46: ...Drive 1 Follow the procedures in Before You Begin 2 Remove the computer cover 3 Remove the drive panel NOTE If you are installing a new drive you need to remove the drive panel insert 4 Slide the drive into place until you feel a click or feel the drive securely installed ...

Страница 47: ...he drive panel 8 Replace the computer cover NOTICE To connect a network cable first plug the cable into the network port or device and then plug it into the computer 9 Connect your computer and devices to their electrical outlets and turn them on See the documentation that came with the drive for instructions on installing any software required for drive operation ...

Страница 48: ...ssis Removing the Heat Sink Assembly 1 Follow the procedures in Before You Begin 2 Remove the computer cover CAUTION Despite having a plastic shield the heat sink assembly may be very hot during normal operation Ensure that the assembly has had sufficient time to cool before you touch it NOTE To loosen the two captive screws on each side of the heat sink assembly you need a long Phillips screwdriv...

Страница 49: ...nts inside your computer discharge static electricity from your body before you touch any of your computer s electronic components You can do so by touching an unpainted metal surface on the computer chassis Removing the Processor 1 Follow the procedures in Before You Begin 2 Remove the computer cover NOTICE If you are installing a processor upgrade kit from Dell discard the original heat sink ass...

Страница 50: ...rself by touching an unpainted metal surface on the back of the computer NOTICE When installing the processor do not touch any of the pins inside the socket or allow any objects to fall onto the pins in the socket 1 Unpack the new processor being careful not to touch the underside of the processor NOTICE You must position the processor correctly in the socket to avoid permanent damage to the proce...

Страница 51: ...r at the front of the socket 7 Pivot the release lever back toward the socket and snap it into place under the side latch to secure the processor NOTICE If you are not installing a processor upgrade kit from Dell reuse the original heat sink assembly when you replace the processor If you installed a processor replacement kit from Dell return the original heat sink assembly and processor to Dell in...

Страница 52: ...ge static electricity from your body before you touch any of your computer s electronic components You can do so by touching an unpainted metal surface on the computer chassis Removing the Fan Assembly 1 Follow the procedures in Before You Begin 2 Remove the computer cover 3 Remove the heat sink assembly 4 Press the release tab on the fan cable connector on the system board to remove the connector...

Страница 53: ...he electrical outlet before removing the cover NOTICE To prevent static damage to components inside your computer discharge static electricity from your body before you touch any of your computer s electronic components You can do so by touching an unpainted metal surface on the computer chassis Removing the Front I O Panel 1 Follow the procedures in Before You Begin 2 Remove the computer cover 3 ...

Страница 54: ...nd lift the panel to remove from the computer 7 Disconnect any cables from the I O panel System Board Jumper Settings The jumper locations are shown below Jumper Setting Description PSWD default Password features are enabled Password features are disabled ...

Страница 55: ...Ensure that your computer and attached devices are turned off If your computer and attached devices did not automatically turn off when you shut down your computer turn them off now NOTICE To disconnect a network cable first unplug the cable from your computer and then unplug it from the network port or device 3 Disconnect any telephone or telecommunication lines from the computer 4 Disconnect you...

Страница 56: ... the system board in the chassis and slide the board toward the back of the computer 2 Replace the eight system board screws and the two mounting bracket screws 3 Replace any components and cables that you removed from the system board 4 Reconnect all cables to their connectors at the back of the computer 5 Replace the computer cover NOTICE To connect a network cable first plug the cable into the ...

Страница 57: ...he system board and the drives 1 release button 2 power supply 3 screws 4 4 AC power connector NOTICE Note the routing of the DC power cables underneath the routing clips in the computer frame as you remove them from the system board and drives You must route these cables properly when you replace them to prevent them from being pinched or crimped 4 Remove the four screws that attach the power sup...

Страница 58: ...nnect the DC power cables NOTICE You must route the DC power cables properly through the routing clips when you replace the cables to prevent them from being pinched or crimped 4 Route the cables through the routing clips and press the clips to close them over the cables 5 Replace the computer cover NOTICE To connect a network cable first plug the cable into the network port or device and then plu...

Страница 59: ...xtra parts are left inside the computer 3 Align the bottom of the cover with the tabs located along the bottom edge of the computer 4 Using the tabs as leverage rotate the cover downward and press down to close it 5 Ensure that the cover is seated correctly before moving it to the upright position NOTICE To connect a network cable first plug the cable into the network port or device and then plug ...

Страница 60: ...ion and ensure that the device you want to test displays in system setup and is active Start the Dell Diagnostics from either your hard drive or from the optional Drivers and Utilities CD ResourceCD Starting the Dell Diagnostics From Your Hard Drive 1 Turn on or restart your computer 2 When the DELL logo appears press F12 immediately NOTE If you see a message stating that no diagnostics utility pa...

Страница 61: ... Run Express Test first to increase the possibility of tracing the problem quickly Extended Test Performs a thorough check of devices This test typically takes 1 hour or more and requires you to answer questions periodically Custom Test Tests a specific device You can customize the tests you want to run Symptom Tree Lists the most common symptoms encountered and allows you to select a test based o...

Страница 62: ...e Dell Diagnostics is running a test or a device on the system board may be faulty or incorrectly installed If the Dell Diagnostics is running allow the testing to complete Check the diagnostic lights to see if the specific problem is identified If the computer does not boot contact Dell for technical assistance see your computer Owner s Manual for information about how to contact Dell Blinking am...

Страница 63: ...l module Continue until you have identified a faulty module or reinstalled all modules without error If available install properly working memory of the same type into your computer If the problem persists contact Dell see your computer Owner s Manual for information about how to contact Dell A possible graphics card failure has occurred If the computer has a graphics card remove the card and then...

Страница 64: ...ng a problem with a device such as the floppy drive or hard drive check the device to ensure that it is functioning properly The operating system is attempting to boot from a device such as the floppy drive or hard drive check system setup to ensure that the boot sequence is correct for the devices installed on your computer Check the computer message that appears on your monitor screen If the pro...

Страница 65: ...alled Before you use system setup it is recommended that you write down the system setup screen information for future reference NOTICE Unless you are an expert computer user do not change the settings for this program Certain changes can make your computer work incorrectly Entering System Setup 1 Turn on or restart your computer 2 When the blue DELL logo appears press F2 immediately If you wait t...

Страница 66: ... installed in the system Processor Type Processor Clock Speed Processor Bus Speed Processor Cache Size Processor ID number whether the processor is Hyperthreading Capable and if the processor has 64 bit Technology Memory Info Displays the amount of Installed Memory Memory Speed Memory Channel Mode and a description of the Memory Technology This option also displays a table that describes the memor...

Страница 67: ...er settings for RAID You can set the SATA controller to RAID Autodetect ATA or RAID On Onboard Devices Integrated NIC On default Enables or disables the integrated NIC controller Settings are On Off or On w PXE When the On w PXE setting is active available only for setting up a future boot process the computer prompts you to press Ctrl Alt b Pressing this key combination causes a menu to display t...

Страница 68: ...ou to verify and assign a new admin password System Password Not set default Displays the current status of the system s password security feature and allows a new system password to be assigned and verified Password Changes Unlocked default Determines the interaction between the System password and the Admin password Locked prevents a user without a valid Admin password from being able to modify ...

Страница 69: ...an R to the left of all entries Clear Log clears the Event Log POST Behavior Fastboot On default When enabled this feature reduces computer startup time by bypassing some compatibility steps Off does not skip any steps during computer startup On starts the system more quickly Numlock Key On default Determines the functionality of the numeric keys on the right side of your keyboard Off commands the...

Страница 70: ...able device in the sequence NOTE To boot from a network the onboard network controller must be set to On w PXE USB Flash Device Insert the memory device into a USB port and restart the computer When F12 Boot Menu appears in the upper right corner of the screen press the F12 key The BIOS detects the device and adds the USB flash option to the boot menu NOTE To boot from a USB device the device must...

Страница 71: ...ase you want to restore it 3 Press the up and down arrow keys to move through the list of devices 4 Press the spacebar to enable or disable a device enabled devices have a checkmark 5 Press plus or minus to move a selected device up or down the list Clearing Forgotten Passwords CAUTION Before you begin any of the procedures in this section follow the safety instructions located in the Product Info...

Страница 72: ...he computer cover see Replacing the Computer Cover NOTICE To connect a network cable first plug the cable into the network device and then plug it into the computer 11 Connect your computer and devices to electrical outlets and turn them on Clearing CMOS Settings CAUTION Before you begin any of the procedures in this section follow the safety instructions located in the Product Information Guide 1...

Отзывы: