background image

Removing and Replacing Parts

4-7

C

ontrol Panel Assembly

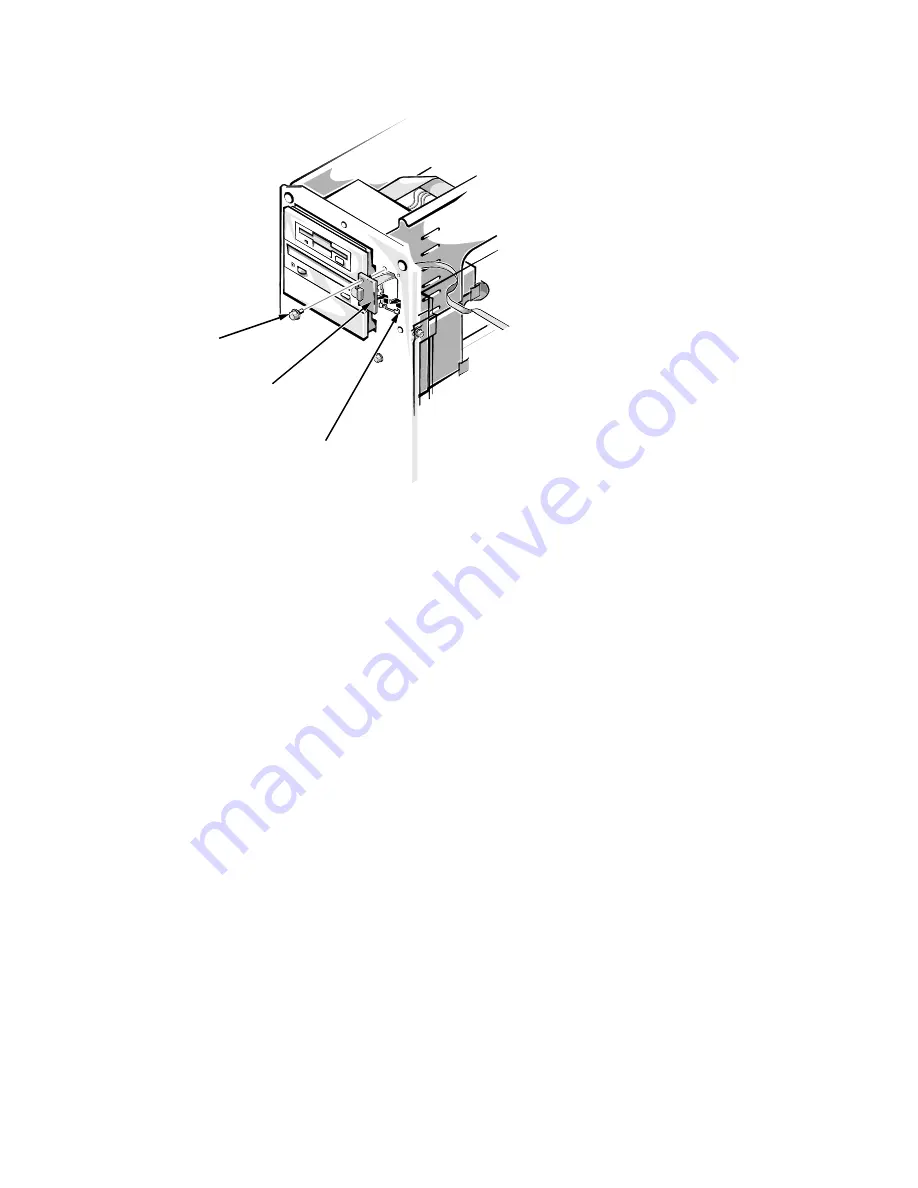
Figure 4-6.  Control-Panel Assembly Removal

1. Disconnect the control-panel assembly cable from the PANEL connec-

tor on the system board (see Figure 4-14).

The PANEL connector is near the top of the system board on the right side 
of the computer chassis.

2. Remove the screw holding the control panel assembly to the front of the 

computer chassis.

3. Lift the control panel assembly out of the two chassis tabs.

4. Remove the control-panel assembly cable from the hole in the chassis.

control panel assembly

screw

chassis tabs (2)

right side of computer

top of computer

Содержание Dimension 2200

Страница 1: ... HOO 3RZHU GJH 6 VWHPV 6 59 0 18 ...

Страница 2: ... Computer Corporation MS DOS and Microsoft are registered trademarks of Microsoft Corporation IBM is a registered trademark of International Business Machines Corporation Intel LANDesk Pentium are registered trademarks and MMX is a trademark of Intel Corporation Other trademarks and trade names may be used in this document to refer to either the entities claiming the marks and names or their produ...

Страница 3: ... SCSI Controller 1 6 SCSI Hard Disk Drives 1 7 SCSI Configuration Guidelines 1 7 SCSI ID Numbers 1 7 Device Termination 1 8 System Unit 1 10 System Power Supply 1 10 Pin Assignments for the DC Power Connectors 1 10 DC Power Distribution 1 12 System Board Layout 1 14 System Board Jumpers 1 15 Interrupt Assignments 1 17 DMA Channel Assignments 1 18 Technical Specifications 1 19 ...

Страница 4: ...or Messages 3 3 Chapter 4 Removing and Replacing Parts 4 1 Recommended Tools 4 1 Precautionary Measures 4 2 Computer Cover 4 3 Front Bezel 4 4 Front Bezel Inserts 4 5 Control Panel Assembly 4 7 Drives 4 8 Externally Accessible Drives 4 9 Hard Disk Drives 4 11 Expansion Cards 4 12 System Power Supply 4 13 System Cooling Fan 4 14 System Board Components 4 15 DIMMs 4 15 System Board Assembly 4 17 Mic...

Страница 5: ... P2 P3 P4 P5 and P6 1 11 Figure 1 8 DC Power Connector P7 1 12 Figure 1 9 DC Power Cables 1 12 Figure 1 10 DC Power Distribution 1 13 Figure 1 11 System Board Components 1 14 Figure 1 12 System Board Jumpers 1 15 Figure 4 1 Computer Cover Removal 4 3 Figure 4 2 Security Keylock 4 3 Figure 4 3 Front Bezel Removal 4 4 Figure 4 4 Plastic Insert Removal 4 5 Figure 4 5 Metal Insert Removal 4 6 Figure 4...

Страница 6: ...Removal 4 22 Figure 4 24 Retention Bracket Screw Removal 4 22 Figure 4 25 System Battery Removal 4 23 Figure 4 26 System Board Removal 4 24 Figure A 1 Main Menu A 3 Figure A 2 Boot Options Submenu A 5 Figure A 3 Advanced Menu A 6 Figure A 4 Security Menu A 8 Figure A 5 Exit Menu A 10 Tables Table 1 1 DC Voltage Ranges 1 10 Table 1 2 Jumper Descriptions 1 16 Table 1 3 Interrupt Assignments 1 17 Tab...

Страница 7: ...ix ...

Страница 8: ...ible PCs and prior training in IBM compatible PC troubleshooting techniques In addition to information provided in this manual and the User s Guide that came with the system Dell provides the Diagnostics and Troubleshooting Guide for troubleshooting procedures and instructions on using the Dell diagnostics to test the computer system WARNING A WARNING indicates the potential for bodily harm and pr...

Страница 9: ...creases the internal operating frequency to a multiple of the system clock frequency The microprocessor has an internal operating frequency of 233 or 266 MHz and a system clock frequency that is external operating frequency of 66 MHz System Features In addition to the standard features found in a traditional personal computer Dell PowerEdge 2200 systems include the following new and or advanced fe...

Страница 10: ...stem interruptions All of these features are briefly described in this chapter For a complete list of system features see Technical Specifications found later in this chapter For information about installing the PowerEdge 2200 systems in a rack see the Dell PowerEdge 2200 Systems Rack Kit Installation Guide P N 87743 When following the text in this manual assume that the location or direction rela...

Страница 11: ...ly when the system cannot be rebooted by pressing Ctrl Alt Del Before you use the reset button to initiate a hardware reset close any open application programs and files if possible power indicator power button reset button drive access indicator 3 5 inch diskette drive CD ROM drive CD ROM drive access indicator diskette drive access indicator third drive bay ...

Страница 12: ...ide Internal View system power supply diskette controller cable system board mounting plate assembly diskette drive power cables system cooling fan control panel cable SCSI cable CD ROM drive internal hard disk drive cage third drive bay control panel assembly front bezel ...

Страница 13: ...rated at 60 nanoseconds ns or faster All of the sys tem memory operates at the speed of the slowest DIMM installed The largest capacity DIMM should be in socket DIMM_A with smaller capacity DIMMs installed in decreasing sizes toward socket DIMM_D The 72 bit wide buffered EDO DIMMs support the ECC feature which detects memory errors and corrects single bit memory errors The ECC feature provides mor...

Страница 14: ...pansion card connectors The expansion card connectors are located on the system board see Figure 1 11 Integrated Server Management The system board contains integrated server management circuitry that moni tors whether the system cooling fan is running as well as critical system voltages and temperatures The integrated server management circuitry works in conjunction with the Intel LANDesk Server ...

Страница 15: ...nal Bays in the User s Guide SCSI Configuration Guidelines Although SCSI devices are installed essentially the same way as other devices their configuration requirements are different To configure your SCSI sub system follow the general guidelines offered in the following subsections SCSI ID Numbers Each device attached to the SCSI host adapter must have a unique SCSI ID number from 0 to 15 See Ch...

Страница 16: ...nes The built in SCSI controller has active termination no action is required Termination is set on the SCSI hard disk drive installed in the left bay of the internal drive bays when the drive is installed by Dell Termination should be disabled on any other drives installed in the internal bays Figure 1 5 shows where the termination jumper should be located on the Dell supplied 2 gigabyte GB 4 GB ...

Страница 17: ...SI Termination Jumper Examples jumpered unjumpered CD ROM drive end view termination jumper Seagate 2 4 and 9 GB hard disk drives bottom view Western Digital 2 GB and 4 GB hard disk drive end view termination jumper termination jumper ...

Страница 18: ...ors on the system board or drives Pin Assignments for the DC Power Connectors The power supply output voltages can be measured at the back wire side of the connectors without disconnecting them Figures 1 6 1 7 and 1 8 show the wire sides of the connectors Table 1 1 DC Voltage Ranges Voltage Range Maximum Output Current1 3 3 VDC 3 15 to 3 45 VDC 14 0 A 5 VDC 4 75 to 5 25 VDC 29 0 A 12 VDC 11 40 to ...

Страница 19: ...ified in Table 1 1 Figure 1 6 DC Power Connector P1 Figure 1 7 DC Power Connectors P2 P3 P4 P5 and P6 11 1 PWRGOOD 2 orange 12 VDC blue 12 VDC yellow 5 VFP purple common black 2 3 4 5 6 7 8 9 10 12 13 14 15 16 17 18 19 20 P1 5 VDC red 5 VDC red 5 VDC red 5 VDC red 5 VDC red 5 VDC red common black common black common black PSON 1 gray common black common black common black 5 VDC white not used brow...

Страница 20: ...about DC power distribution Power supply connector identification Power cable connections for diskette tape CD ROM and hard disk drives Power distribution to sockets and connectors on the system board Figure 1 9 DC Power Cables 1 2 3 4 3 3 VDC blue white common black common black 5 P7 6 3 3 VDC blue white 3 3 VDC blue white common black P7 P6 P5 P4 P3 P2 P1 ...

Страница 21: ...fuse processor core regulator 12 VDC 5 VDC 5 VDC 5 VDC PANEL KYBD MOUSE FAN 5 VFP 5 VDC 3 5 inch diskette drive power management logic keyboard controller battery 3 VDC P1 EISA1 through EISA3 PCI4 through PCI6 PROC_1 DIMM_C DIMM_B DIMM_A P4 internal hard disk drive optional drive P5 P6 RTC NVRAM P7 3 3 VDC system board CD ROM drive internal hard disk drive system power supply Y cable internal hard...

Страница 22: ...control panel connector PANEL hard disk drive access indicator connector HDLED EISA connectors EISA1 bottom EISA2 and EISA3 fan connector FAN power input connector POWER 3 V power input connector POWER3V auxiliary fan connector AUXFAN PCI connectors PCI4 bottom PCI5 and PCI6 server management connector SVR_MGT configuration jumpers diskette controller connector FLOPPY integrated SCSI host adapter ...

Страница 23: ...System Overview 1 15 System Board Jumpers Figure 1 12 System Board Jumpers RSVD1 RSVD2 PASSWD EISA CARDBIOS 266MHZ 233MHZ VGA ...

Страница 24: ...nstalled only if microprocessor s internal speed is 233 MHz PASSWD Enables disables password Jumper installed to activate boot password feature EISA Clears EISA configuration settings Install jumper and boot system to clear configura tion settings Remove jumper and use EISA Configuration Utility to configure system VGA Enables disables inte grated video controller Install jumper to enable integrat...

Страница 25: ... unless this IRQ line is used by secondary parallel port IRQ6 Generated by super I O controller to indicate that diskette or tape drive requires service IRQ7 Generated by super I O controller to indicate that device con nected to parallel port requires service IRQ8 Generated by keyboard controller for each tick of RTC IRQ9 Available for use by expansion card IRQ10 Available for use by expansion ca...

Страница 26: ...signments DREQ Line Used By Available DREQ0 Available DREQ1 Available DREQ2 Generated by super I O controller to initiate DMA cycle for attached diskette drive DREQ3 Available DREQ4 Generated by bus controller chip to activate second DMA controller DREQ5 Available DREQ6 Available DREQ7 Available ...

Страница 27: ... bus width 32 bits Expansion Bus Bus types EISA PCI local bus Bus speed PCI 33 MHz EISA 8 33 MHz PCI expansion card connectors three full length 32 bit no shared expansion card slots ISA EISA expansion card connectors three full length 8 or 16 bit ISA or 32 bit EISA no shared expansion card slots System Clocks System clock 66 MHz matches external processor speed Diskette communica tions ports 24 M...

Страница 28: ...tape drive or CD ROM drive Internally accessible bays three hard disk drive bays for SCSI hard disk drives up to 1 6 inches high Ports Externally accessible Serial DTE two 9 pin connectors 16550 compatible Parallel one 25 hole connector bidirectional Video one 15 hole connector VGA compatible PS 2 style key board 6 pin mini DIN PS 2 compatible mouse 6 pin mini DIN Internally accessible SCSI contro...

Страница 29: ...tage 230 W Voltage 115 V at 60 Hz 230 V at 50 Hz Backup battery 3 0 V CR2032 lithium coin cell Physical Height 44 45 cm 17 5 inches Width 24 13 cm 9 5 inches Depth 41 91 cm 16 5 inches Weight maximum 17 68 kg 39 0 lb Environmental Temperature Operating 10 to 35 C 50 to 95 F Storage 40 to 65 C 40 to 149 F Relative humidity 8 to 80 noncondensing Maximum vibration Operating 0 25 G at 3 to 200 Hz for ...

Страница 30: ...inued Maximum shock Operating half sine wave form 50 G for 2 ms Storage half sine wave form 110 G for 2 ms square wave form 27 G for 15 ms Altitude Operating 16 to 3048 m 50 to 10 000 ft Storage 16 to 10 600 m 50 to 35 000 ft Table 1 5 Technical Specifications continued ...

Страница 31: ...f a problem or indicate the appropriate troubleshooting procedure to use After the user describes the problem follow these steps 1 Ask the user to back up any data on the hard disk drive if the system s condition permits Appendix C Maintaining the System in the User s Guide provides infor mation about backing up data 2 Ask the user to try to duplicate the problem by repeating the operations he or ...

Страница 32: ...captive screws must be secure enough to ensure a firm connection 4 If any network cables are present verify that they are attached properly 5 Verify that any devices attached to the serial and parallel port connec tors are properly connected Each of the serial and parallel interface cables must be firmly attached to an appropriate connector on the back of the computer as well as to the interface c...

Страница 33: ...pherals and the computer Insert the Dell Server Assistant CD into the CD ROM drive Press the reset button or Ctrl Alt Del to reboot the system 2 Check the power supply fan Does the fan run normally Yes Proceed to step 3 No Troubleshoot the system power supply 3 Watch the Num Lock Caps Lock and Scroll Lock indicators on the upper right corner of the keyboard After all three indicators flash momenta...

Страница 34: ...mthevisualinspection referto SystemFeatures inChapter1tolocate components in the inspectionprocedure To perform the internal visual inspection follow these steps 1 Turn off the system including any attached peripherals and disconnect all the AC power cables from their power sources 2 Remove the computer cover as described in Computer Cover in Chapter 4 3 Verify that the IC chips DIMMs expansion ca...

Страница 35: ...attached peripherals to their power sources and turn them on Does the problem appear to be resolved Yes No further steps are necessary No Proceed to the next section Eliminating Resource Conflicts and to Getting Help found later in this chapter Eliminating Resource Conflicts Devices within the computer may require dedicated memory spaces interrupt levels or DMA channels all of which must be alloca...

Страница 36: ...menu without mouse support Use the keyboard to choose Run System Utilities and then select Run System Diagnostics to load the diagnostics program The Diagnos tics Menu appears allowing you to choose the following options or exit to MS DOS which returns to the Dell Server Assistant menu Run All Tests Runs all tests for a thorough check of the system Run Quick Tests Runs selected tests from all test...

Страница 37: ...em may emit a series of beeps that identifies the problem or that can help you identify a faulty component or assembly Table 3 1 lists the beep codes that may be gener ated during the POST Most beep codes indicate a fatal error that prevents the system from completing the boot routine until the indicated condition is corrected When the system emits a beep code record the code and then find it in T...

Страница 38: ...M failure Defective DIMMs or system board Reseat the DIMMs or replace the system board 1 4 2 1 CMOS failure Defective system board 1 4 3 1 Memory controller or DIMM failure Defective DIMMs or system board Reseat the DIMMs or replace the system board 2 1 2 3 Invalid ROM copyright notice Defective system board 2 2 3 1 Unexpected interrupt Improperly seated expansion card or the system needs rebootin...

Страница 39: ...ation Embedded server manage ment error There is an error in the embedded server man agement subsystem Communication error in ESM module Embedded server manage ment firmware download failed The BIOS is attempting to download embedded server management firmware Download of ESM firm ware timed out Expansion ROM not initialized The BIOS detected a resource conflict while configuring a Plug and Play I...

Страница 40: ...essor system a terminator card is not installed in the second ary microprocessor connector Install a terminator card in the secondary micro processor connector See Microprocessor Module in Chapter 4 Processor X temperature sensor is not installed The primary X 1 or secondary X 2 micro processor s temperature sensor is not connected to the system board Connect the micro processor s temperature sens...

Страница 41: ...re DIMMs may be improperly seated or faulty Reseat the DIMMs or replace the DIMMs System timer error A chip on the system board malfunc tioned Defective micro processor or system board Warning IRQ not initial ized The BIOS detected a resource conflict while configuring a Plug and Play ISA or PCI expan sion card See Eliminating Resource Conflicts in Chapter 2 Warning Pro cessor is not installed in ...

Страница 42: ...3 6 Dell PowerEdge 2200 Systems Service Manual ...

Страница 43: ...You have removed the computer cover You can replace or reinstall a part by performing the removal procedure in reverse order unless additional information is provided Recommended Tools Most of the procedures in this chapter require the use of one or more of the fol lowing tools Small flat blade screwdriver Wide flat blade screwdriver Number 1 and number 2 Phillips head screwdrivers 1 4 inch nutdri...

Страница 44: ...k on the computer per form the following steps in the sequence listed 1 Turn off the computer and any attached peripherals 2 Disconnect the computer and any attached peripherals from their power sources to reduce the potential for personal injury 3 Disconnect any communications cables 4 Wear a wrist grounding strap and clip it to any unpainted metal sur face on the computer chassis If a wrist grou...

Страница 45: ...moval 1 Remove the four screws along the back edge of the cover Use the key provided with the system to remove the special keylock screw if it is installed in one of the cover mounting screw locations Figure 4 2 Security Keylock cover mounting screws 4 handle key keylock screw ...

Страница 46: ...t Bezel Figure 4 3 Front Bezel Removal 1 Remove the computer cover 2 Pry the front bezel loose with your finger tips and remove it from the chassis As you pry the front bezel loose pry at different points around the bezel to keep the opening between the front bezel and the computer chassis equal on all sides to prevent damage to the bezel alignment pins alignment holes 5 retaining clips 6 retainin...

Страница 47: ...and place your fingers on the outside of the plastic insert 3 Push on the outside of the plastic insert indicated by the two arrows in Figure 4 4 then twist the sides of the front bezel outward until the plastic insert is released from the latches inside the bezel To replace a plastic insert position one end of the insert in place under its latch then press the other end into place until the tab s...

Страница 48: ...5 Metal Insert Removal To remove a metal insert follow these steps 1 Remove the front bezel 2 Remove the retaining screw at the right end of the metal insert see Fig ure 4 5 3 Pivot the metal insert out and slide it to the right metal insert retaining screw ...

Страница 49: ...4 The PANEL connector is near the top of the system board on the right side of the computer chassis 2 Remove the screw holding the control panel assembly to the front of the computer chassis 3 Lift the control panel assembly out of the two chassis tabs 4 Remove the control panel assembly cable from the hole in the chassis control panel assembly screw chassis tabs 2 right side of computer top of co...

Страница 50: ... this figure when you perform any of the procedures in the following subsections Figure 4 7 Drive Hardware SCSI hard disk drives SCSI interface cable CD ROM drive 3 5 inch diskette drive DC power cables diskette drive interface cable diskette drive interface connector FLOPPY SCSI connector SCSI lower externally accessible drive bay optional drive ...

Страница 51: ... power cable and the interface cable from the back of the drive Be sure to record the power connector number and the location of the inter face cable connector 2 Press inward toward center of drive on the two drive release tabs and slide the drive out of the bay 3 Remove the drive mounting rails and drive mounting extensions if present from the drive see Figure 4 9 4 If the drive is a SCSI drive r...

Страница 52: ... cable and the drive connector Check the back of the drive for an adapter if present remove it and retain it for use on the new drive Figure 4 9 Drive Mounting Rails and Extensions Removal When you reinstall a SCSI drive set the SCSI address jumpers and the SCSI bus termination jumpers to the settings you recorded drive release tabs drive mounting rails 2 drive mounting extensions 50 pin to 68 pin...

Страница 53: ...rd the back of the computer until the alignment tabs disengage from the alignment rails then lift it out of the computer 5 Remove the four hard disk drive mounting screws from the hard disk drive then slide the drive out of the bracket 6 Record the setting of the SCSI address jumpers and SCSI bus termina tion jumper When you reinstall a hard disk drive set the SCSI address jumpers and the SCSI bus...

Страница 54: ...ny cables attached to the expansion card you want to remove Be sure to record the location of each cable before you disconnect it 3 Remove the expansion card retaining screw 4 Grasp the expansion card by its corners and carefully remove it from the expansion card connector expansion card expansion card retaining screw card guide slots inside front of computer ...

Страница 55: ...he externally accessible drives and the hard disk drives see Figure 4 7 Be sure to record the connector number and plug location for each power cable 3 Remove the four power supply mounting screws 4 Slide the power supply forward about an inch to clear the retaining tabs then lift it out of the computer When you reinstall the power supply be sure the slots on the bottom of the power supply engage ...

Страница 56: ...ect b Pull the plungers completely out of the push fasteners on the back wall of the chassis 4 Remove the system cooling fan and the push fastener barrels from the chassis To replace the system cooling fan use four new push fasteners New push fasteners have the plunger inserted part way into the barrel Align the mounting holes in the system cooling fan with the holes in the back wall of the chassi...

Страница 57: ...ectors SERIAL keyboard bottom and mouse top connectors KYBD MOUSE hard disk drive access indicator connector HDLED EISA connectors EISA1 bottom EISA2 and EISA3 fan connector FAN power input connector POWER 3 V power input connector POWER3V auxiliary fan connector AUXFAN PCI connectors PCI4 bottom PCI5 and PCI6 server management connector SVR_MGT configuration jumpers diskette controller connector ...

Страница 58: ...the DIMM away from the socket Figure 4 16 DIMM Installation To replace a DIMM press outward on the securing clips at each end of the socket until they snap open Orient the DIMM to the socket and press down on the outer edges of the DIMM with your thumbs while pulling up on the securing clips until they lock around the ends of the DIMM 1 securing clip 2 2 DIMM securing clip 2 1 2 DIMM cutout ...

Страница 59: ...he back of the computer Be sure to record where each cable is attached 2 If there are no expansion cards installed go to step 4 Otherwise lay the computer on its right side so you can access the expansion cards 3 Disconnect any cables connected to expansion cards and remove any expansion cards then place the computer in an upright position 4 Remove the four screws from the system board mounting pl...

Страница 60: ...r face cable hard disk drive access indicator cable system cooling fan cables and SCSI interface cable 6 Lift the system board assembly away from the computer chassis Microprocessor Module To remove a microprocessor module follow these steps 1 Write down or print out the system configuration information in the EISA Configuration Utility 2 Remove the system board assembly 3 Remove the microprocesso...

Страница 61: ...oard see Figure 4 20 Figure 4 20 Removing a Microprocessor Module From a Retention Bracket c Press inwards on the microprocessor module retention latches until they snap into a retracted position see Figure 4 20 primary microprocessor module retention screws 2 secondary microprocessor module retention screws 2 temperature sensor cable microprocessor module retention latches 2 heat sink ...

Страница 62: ...connecting the tem perature sensor cable change the jumber if necessary enter the System Setup program and confirm that the Processor 1 and Processor 2 categories correctly iden tify the installed microprocessor s Run the EISA Configuration Utility to reconfigure the system Run the system diagnostics to verify that the new micropro cessor is operating correctly If installing a second microprocesso...

Страница 63: ...cket cover Using the thumb and forefinger of each hand pinch the vertical tabs at each end of the cover and then lift the cover straight up 3 Remove the terminator card Hold the card by its edges and lift the card straight up from the micro processor retention bracket terminator card retention bracket cover terminator card microprocessor retention bracket tabs 2 ...

Страница 64: ...rminator card if necessary see the previous procedure 3 Remove any microprocessor module if necessary 4 Remove the four screws that secure the microprocessor retention bracket from the system board mounting plate assembly Figure 4 24 Retention Bracket Screw Removal system board microprocessor retention bracket clips 2 per bracket microprocessor retention bracket screws 4 per bracket ...

Страница 65: ...s Be sure to record the location of any cables attached to the PCI cards being removed 4 Remove the battery Carefully pry the battery out of its socket with your fingers or with a blunt nonconducting object such as a plastic screwdriver To replace the system battery orient the new battery with the facing up Insert the battery into its socket and snap it into place Compare the system con figuration...

Страница 66: ... retention brackets 6 Slide the system board toward the front of the computer to disengage the system board mounting hooks 7 Lift the system board out of the system board mounting bracket If you are replacing the system board remove the DIMMs microprocessor module s temperature sensor cable terminator board and retention brackets and install them on the replacement board Verify that the jumper set...

Страница 67: ...Main menu Provides settings for the basic system configuration Advanced menu Provides detailed settings for some system features Security menu Provides password diskette access virus checking and system backup reminder settings Exit menu Provides selections for saving and loading the configurations and options In addition to the initial menu bar selections some selections have submenus These selec...

Страница 68: ...ther direction Up arrow key or down arrow key Moves the cursor up or down Tab Shift Tab Moves to the next field Moves to the previous field Home or End Moves the cursor to the top or bottom of the window F5 or Selects a lower value for the field F6 or Shift or Spacebar Selects a higher value for the field F9 Loads the default configuration values for this menu Alt d Loads the default configuration...

Страница 69: ...te on black The hightlight color for an input field that is selected Main Menu Figure A 1 Main Menu Main Advanced Security Exit Time 5 01 96 Date June 04 1997 Diskette Drive A 1 44 MB 3 5 inch Diskette Drive B Not Installed Fast Video BIOS On and Cached Memory Cache Enable Boot Sequence A then C Numlock On Speaker On Processor 1 Pentium II 266 Processor 2 Pentium II 266 Level 2 Cache 512 KB Base M...

Страница 70: ...oprocessor Boot Sequence Displays a submenu See Figure A 2 Num Lock Determines whether keyboard s Num Lock mode is activated at boot Speaker Enables or disables the on board speaker Processor 1 and Processor 2 Displays type of microprocessor s installed Level 2 Cache Displays amount of level 2 cache memory in the microprocessor s Base Memory Displays amount of memory available to MS DOS programs t...

Страница 71: ...Setup message during boot Diskette Drive Check Enables or disables checking for type of diskette drive during boot Reset Button Enables or disables the Reset button on the front bezel Main Advanced Security Exit Boot Sequence A then C SETUP Prompt Enabled POST Errors Enabled Diskette Drive Check Enabled Reset Button Enabled Item Specific Help Dell System PowerEdge 2200 Setup BIOS Version AXX Deter...

Страница 72: ...allel Mode Output only Diskette Controller Enabled Onboard SCSI Enabled PCI Scan Sequence Slot devices first Use MP specification 1 4 PS 2 Mouse Enabled Item Specific Help Dell System PowerEdge 2200 Setup BIOS Version AXX Configures the system s built in serial port F1 Select Item Help Change Values F9 Setup Defaults ESC Exit Select Menu Enter Select Sub Menu F10 Previous Values ...

Страница 73: ...5 3BC IRQ7 278 IRQ5 378 IRQ7 default and Auto Auto selects the next available combination Parallel Mode Controls whether system s built in parallel port acts as an Output Only AT compatible default Bidirectional PS 2 compatible or ECP extended capabilities port Diskette Controller Enables default or disables system s built in diskette controller On Board SCSI Enables default or disables the built ...

Страница 74: ...ess User System Backup Reminder Disabled Virus Check Reminder Disabled Item Specific Help Dell System PowerEdge 2200 Setup BIOS Version AXX Pressing Enter dis plays a dialog box for entering the supervisor 7 digit alphanumer ic password This password gives full ac cess to the Setup menu The supervisor password must be enabled before the user password can be set F1 Select Item Help Change Values F9...

Страница 75: ... up to seven alphanumeric char acters See Using the Supervisor Password Feature in Chapter 4 of the User s Guide Set User Password Displays a dialog box to enter a new user password up to seven alphanumeric char acters See Using the User Password Feature in Chapter 4 of the User s Guide Password On Boot Allows you to require the entry of a pass word before the boot process of the system is complet...

Страница 76: ...anges Get Default Values Load Previous Values Save Changes Item Specific Help Dell System PowerEdge 2200 Setup BIOS Version AXX Saves all changes made in the Setup program to CMOS exits the Setup program and then re boots the computer F1 Select Item Help Change Values F9 Setup Defaults ESC Exit Select Menu Enter Select Sub Menu F10 Previous Values ...

Страница 77: ...figures your system according to the selections stored in CMOS Exit Without Saving Changes Exits the System Setup program without saving any of the changes you have made Get Default Values Loads the default values for each menu in the System Setup program Load Previous Values Loads the values previously stored in CMOS for each menu Save Changes Stores your changes in CMOS but does not exit the Sys...

Страница 78: ...A 12 Dell PowerEdge 2200 Systems Service Manual ...

Страница 79: ...4 9 computer back left side internal view 1 5 cover removal 4 3 front right side internal view 1 4 orientation 1 2 technical specifications 1 19 configuration guidelines SCSI drives 1 7 configuration jumpers descriptions 1 16 locations 1 14 1 15 4 15 connectors locations 1 14 4 15 control panel assembly location 1 4 removal 4 7 D DC power connectors 1 10 distribution diagram 1 13 DIMMs ECC 1 5 ins...

Страница 80: ...l visual inspection 2 2 externally accessible drives removal 4 9 F FAN connector 4 15 FLOPPY connector 4 15 front bezel features 1 3 insert removal 4 5 4 6 removal 4 4 H hard disk drives SCSI configurations 1 7 hard disk SCSI drives bracket removal 4 11 location 4 8 hard disk drive access indicator 1 3 HDLED connector 4 15 help getting 2 6 I ID numbers SCSI devices 1 7 indicators 1 3 initial proce...

Страница 81: ...OWER3V connector 4 15 precautionary measures 4 2 PROC_1 connector 4 15 PROC_2 connector 4 15 R reset button 1 3 resource conflicts eliminating 2 5 S SCSI configuration guidelines 1 7 SCSI connector 4 15 SCSI controller integrated 1 6 SCSI devices ID numbers 1 7 SCSI hard disk drives See drives SERIAL connector 4 15 specifications technical 1 19 subsystems advanced expansion 1 6 SVR_MGT connector 4...

Страница 82: ... starting A 1 T technical specifications 1 19 TEMP_1 connector 4 15 TEMP_2 connector 4 15 termination jumpers SCSI drives 1 8 terminator card removal 4 21 troubleshooting boot routine observing 2 3 external visual inspection 2 2 initial procedures 2 1 initial user contact 2 1 internal visual inspection 2 4 U user contact initial 2 1 V video controller integrated 1 6 visual inspection external 2 2 ...

Отзывы: