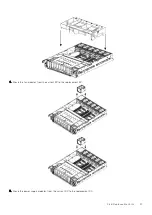


Figure 7. Removing a 3.5" disk drive
Installing a 3.5" disk drive
About this task
NOTE:
If you are replacing more than one disk, replace one disk at a time so the system does not attempt to simultaneously
rebuild multiple drives.
To install a disk:
Steps
1. Attach an ESD wristband to your wrist and the enclosure in which you are installing the disk.
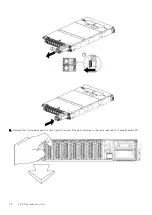
2. Insert the disk in the slot as follows:
a. With the disk's latch fully open, gently push the disk into the slot. (1)
The latch begins to rotate to the right when its tabs meet the enclosure.
b. Push the handle inward to engage the latch (2).
Figure 8. Installing a 3.5" disk drive
Results
The disk's active light flashes to reflect the disk’s spin-up sequence.
Field Replaceable Units
51


