Service Manual
Alignment & Adjustments
6-8
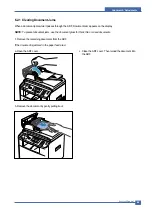
5. Release the blue strap, the rear cover stopper, and
fully open the rear cover, as shown.
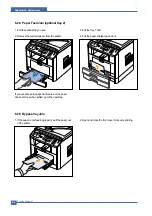
6. Unfold the duplex guide fully.
7. While pushing the fuser lever to the right, open the
fuser door.
NOTE: Make sure to unfold the fuser guide before
opening the fuser door or you may damage the
fuser door.
8. Pull the jammed paper out.
If the jammed paper does not move when you pull,
push the two blue pressure levers up to loosen the
paper, and then remove it.
9. Return the levers, fuser door, rear cover stopper, and
duplex guide to their original position.
10. Close the rear cover.
Printing automatically resumes.
Содержание 1815 Mono Laser
Страница 1: ...Dell 1815dn Service Manual 27 Mar 2006 ...
Страница 28: ...Service Manual System Outline 4 10 ...
Страница 126: ...Exploded View Parts List Service Manual 8 3 8 2 Cover Ass y 0 1 2 2 3 2 1 2 2 3 4 5 5 1 5 2 6 ...
Страница 127: ...Service Manual Exploded View Parts List 8 4 8 3 Middle Cover Ass y 0 1 2 3 4 5 6 6 ...
Страница 128: ...Exploded View Parts List Service Manual 8 5 8 4 Front Cover Ass y 0 1 2 3 4 5 10 10 8 9 7 6 11 ...
Страница 129: ...Service Manual Exploded View Parts List 8 6 8 5 Rear Cover Ass y 0 1 2 3 7 4 5 6 8 ...
Страница 131: ...Service Manual Exploded View Parts List 8 8 8 7 Fuser Drive Ass y 0 1 2 3 5 5 6 7 8 9 4 ...
Страница 132: ...Exploded View Parts List Service Manual 8 9 8 8 Main Drive Ass y 0 2 4 1 3 5 6 8 7 6 7 3 ...
Страница 135: ...Service Manual Exploded View Parts List 8 12 8 11 Cover Platen Ass y 0 1 1 1 1 2 1 3 1 4 1 5 2 3 4 4 5 6 7 7 5 8 9 ...
Страница 136: ...Exploded View Parts List Service Manual 8 13 8 12 OPE Unit 0 1 2 3 4 5 6 7 8 ...
Страница 149: ...Block Diagram Service Manual 9 1 9 9 9 Block Diagram ...
Страница 150: ...Connection Diagram Service Manual 10 1 10 10 10 Connection Diagram ...


