Alignment & Adjustments
Service Manual
6-7
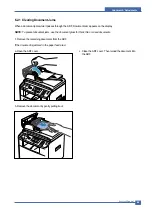
6.2.6 Fuser Area Jam
NOTICE: The fuser area is hot. Take care when removing
paper from the printer.
1. Open the front cover and lightly pull the toner
cartridge straight out.
2. Remove the paper by gently pulling it straight out.
3. Replace the toner cartridge and close the front cover .
Printing automatically resumes.
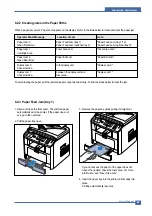
6.2.7 Paper Exit Jam
1. Open and close the front cover. The jammed paper
automatically exits the printer.
If the paper does not exit, go to the next step.
2. Gently pull the paper out of the output tray.
3. If you cannot see the paper in the output tray or the
paper does not move when pulled, open the rear
cover.
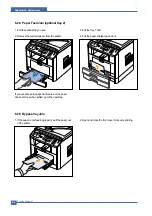
4. If you see the jammed paper, push the two blue pres-
sure levers up and remove the paper.
If you do not see the paper, go to the next step.
Содержание 1815 Mono Laser
Страница 1: ...Dell 1815dn Service Manual 27 Mar 2006 ...
Страница 28: ...Service Manual System Outline 4 10 ...
Страница 126: ...Exploded View Parts List Service Manual 8 3 8 2 Cover Ass y 0 1 2 2 3 2 1 2 2 3 4 5 5 1 5 2 6 ...
Страница 127: ...Service Manual Exploded View Parts List 8 4 8 3 Middle Cover Ass y 0 1 2 3 4 5 6 6 ...
Страница 128: ...Exploded View Parts List Service Manual 8 5 8 4 Front Cover Ass y 0 1 2 3 4 5 10 10 8 9 7 6 11 ...
Страница 129: ...Service Manual Exploded View Parts List 8 6 8 5 Rear Cover Ass y 0 1 2 3 7 4 5 6 8 ...
Страница 131: ...Service Manual Exploded View Parts List 8 8 8 7 Fuser Drive Ass y 0 1 2 3 5 5 6 7 8 9 4 ...
Страница 132: ...Exploded View Parts List Service Manual 8 9 8 8 Main Drive Ass y 0 2 4 1 3 5 6 8 7 6 7 3 ...
Страница 135: ...Service Manual Exploded View Parts List 8 12 8 11 Cover Platen Ass y 0 1 1 1 1 2 1 3 1 4 1 5 2 3 4 4 5 6 7 7 5 8 9 ...
Страница 136: ...Exploded View Parts List Service Manual 8 13 8 12 OPE Unit 0 1 2 3 4 5 6 7 8 ...
Страница 149: ...Block Diagram Service Manual 9 1 9 9 9 Block Diagram ...
Страница 150: ...Connection Diagram Service Manual 10 1 10 10 10 Connection Diagram ...


