background image


Page 15 

935 SOUTH WOODLAND AVENUE, MICHIGAN CITY, IN  46360-5672 
TEL.:  219-861-0661 - FAX: 219-861-0662 - TOLL-FREE: 888-925-5444                      

www.dekkervacuum.com


Cooling Fan 

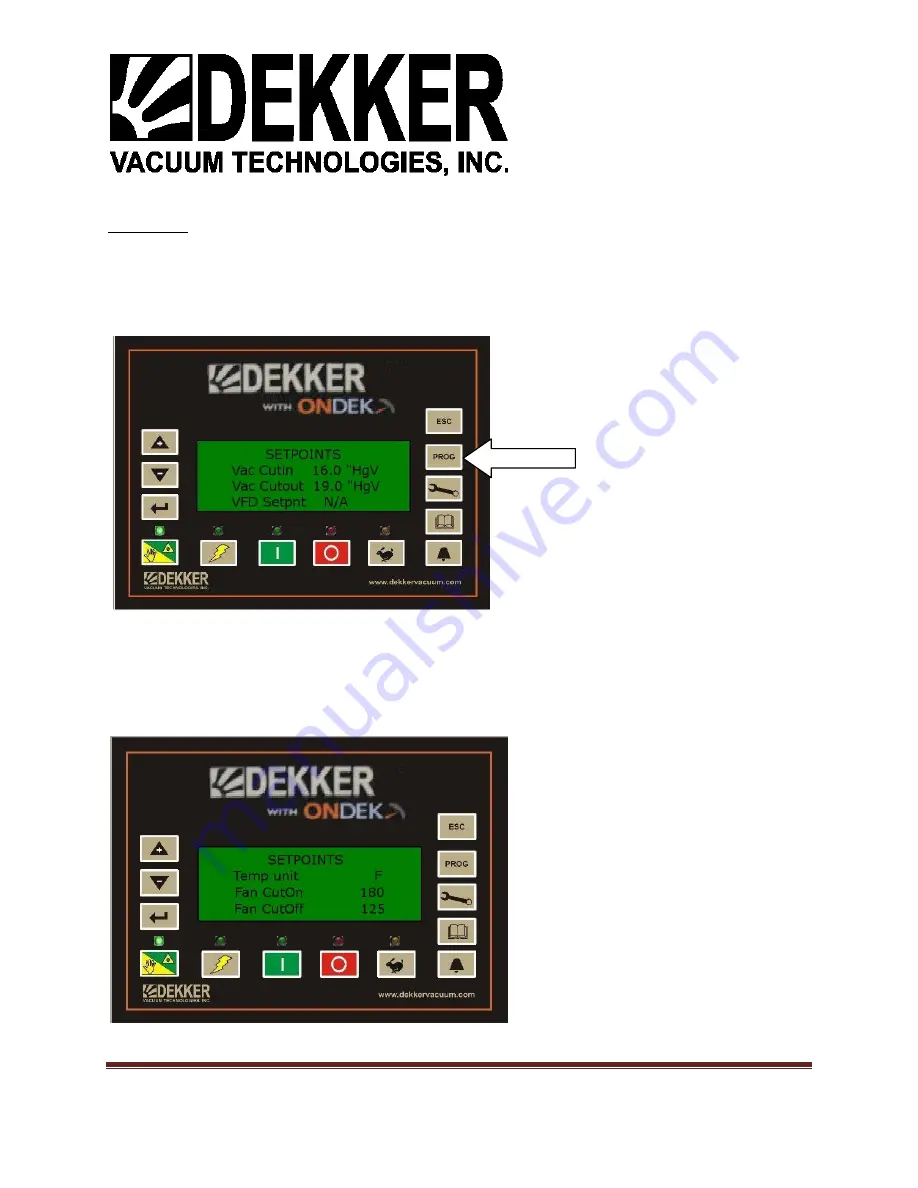
The Dekker Controller is equipped with a temperature control to operate a cooling fan when applicable. 
This feature requires a cooling fan keycode to be entered (see entering keycodes above). Once the 
cooling fan keycode is entered press the PROG button until you see the SETPOINT screen. 


Use DOWN arrow to scroll to  Fan CutOn and Fan CutOff. These are the setpoints to turn the fan on and 
off. They can be changed by entering password, scroll back to the settings. Press ENTER then use UP / 
DOWN arrows to change values. You must press ENTER again to save. Normally Open  Output C7 is used 
for this purpose. 


PROG 

Содержание OnDek Controller

Страница 1: ...________ 8 Multimachine Setup________________________ ___ 9 Temperature Warnings And Faults_______________10 Setting Date And Time_________________________11 Entering Keycodes____________________________13 Cooling Fan__________________________________15 Rotation_____________________________________16 Scavenger Output_____________________________17 Faults and Fault Logs__________________________18 ...

Страница 2: ...dry relay contact outputs Analog I O includes 2 RTD Resistance Temperature Detectors inputs four 0 10VDC 4 20mA inputs one 0 10VDC output and one 4 20mA output Power input to the controller is 24VDC DEKKER CONTROLLER KEYPAD The Dekker Controller text display buttons and LEDs are described below Refer to the diagram below that shows this information 4 line LCD Display ESCAPE BUTTON RETURNS TO RUN S...

Страница 3: ... battery clip and the surface of the battery it may be a rubber sleeve around the clip or a small plastic insulator between the clip and battery This must be removed before applying power to the controller If not removed the controller will not retain Date Time and other values that are written to the controller for setup The controller cannot be flashed with new firmware until this is removed To ...

Страница 4: ... 888 925 5444 www dekkervacuum com Controller Input Output Layout 987654321 Digital Inputs Relay Outputs C1 C7 24 VDC RTD1 RTD2 Analog In 4 Analog In 3 Analog In 2 Analog In 1 NC C7 NO NC C6 NO NC C5 NO NC C4 NO C3 NO C2 NO C1 NO RS232 Port 4 20MA Calibration Switches 4 20MA Out 0 10 VDC Out Ethernet Port ...

Страница 5: ... an external device Analog input 4 is a 0 15 psia transducer used in conjunction with Analog input 1 transducer to measure the difference in vacuum across the inlet filter Relay Outputs C1 NO Vac Pump Motor Starter C2 NO Local Lag Light C3 NO Horn Output C4 NO Remote Lag Light C5 NO AllFault Out C6 N0 Scavender Valve Out C7 NO Cooling Fan All inputs and outputs are 24VDC Analog inputs are 0 10 Vdc...

Страница 6: ...0662 TOLL FREE 888 925 5444 www dekkervacuum com Entering Password Press and hold ESC button until Password 0 appears at bottom of screen Press MAINT button twice which enters the password 33 Then press ENTER You now have access to change Controller settings ESC button Password 0 MAINT ENTER ...

Страница 7: ...61 FAX 219 861 0662 TOLL FREE 888 925 5444 www dekkervacuum com Changing Vacuum Units Enter Password If current screen is STOPPED or RUNNING press PROG once to view Setpoints screen If HgV is already set for vacuum units you will see Vac CutIn and Vac CutOut in HgV units PROG ...

Страница 8: ...t Then press ENTER Once you press ENTER use UP arrow to change unit you will have a choice of TORR HgV or Millibars Once selection is made you must press ENTER again to save Changing Vac CutIn and CutOut Enter Password If current screen is STOPPED or RUNNING Press PROG once to view Setpoints screen Press UP or DOWN button if necessary to select Vac CutIn then press ENTER DOWN ENTER Vacuum Unit UP ...

Страница 9: ...he least hours will rotate to Lead if the hours are imbalanced This keeps from putting all the run hours on one pump To set up for multimachine CAT5 Ethernet cables are run from the RS485 jack mounted inside the panel The cable is plugged into the jack in the first panel then routed to the second panel and plugged in Each panel has two jacks so that you can run cables to each machine if more than ...

Страница 10: ...hird set multimachine for 3 Do this for all Controllers each with a different multimachine number starting with the first they should be 1 2 3 4 etc When Controllers power back up on each Controller it should show Units Found which will be the number of Units found on the RS485 Bus This should match the number of Controllers if a Duplex 2 if a Triplex 3 etc Temperature Warnings And Faults Temperat...

Страница 11: ... TOLL FREE 888 925 5444 www dekkervacuum com Setting Date And Time Enter Password Press PROG once to view Setpoints screen Using Down Arrow scroll to Date and Press ENTER key Use Up Down arrows to change Date press ENTER again to save Use Up Down key to select Time Press Enter PROG UP DOWN ENTER ...

Страница 12: ...Page 12 935 SOUTH WOODLAND AVENUE MICHIGAN CITY IN 46360 5672 TEL 219 861 0661 FAX 219 861 0662 TOLL FREE 888 925 5444 www dekkervacuum com Use UP DOWN key to change Press ENTER to save UP DOWN ENTER ...

Страница 13: ...m Entering Keycodes Keycodes are used to enable available options Keycodes are 7 digits All keycodes are entered with 2 leading 0s Enter Password Press DOWN key to find option needed PROG DOWN From STOPPED or RUNNING screen press PROG button once to get to SETPOINTSs Screen Press PROG button once more to get to SYSTEM OPTIONS Screen PROG ...

Страница 14: ...ear with one 0 Once selected press ENTER Keycode will appear with two 0s Press ENTER again then use UP DOWN keys to enter third digit of keycode Press ENTER again then use UP DOWN keys to enter fourth digit of keycode Press ENTER after each entry and continue until all digits of keycode are entered Then press ENTER one last time The N A will change to Yes enabling the option chosen ENTER ENTER ENT...

Страница 15: ...s a cooling fan keycode to be entered see entering keycodes above Once the cooling fan keycode is entered press the PROG button until you see the SETPOINT screen Use DOWN arrow to scroll to Fan CutOn and Fan CutOff These are the setpoints to turn the fan on and off They can be changed by entering password scroll back to the settings Press ENTER then use UP DOWN arrows to change values You must pre...

Страница 16: ...pump If this condition is not met rotation will not occur If a triplex or higher system rotation for each pump will occur in order based on run hours of each pump Manual Rotation The pumps can be rotated manually but the same condition above applies the Lead must have the most hours To rotate pumps manually On the Lead pump press and hold RESET button until you see the text Manual Transfer appear ...

Страница 17: ...troller is used for a bleed valve This output cycles on for 30 Secs and off for 9 minutes based on vacuum level The vacuum level for cycling to occur is adjustable via the Setpoint menu on the Dekker Controller Enter password Press PROG until Setpoints screen is shown Using DOWN arrow scrool to Scav Lvl Press ENTER Use UP DOWN arrows to change value Press ENTER to save ENTER ...

Страница 18: ...ssure The Temperature and Back Pressure faults are adjustable from the setpoint screen but it is not recommended to change these without consulting with a Dekker Technician Changing these values could result in pump damage Below is what is shown on the screen when a temperature fault occurs The Run Status light will also turn red and flash so you can see a fault has occurred from a distance Faults...

Страница 19: ...l record up to 10 faults When this ir reached the most recent fault is recorded at the top of the list and fault at the bottom of the list is removed To view the fault log press the Log button Each fault can be selected to view what values such as Vacuum Back Pressure etc were at the time of the fault and up to 10 minutes prior to the fault To view this detail use UP or DOWN key to select the faul...

Страница 20: ...ww dekkervacuum com Then press ENTER The first screen shows what was occurring at the time of the fault use DOWN arrow to view more information Press ENTER again to view what was occurring 1 minute prior to fault Press again for 2 minutes prior You can continue pressing ENTER to view up to 10 minutes prior to fault ENTER ...

Страница 21: ...ontroller is equipped with Autostart This feature allows automatic restart of system when power returns from a power loss To enable this feature press PROG button to show SETPOINTS screen Use DOWN arrow to select Autostart Press ENTER Use UP arrow to change to On Press ENTER to save If system is multimachine this must be set on all controllers UP DOWN ENTER PROG ...

Страница 22: ...he screen below This screen shows the support phone number for Dekker Vacuum along with the Serial number and model number of the system Pressing the MAINT button twice will display the spare parts list for the system This list can be used for ordering parts if needed Part numbers will appear in place of the Xs These numbers are entered at the factory Use Down arrow to navigate through the list DO...

Страница 23: ...e to view the maintenance schedule This list provides a recommended maintenance schedule along with intervals The time in hours until the maintenance is due counts down and can be seen on the Dekker Controller LCD in this area Proper maintenance is necessary to provide proper performance and can prolong the life of your system The UP and DOWN ARROW buttons can be used to navigate through the list ...

Страница 24: ...cuum com Press MAINT the fifth time to view the Service History Service history is recorded with date and time of service each time the recommended service is completed and the maintenance schedule is reset Pressing MAIN again will return you to the Dekker support screen Pressing ESC at anytime will return to the main screen MAINT ...

Страница 25: ...INT button until you see the maintenance interval screen The 0 shows the period has expired and generates the warning on the screen You must reset the HRS To Srv to 500 or the schedule selected Use DOWN key to select HRS TO SRV and press ENTER Use UP key to reset to the correct interval 500 in this case Press ENTER again to save this last press of ENTER also records the date and time this service ...

Страница 26: ... DPInlet is a differential pressure across the inlet filter to monitor the filter When the differential reaches the preset point a warning will show on the screen once the filter is cleaned and the differential is reduced the warning will go away A keycode See Entering Keycodes is required to enable this feature also an extra transducer is required ...

Страница 27: ... To enable remote Start Stop first the inputs must be wired A NO momentary button is wired from the 24VDC on one side and to Digital input 6 on the other side A NC momentary button is wired to 24VDC on one side and to Digital input 7 on the other Both buttons must be momentary Then to enable Remote Start Stop you must enter the keycode See Entering keycodes ...

Страница 28: ...com Network Options Press PROG Continue to press PROG until Network screen appears This screen allows for changing Static IP address Subnet mask and Gateway for network use You can also turn DHCP on if a DHCP server is available to assign the controller an IP address This screen should only be changed by qualified personnel Keycode List ...

Отзывы: