


9
5.
Malfunction
If a malfunction should occur, the LCD displays the measured values, an error code and also a key symbol
. The
meaning of individual error codes can be found in the attachments.
6.
Monitoring the calibraton periods
After 12 months since the last calibration (Max. calibration interval) an inscription
starts flashing on the LCD
display. The connected transmitters must be calibrated immediately.
7.
Reading the record of measured concentrations and alarms
The controller periodically after 60s stores the current detected concentration into it's internal memory. The internal memory
retains data from the last 49 000 measurements (cca 34 days). In order to read this information, the program DegaConfig is
required. Refer to the DegaConfig program instruction
8.
Indication of past alarms
The controller is equipped with an indication of alarms that have already faded. If such an alarm occurred, the icon
is
displayed. To view these alarms, enter the menu HIST
HILA, where the date and time since the highest measured alarm
since reseting HIST
_RST is displayed for each transmitter. After viewing the history it's possible to reset the counter
throught HIST
_RST and the icon
disappears.
9.
Automatic adjustment of the 0 point
The connected digital transmitters have an inner diagnostic, which detects whether or not the 0 point is in disbalance. If so, an
automatic adjustment will take place and the controller indicates this with the icon
.
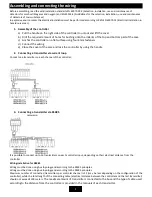
10.
Menu
Enter the menu by pressing the ENTER button and hold it for cca 5s. The main segments of the LCD display the menu
functions. Use the arrows to move from one entry to another and press ENTER for selecting an entry. The last entry is always
EXIT, which returns you to a higher menu level. The menu stucture is as follows:
↓
←
↑
submenu
HIST
INFO
CONF
TEST
SERV
EXIT
↓
1
HI1H
←
NCAL
←
TMP1
←
RELE
←
SERV
←
↓
↑
↓
↑
↓
↑
↓
↑
↓
↑
2
HI8H
LCAL
TMP2
TRAN
SERV
↓
↓
↓
↓
↓
3
HI12
TEMP
ALM1
_RST
EXIT
↓
↓
↓
↓
4
HI24
ADDR
ALM2
EXIT
↓
↓
↓
5
HI2D
EXIT
ALM3
↓
↓
6
HI7D
ALM4
↓
↓
7
HIAL
CALI
↓
↓
8
HILA
EXIT
↓
9
_RST
↓
EXIT