PAGE
13
OF18
•
The warming drawer has a rotary on off
switch control.
•
Indicator light will glow when the drawer
has been switched on.
•
Food left for too long in the warmer
drawer could dry out and spoil. As a
precaution
food
should
always
be
covered, to minimise the drying effect.
•
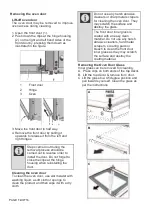
The drawer can be removed for cleaning
purposes.
•
Pull the drawer out to the bump- stop,
then lift the front slightly and continue
pulling till the drawer slides free.
•
Refit by lifting the rear of the drawer over
the bump-stop and then sliding it back.
4. Maintenance and care
General cleaning
•
Switch off the electrical power supply
before cleaning any part of the appliance.
•
Wipe down glass panels, cabinet, door,
control knobs, trims and handles with a
hot soapy cloth. Do not use a steam
cleaner.
•
Use only liquid household cleaners and
avoid abrasive powders, scouring pads
and caustic cleaners.
•
Rinse and wipe down with a clean cloth.
Cleaning the oven
•
Switch off the electrical power supply
before cleaning any part of the appliance.
•
Open the oven door and allow the oven to
cool down.
•
For improved access, the shelf, roast pan
and oven door may be removed.
•
Clean the oven with a damp, hot soapy
cloth. Do not use a steam cleaner.
•
It may be necessary to soak burnt soils
with a liquid cleaner to soften them before
scrubbing them with a nylon brush or
scouring sponge.
•
Heavy soils on the bottom of the oven
may require overnight soaking under a
sponge liberally sprinkled with household
ammonia. The soil can then be removed
the following morning by washing
normally.
•
Do not use metal objects or steel wool to
clean the oven.
Warming drawer
Steam assisted cleaning
Important!
Any food residue must be removed from the
bottom of the cavity before you start steam
assisted cleaning. Remove all oven
accessories.
1. Pour 100 ml of water into the emboss on
the oven floor.
2. Select the steam assisted cleaning
function.
3. Turn the oven on to Run this cycle for 5
minutes.
4. At the end of the cycle, wait 5 minutes
before opening the door.
5. Open the door and wipe the inner
surfaces of the oven with a damp sponge
or cloth.
6. Use warm water with washing liquid, a
soft cloth or sponge to clean persistent
dirt and wipe it with a dry cloth.
Important!
•
Ensure that all water has been wiped
away after steam assisted cleaning as this
may damage your oven. Steam assisted
cleaning must be performed in a cold
oven.
•
If you have grease or any other difficult to
remove substance you may need to
traditionally clean your oven (as per
instructions in general information) after
completing the steam assisted cleaning
cycle.
•
Use the steam assisted cleaning feature
as soon as possible after spills occur. The
longer a spill sits and dries in the oven,
the more difficult it may be to remove.
Oven light
The oven light is switched on by the oven
thermostat and switches off when the
thermostat knob is returned to
0
.
To replace a faulty light bulb, proceed as
follows.
•
Switch off the power at the wall isolator to
avoid the possibility of electric shock.
•
Remove the light cover by unscrewing it in
an anti-clockwise direction
•
Unscrew the faulty bulb and fit a new 25
watt bulb rated for 300’C
•
Refit the light cover.


